


Photoshop 3D Beginners Tutorial (Part 1)
Photoshop 3D Beginners Tutorial (Part 1)
There are many people who have been working in Photoshop for years, but with the emergence of Photoshop 3D capabilities there is a whole new area to learn. I will run a series of blogs starting with the basics, which will help you gain more knowledge and experience in this area. I will assume throughout this series of blogs that you are reasonably proficient in Photoshop and are using Photoshop cc.
The Importance of 3D in retouching
There was a time when I hadn’t even considered using 3D objects in retouching. Having access to a huge collection of two dimensional samples to use in my projects I came to realise that a sample shot at the wrong angle and with different lighting was very difficult to fit into the original image if not impossible.
If you can create a good 3D object you can alter the lighting, viewing angle, texture and colour so that it will fit perfectly into your image. Photoshop will not replace dedicated 3D software as it is more basic. Having said that, it has a lot of good practical uses.
If Photoshop is not capable of creating the object you have in mind it is possible to manipulate 3D objects made in more complex 3D software. Other 3D software can be a lot more complex. I believe Photoshop offers a relatively easy introduction into the world of 3D.
In this first Photoshop 3D blog, you will learn how to create a simple shape that has rotational symmetry then learn the basics of moving this shape around and become familiar with the 3D workspace.
Here’s the image I will use in the tutorial.

Starting image
If you click on this image to see an enlarged version then right click (or Control click) you are welcome to download it for your own use. The creation of the 3D object relies on a path so you can also choose to use the principals in this tutorial to draw your own shape and create a 3D object from it.
Step One
Open your image in Photoshop and draw a path around either the left or right half of it with the pen tool. I have shown the shape of my path in green. This is for illustrative purposes only, as a path is difficult to see. Notice how I have squared off the bottom with a horizontal line rather than following the curve of the base. Also make sure the path is closed i.e. you have to click on your starting point at the end.

Path Shape
Unlock the background layer by double clicking on it then click on the eye in the layers pallet so you only see a transparent canvas with the path visible. If the path is not visible you need to select it in the Paths pallet.

Path Selected in Layers Pallet
Click in the top right hand corner and select “3D” to enter the Photoshop 3D workspace area. This opens up the pallets you are most likely to use and closes ones that are not likely to be needed.
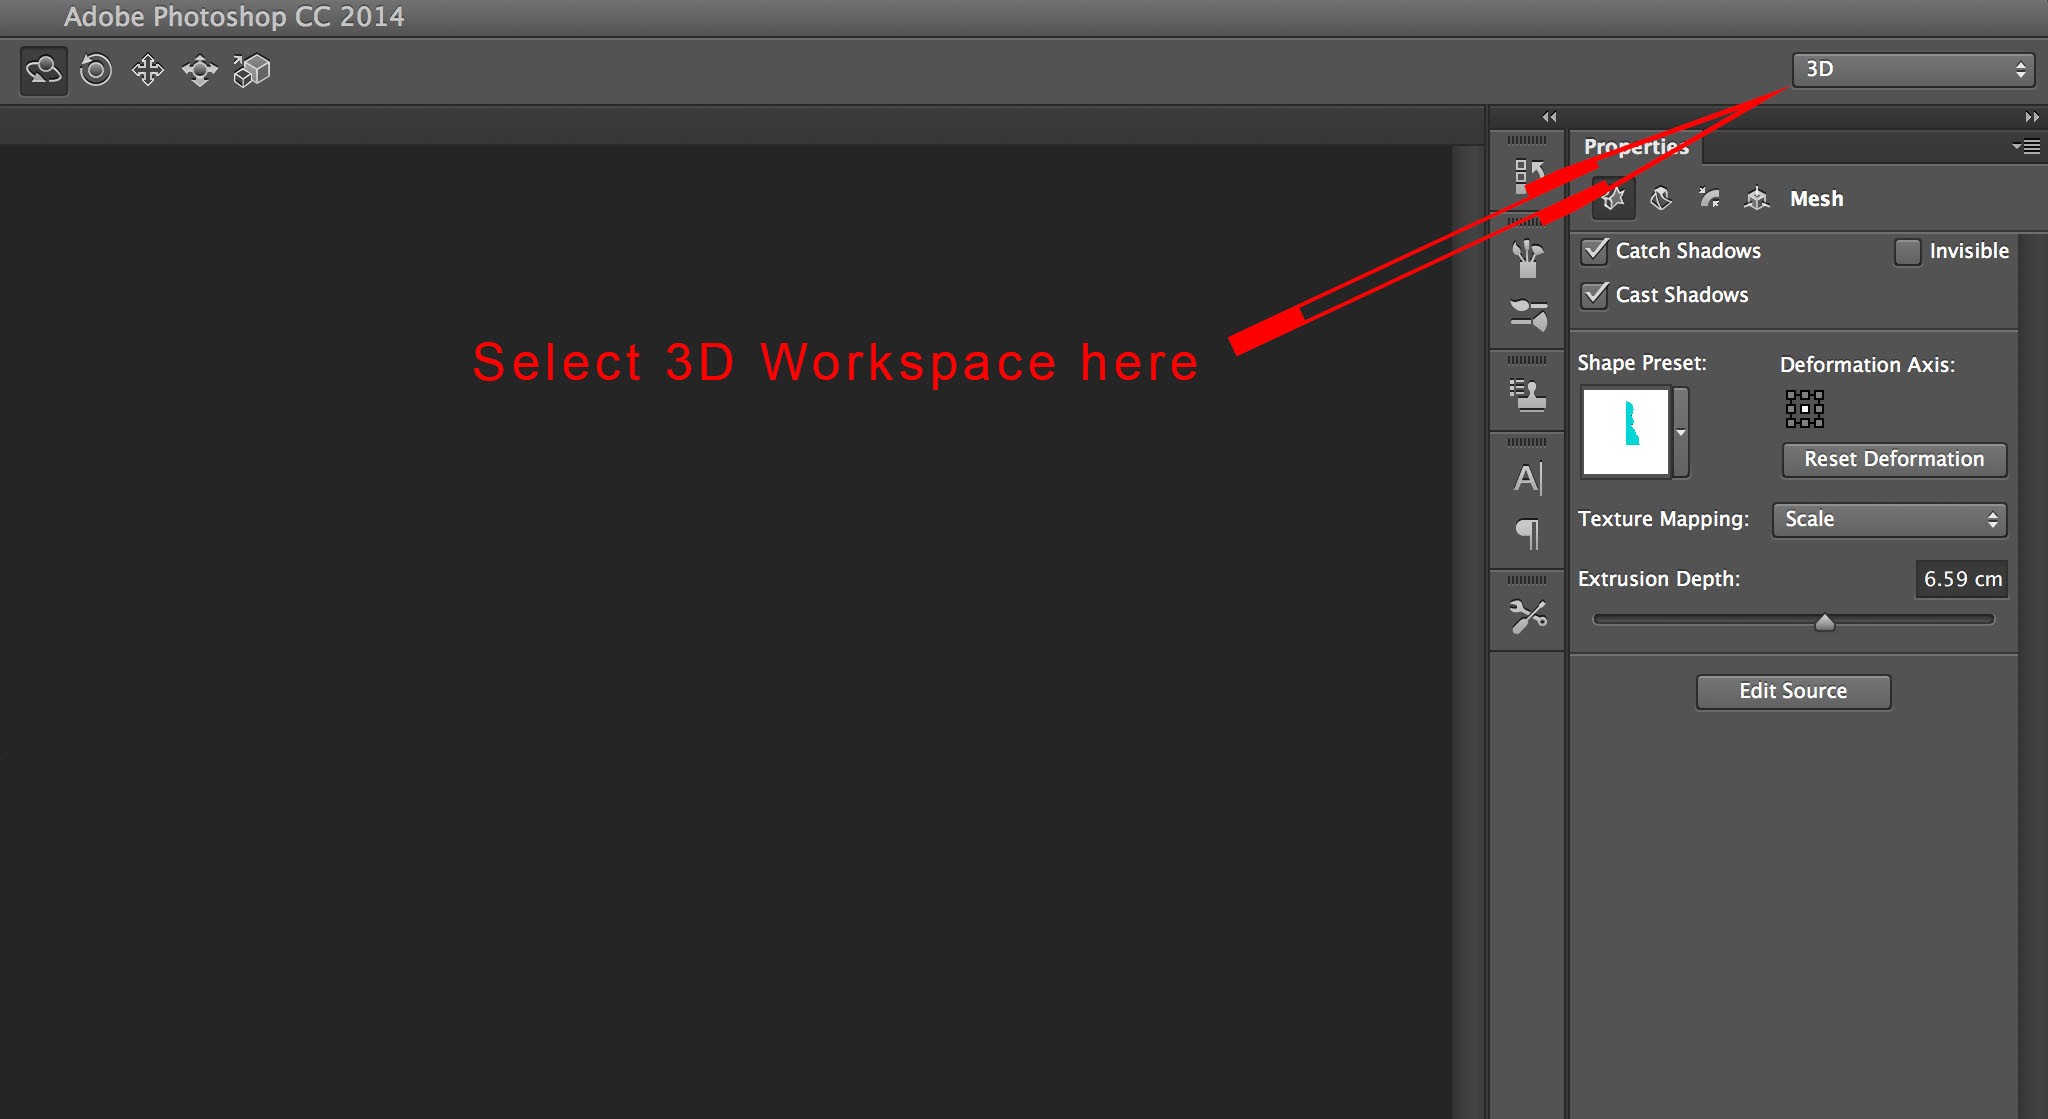
Select Workspace.
In the 3D pallet select “Work Path” as source and make sure “3D Extrusion” is selected.

Create 3D Extrusion.
Click on Create at the bottom of the Pallet. You will now have a 3D object as shown:

Extrusion.
A Brief Exploration of the workspace.
In the top left hand corner is the Secondary view. Click on the camera icon to change the secondary view as shown:

Change Secondary View.
Click in the top right hand corner of the secondary view window to swap the secondary and main views. A second click will swap them back again.

Swap main and secondary views.
You can close the Secondary View window by clicking on the cross in the top left hand corner if you prefer a less cluttered workspace. If you wish to show the secondary view window again go to View>Show>Secondary View.
Moving in 3d space
Moving within a 3D space can be quite confusing if you are not used to it. Start by pressing “V” on your keyboard to select the move tool as normal. Now click anywhere outside your 3D object. This allows you to move your whole 3D world. Below is an example of the whole 3D world having been moved:

Moving 3D World.
Notice how the 3D object lies on the ground plane on the intersection between the red and blue lines. Also the default light has been moved. The light itself cannot be seen, but the shadow has not changed in relation to the background.
Now click on the 3D object itself. This selects the object, which is indicated by a box shown around it. It is now possible to move the 3D object independently of the background and light source. Here’s how the object may look when moved:

3D object moved.
The 3D object is no longer on the intersection of the red and blue lines, and is floating above the ground plane.
The important point is that the same tools are used to move the 3D world and objects within that world. You need to make sure you know if it’s the object or whole world that is selected.
Moving within a 3D space is a lot more complex than normal. The various options needed for moving can be found in the top centre area of the screen, but these will only be visible when the move tool is selected in 3D mode:

3D Moving options.
I would encourage you to experiment with these. We will have a more detailed look at them in next weeks blog.
Step 2
You will now create a 3D pawn as it would appear on a chess board. This may be simpler than you think.
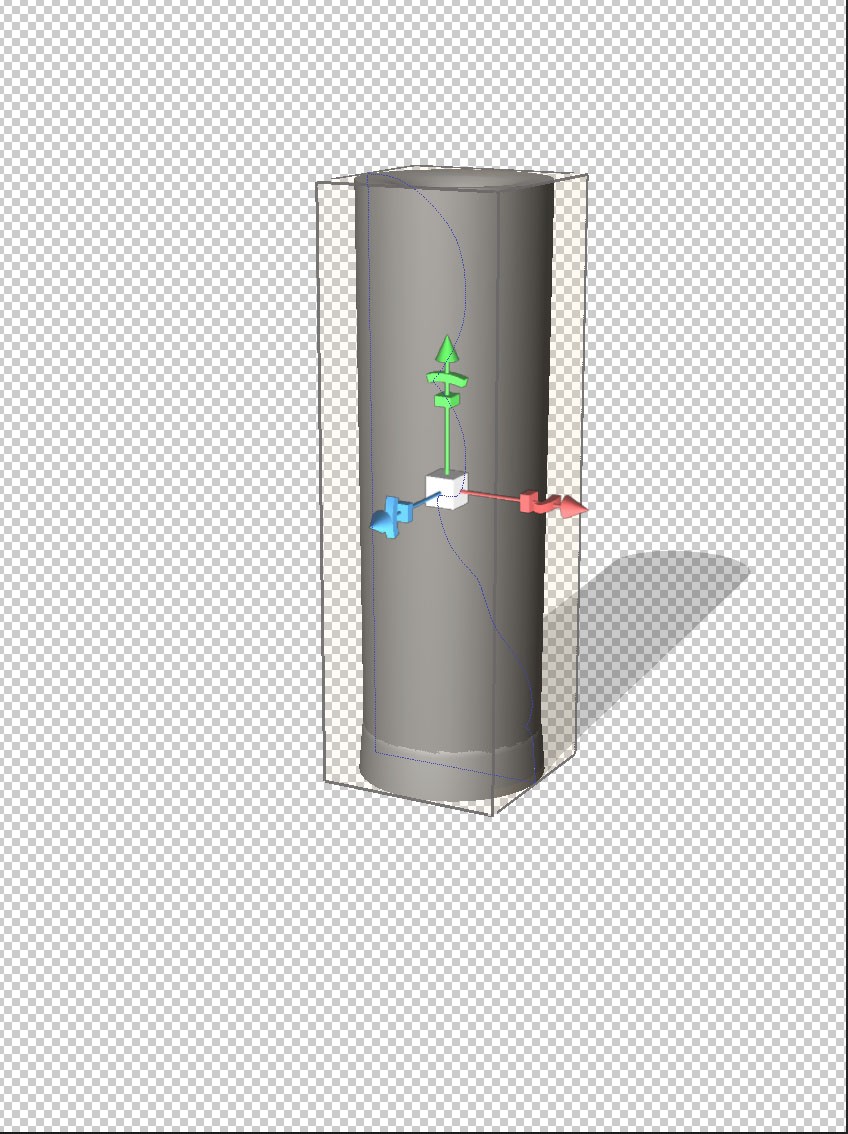
Here’s how the object looks at an angle. I have also hidden the ground plane via View>Show>3D Ground Plane which toggles the ground plane visibility on and off:

3D Object Selected.
Notice the object has a box around it with move options indicating that it is selected.
Now look at the “Properties” pallet which should be in the top right hand corner by default:

Properties Pallet.
Your properties pallet will not look like this if you do not have your 3D object selected.
You can select various options in the properties pallet by clicking on the icons at the top:
Properties Pallet Detail.
The above shows the far left set of options selected. This is where you can change the Extrusion depth. This refers to the thickness of your 3D object. Set the extrusion depth to “0”:
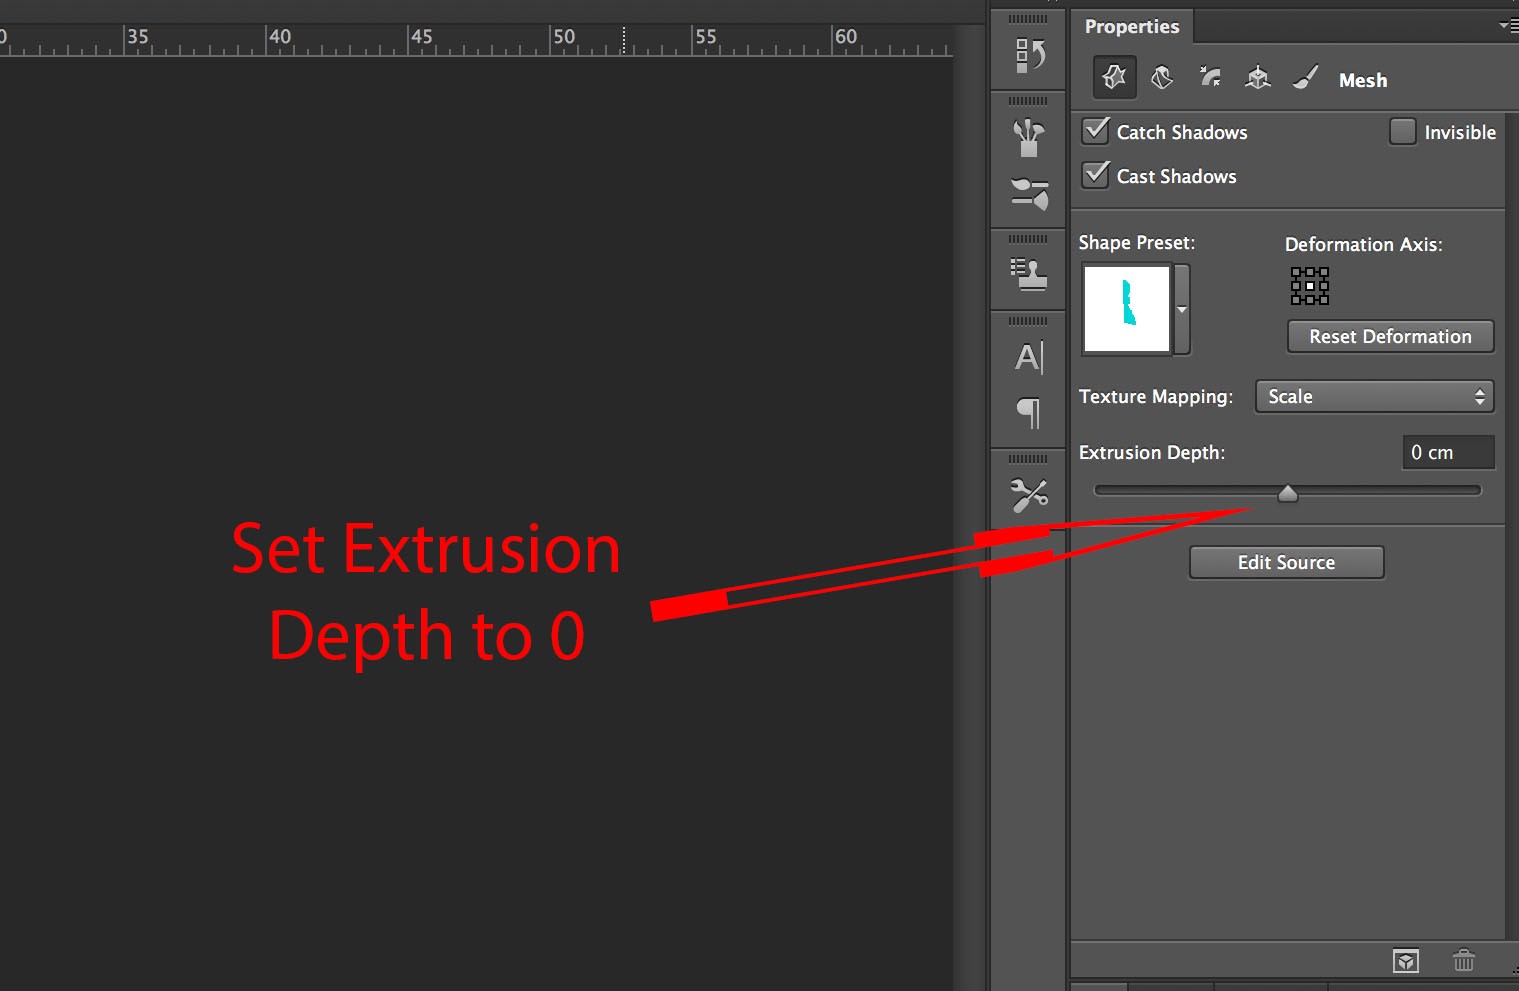
Extrusion set to 0.
Your object will now look paper thin as shown:
Effect on 3D object.
Step 3
You now need to make a 3D object by rotating about an axis.
At the top of the properties pallet click on the second icon in from the left as shown:

Second set of options in properties pallet.
Notice that you can alternatively change the extrusion depth here.
In the lower half of the Properties pallet select “Bend” and change the “Horizontal axis (x)” to 360.
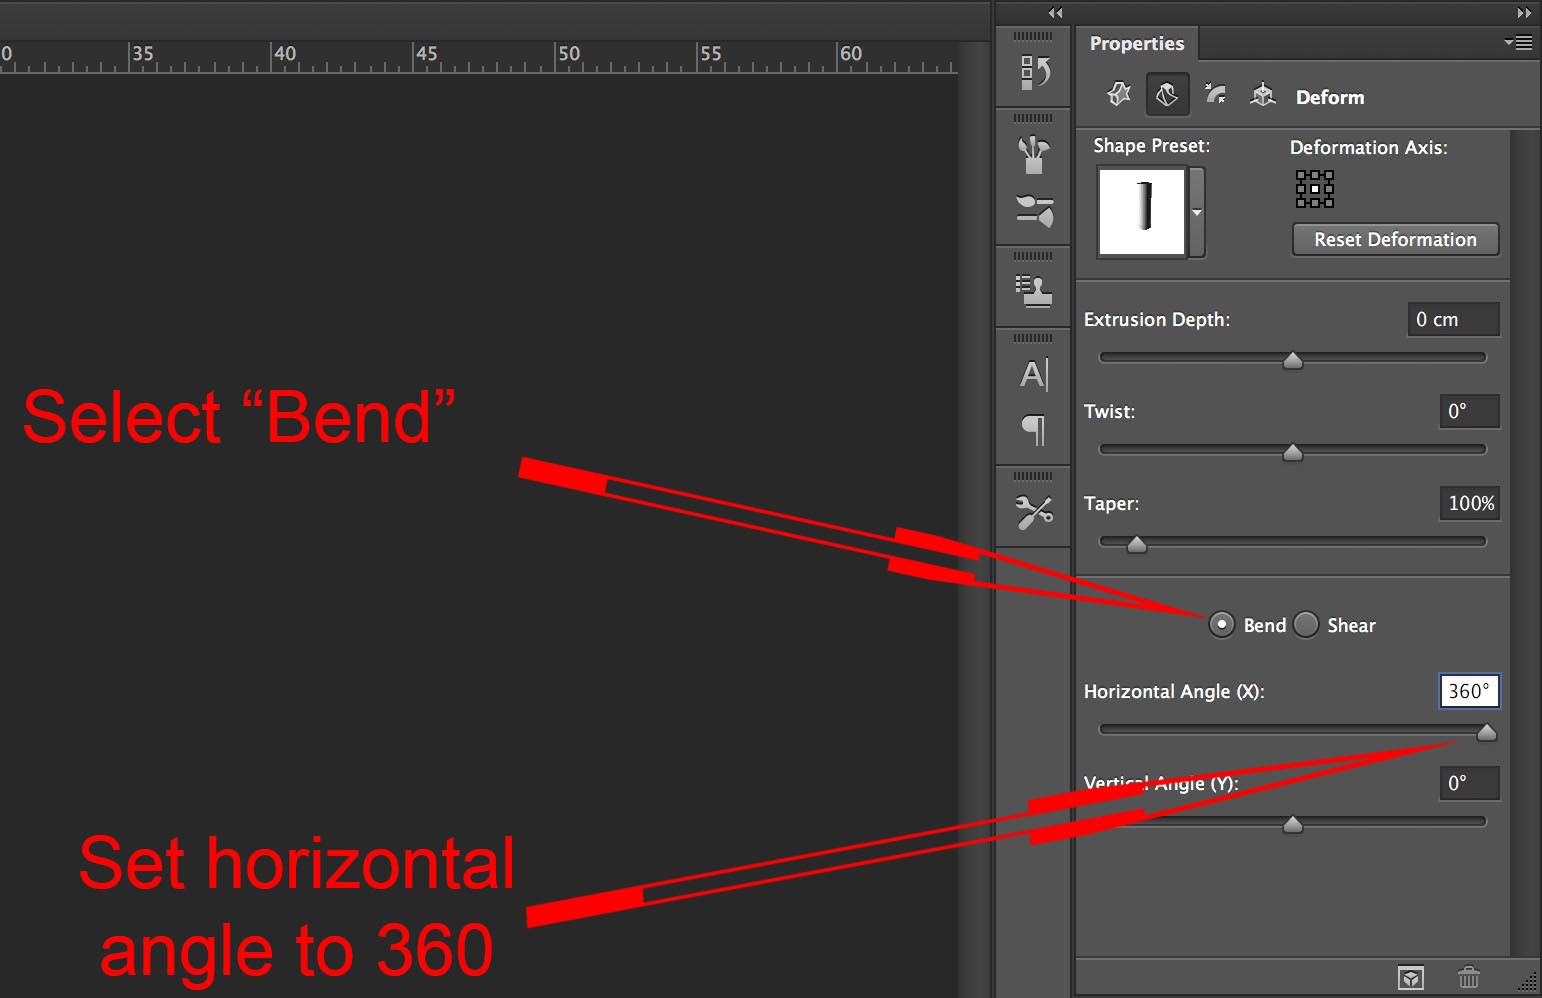
Set Horizontal Rotational Axis.
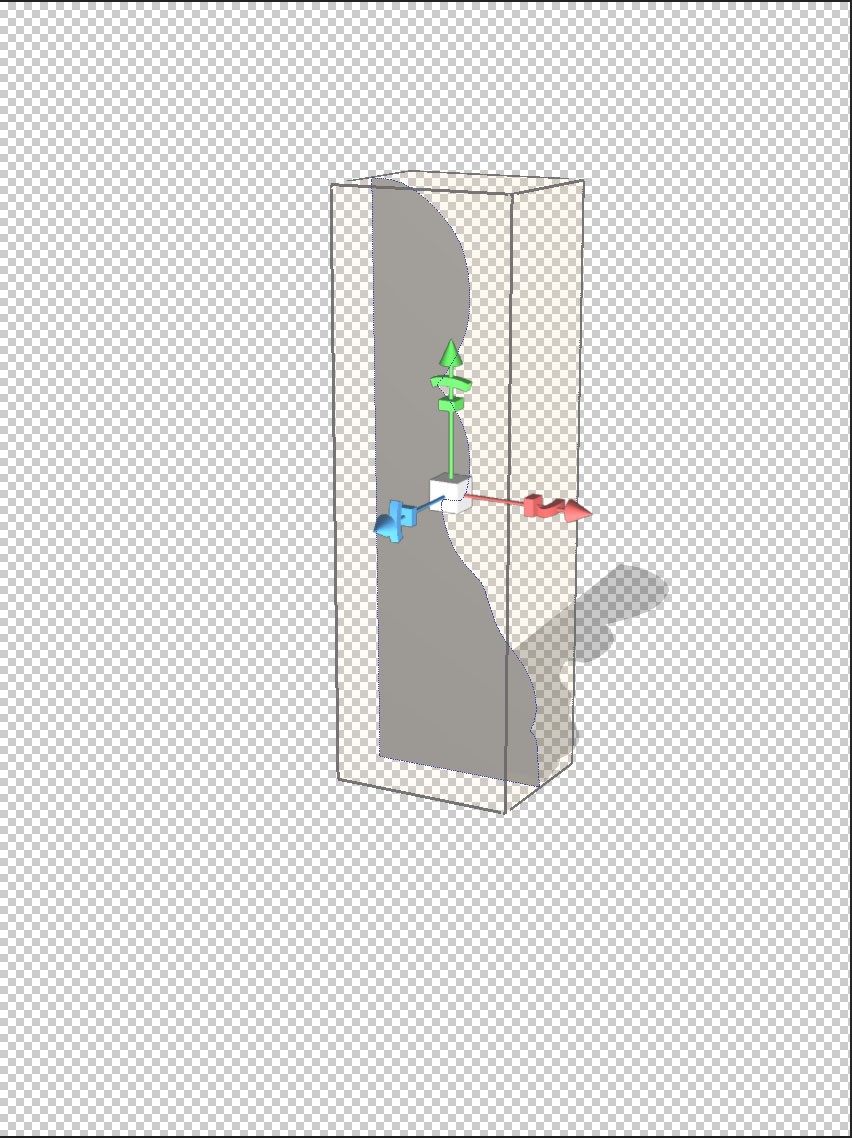
This is how your image looks now:
Central Rotational Axis
This object is created by rotation about a central point. You need to change the point of rotation to the left hand side.
Step 3
Go back to the first set of options in the properties pallet as shown:
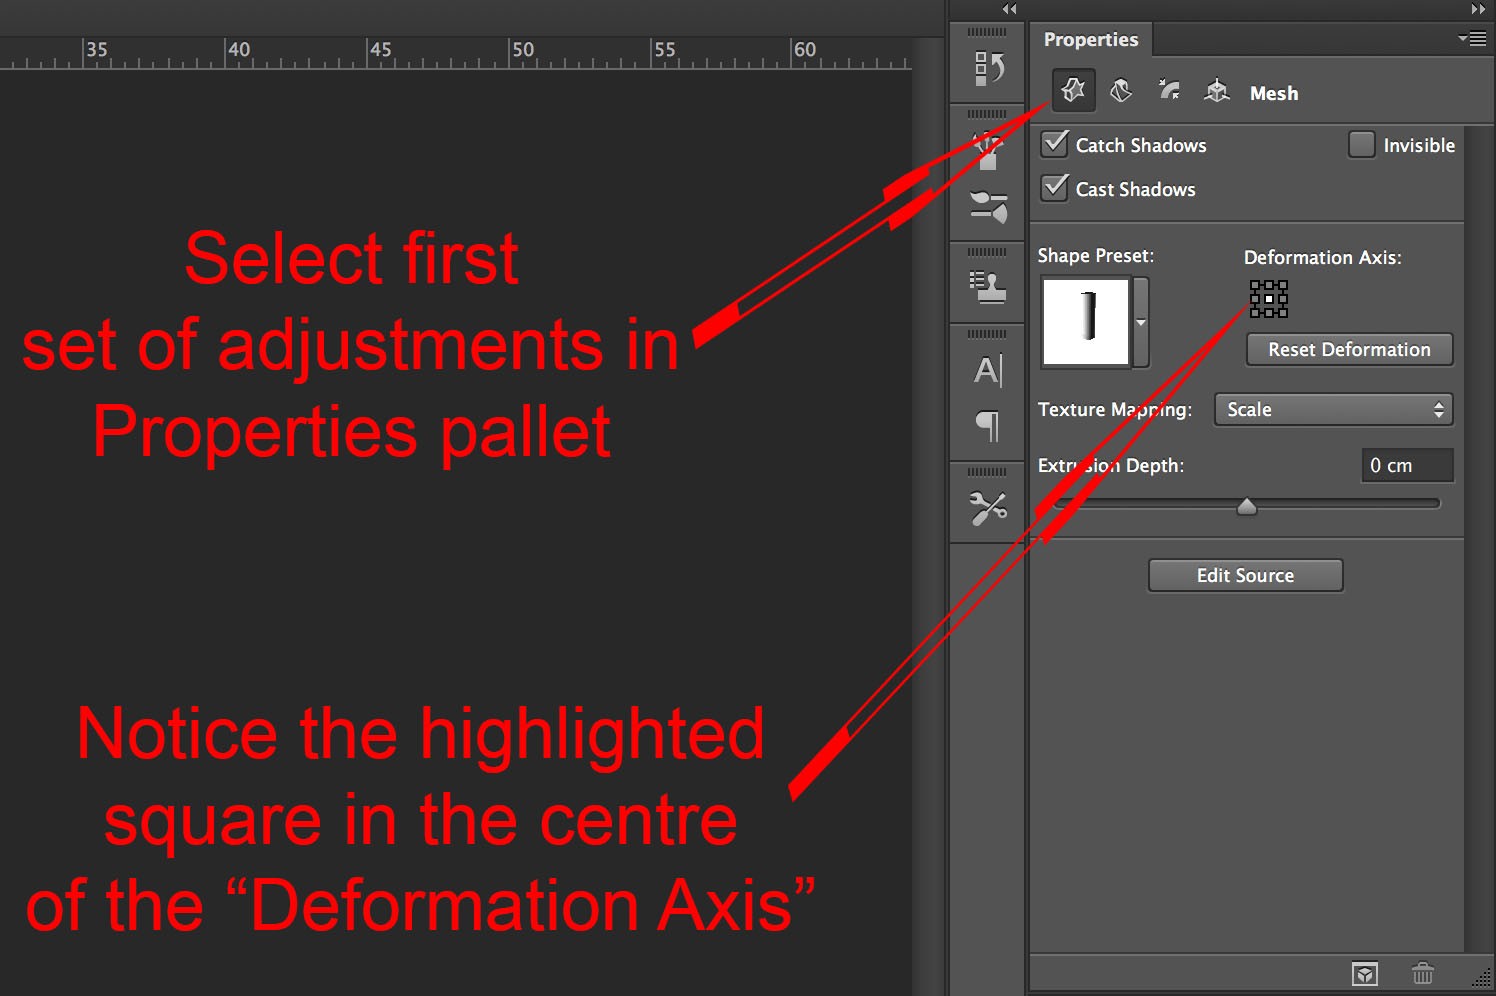
First set of Property pallet options.
Notice the highlighted central square in the “Deformation Axis” area.
Click on the square shown.
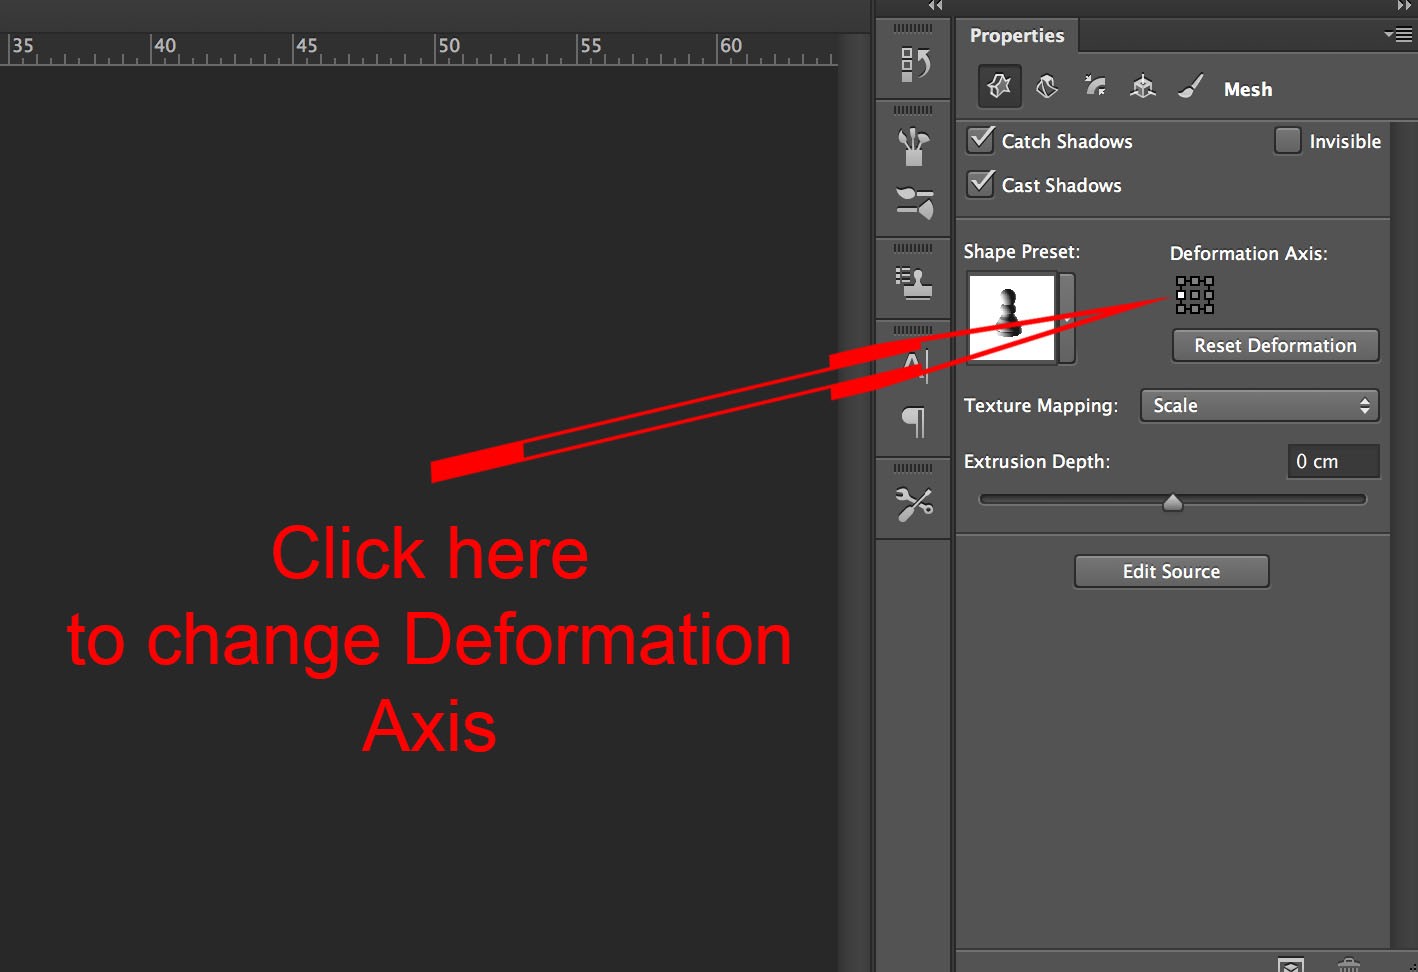
Change Deformation Axis
You have now changed your rotational point to the left hand side, and your image will look like this.

Rotation about left hand axis.
Using the move tools mentioned earlier you can see that this is truly a 3D object that can be viewed from any angle:

3D pawn.
When creating objects in this way think of things that have rotational symmetry. Other possibilities are bottles, plates, wine glasses or bowls.
There’s a lot more to learn on the subject of Photoshop 3D. I think there is a lack of ready available knowledge of the basics. It is very important to learn these before moving onto more complex ideas. If you use the ideas here to create your own objects you will become more familiar with the concepts.
Next week we will look at moving in the 3D space.
I hope this has been of help if you are new to Photoshop 3D and have fun using these ideas!
lager42793@gmail.com
Here’s why you should work with a certified electrician for services related to EV charger installation Dealing with tasks like EV charger installation on your own can be unpredictable. Even though it may seem straightforward its best to bring in a trained pro to get the job done safely. Licensed pros have the skills and experience needed to resolve hidden issues that DIYers may overlook. Hiring an expert means the job is completed efficiently and meets all local codes. In the end its the smarter choice to call on a qualified technician for your repair needs. Youll gain peace of mind and minimize risks. electrical repair Mountain View Upgrading your home lighting? Here’s why a certified electrical expert should complete can lights hanging fixtures and cabinet lights 3c1dafe
https://shorturl.fm/N6nl1
http://uzinform.com.ua/news/2024/12/18/205572.html
https://shorturl.fm/m8ueY
https://shorturl.fm/XIZGD
https://shorturl.fm/j3kEj
https://shorturl.fm/68Y8V
https://shorturl.fm/9fnIC
https://shorturl.fm/9fnIC
https://shorturl.fm/FIJkD
https://shorturl.fm/bODKa
https://shorturl.fm/A5ni8
https://shorturl.fm/68Y8V
https://shorturl.fm/XIZGD
Hullo to all our soothing water enthusiasts Theres absolutely nothing quite like plunging into a soothing hot tub after a grueling day. For anyone in search of the absolute relaxation experience a hot tub is indeed second to none. Multiplicity is truly the spice of lifestyle and we truly pride ourselves on offering a vast selection of spas to cater to every desire. Superiority to us is more than just a word. Its our hallmark. Every of our products experience rigorous testing to ensure they repeatedly provide the optimum leisure experience for numerous years to come. Our knowledgeable staff are always on hand to advise you in locating the best-suited spa for your requirements and residence. Have you ever considered having your private comfort oasis? Everything are your must-haves when it involves choosing the optimal jacuzzi? Lets discuss about any of it Continue to be lively and comfy By-the-way I started my own newbie service online business a while back you can view here: Hot tub brands Litchfield Park Arizona The Relaxation Response: Easing Muscle Tension with Warm Tubs 887bb58
varvaramatveeva098@gmail.com
https://shorturl.fm/xlGWd
https://shorturl.fm/PFOiP
https://shorturl.fm/0oNbA
https://shorturl.fm/ypgnt
https://shorturl.fm/Kp34g
https://shorturl.fm/hQjgP
https://shorturl.fm/nqe5E
[url=https://chimmed.ru/products/r-3-tret-butil-4-metil-22-dimetiloksazolidin-34-dikarboksilat-id=6504044]r 3 tert butyl 4 methyl 2, 2 dimethyloxazolidine 3, 4 dicarboxylate – купить онлайн в интернет-магазине химмед [/url]
Tegs: [u]monoclonal anti copper transporting atp – купить онлайн в интернет-магазине химмед [/u]
[i]monoclonal anti copper transporting atp – купить онлайн в интернет-магазине химмед [/i]
[b]monoclonal anti copper transporting atp – купить онлайн в интернет-магазине химмед [/b]
r 4 9h fluoren 9 yl methoxy carbonyl amino 6 methylheptanoic acid – купить онлайн в интернет-магазине химмед https://chimmed.ru/products/r-4-9h-fluoren-9-ylmethoxycarbonylamino-6-methylheptanoic-acid-id=6529589
Grasping the Workings of EMDR Therapy.
EMDR has acquired recognition while an effective treatment with regard to trauma-related disorders, however the mechanisms underlying the its therapeutic effects stay the topic of on-going study as well as controversy. On this post, we all explore within the complex processes engaged in EMDR therapy as well as examine how they add for you to symptom decrease along with psychological relief.
With this core of EMDR therapy is definitely the the particular principle of memory reprocessing, which usually will involve accessing in addition to reconsolidating traumatic memories to help decrease their emotional charge in addition to associated negative beliefs. As a result of a few bilateral stimulation techniques, such as for example eye movements, tactile taps, or perhaps auditory tones, EMDR aims to facilitate the adaptive processing of traumatic experiences within just the brain’s information processing system.
One of those offered mechanism regarding action is actually in which the particular bilateral stimulation employed in EMDR therapy induces a new state connected with dual attention, enabling individuals to simultaneously concentration on distressing memories although engaging throughout external sensory input. This dual attentional focus is definitely thought for you to advertise desensitization to traumatic material in addition to facilitate the actual integration associated with new, a lot more adaptive information.
Additionally, EMDR may possibly stimulate the release connected with neurobiological factors for example endorphins in addition to oxytocin, that are involved throughout stress reduction and social bonding, further enhancing the actual therapeutic process.
Whilst the precise mechanisms of EMDR therapy are generally still becoming elucidated, the efficacy in treating trauma-related ailments indicates of which the idea engages complex neurobiological processes that will promote psychological healing along with resilience.
[url=https://lkinstitute.com/emdr-trainings]EMDR IOP individual therapy[/url]
58ae7f0
Selecting a experienced spine care specialist when dealing with lower back issues is often life-changing. whether You’re Dealing with ongoing lumbar pain, nerve pain, or general stiffness, a certified chiropractic provider is equipped to offer long-term benefits. Many individuals look up phrases such as “chiropractor near me for back pain” or “licensed spine doctor” near them because they realize the importance of working with an expert in musculoskeletal function. A licensed chiropractor goes beyond symptom relief to address the underlying cause of your discomfort. This includes realigning vertebrae, reducing muscular tension, and restoring nerve flow. By working with a chiropractor who specializes in long-term discomfort and postural problems, patients often experience better posture, restful nights, and a decrease in pharmaceutical use. For anyone considering chiropractic care, it’s wise to select a practitioner with proven expertise and a track record of success in treating lower back pain, spinal compression, and nerve irritation.
[url=https://canada-chiropractic.com/signs-you-need-a-chiropractor-for-neck-pain/]auto Accident chiropractic care Slc[/url]
[url=http://ironwaterstudio.net/]How to find the right chiropractor a local expert[/url] b58ae7f
Heya to every single one of our peaceful aqua devotees Theres nothing quite like sinking into a warm hot tub after a stressful day. For people in search of the absolute calmness experience a jacuzzi is genuinely unparalleled. Variety is really the essence of lifetime and we truly pride ourselves on offering a vast selection of jacuzzis to meet every preference. Superiority to us is not just an ordinary word. Its our emblem. Every single of our products go through strict testing to ensure they always provide the prime leisure experience for numerous years to come. Our seasoned staff is always on hand to direct you in choosing the best-suited hot tub for your needs and lifestyle. Have you ever considered having your very own pleasure haven? Just what are your must-haves when it comes to choosing the optimal spa? Lets converse about any of it Stay bubbly and calm By the way I set up my very own raw small business web presence not long ago one can view it here: Custom hot tubs Sun Lakes Arizona Utilizing Hot Jacuzzis to Disrupt the Circle of Chronic Insomnia 7f050ca
Scheduled Maintenance Averts Expensive Fixes
Routine roofing care can avoid massive and high-priced repairs if neglected untended for extended times. Little damages like seepages, fissures, or lost slates can develop into serious issues if ignored. Homeowners should schedule routine examinations with qualified roof professionals to identify any problems promptly and fix them prior to they become pricey headaches. Preserving the roof in top shape can lengthen its durability and reduce homeowners money eventually.
For illustration A homeowner observes a minor seepage in their roof and contacts a certified expert to inspect. The professional finds multiple problems that could have caused serious damage if ignored. Resolving these issues early saves the property owner a significant amount of money in future fixes.
By way of a situation in point An resident schedules regular examinations for their covering. During one of these checks, the contractor finds early signs of deterioration. Routine upkeep carried out immediately prolongs the longevity of the roofing and avoids high-priced restorations down the line.
[url=https://portcityexteriors.com/roofing-companies-leland-nc/]Always Reliable roofing alternatives close to Wrightsville Beach NC[/url]
[url=http://pulsomundialnews.com]Fighting Ocean Breezes: Effective Roofing Protection Tactics[/url] e5887bb
Finding the right coating system plays a big role in property improvements. For those improving exposed flooring UV-Resistant Epoxy for Pool Surrounds stand out as the most reliable options available today. Chlorine-resistant epoxy systems provide a safe floor upgrade for sunbathing decks. This type of coating resist constant moisture while delivering decorative flakes. Used by contractors they boost property value of backyards. Sun-safe epoxy finishes combat UV degradation retaining the surface integrity of your exterior flooring. With the help of light-stable polymers these coatings perform well even after constant outdoor use. Licensed epoxy driveway contractors ensure quality when it comes to applying long-lasting epoxy entryways. For flawless results turn to experienced professionals who know substrate prep. Their knowledge yields a strong bond. Speedy polyaspartic pros have changed the floor coating world. Unlike traditional epoxy the surface sets in a single day. Perfect for garage makeovers avoiding disruption. To wrap up Epoxy Pool Deck Coatings help elevate residential curb appeal through skilled application. With safety speed and strength these flooring solutions set the standard. High-Gloss Reflective Epoxy Contractors around Spring Hill FL A Homeowner’s Guide to Maintaining High-Traffic Coated Concrete Entry Solutions Over Time e7f050c
MEJTYJY3452275MAVNGHJTH
Thanks for producing that enlightening & yet exciting platform. I certainly anticipate to information anytime an instance manifests itself Gratitude repeatedly for allowing the site open towards people Factors Engaging a Broker Is the Smart Choice for a Speedy Home Listing 70ffe73
Eye Movement Desensitization and Reprocessing remedy for Survivors of Domestic brutality: Restoring authority and representation Abusive relationships can be a pervasive and stressful experience that will can have profound effects on survivors emotional well-being. Eye Movement Therapy Desensitizing and also Desensitization Eye Movement Desensitization and Reprocessing treatment presents the important resource with regard to survivors of at-home physical violence promoting their journey toward recovery empowerment along with reclaiming their power and also agency. With this particular forum post all of us explore the implementation of EMDR therapy in survivors associated with domestic violence and address its potential benefits regarding addressing trauma-related concerns and also encouraging resilience in addition to rehabilitation. Among the primary challenges faced by survivors connected with domestic violence is definitely the impact of trauma on their sense associated with self-worth safety along with trust in others. EMDR therapy gives a safe and encouraging space pertaining to survivors to be able to work through distressing memories and also emotions counter negative values about by themselves and develop considerably transformative coping approaches. Further EMDR therapy can easily tackle the complex interplay of trauma in addition to attachment issues that often emerge inside context of home violence helping survivors to be able to manage their relations in addition to establish healthier bounds. More over EMDR therapys emphasis on empowerment and also agency aligns with the goals associated with many survivors connected with domestic violence who are searching to regain control over their lives in addition to liberate themselves from cycles of abuse. By delivering powerful and also readily available trauma medication EMDR therapy helps survivors throughout reclaiming their power as well as building a more optimistic extended free from the tincture associated with the past. Adolescent self-esteem improvement 042_a16
Going through the maze of todays Social Security Disability application system could be an intimidating task for some. The process can be sophisticated and frustrating therefore the chances of getting refused are high. This is how a social security disability legal practitioner will come in. A legal professional will allow you to navigate the application process enhance your odds of becoming approved additionally appeal a denied claim. In this specific article we are going to explore about five issues associated with the job of a social security disability solicitor. Navigating the Social Security Disability application processes by using a legal professional The social security disability application procedure could be complicated then overwhelming. A legal professional will allow you to understand the requirements and make suggestions through the procedure. They are able to also allow you to gather the mandatory medical data and certification to guide ones claim. They are able to further help in prepping you for the proceeding if required. The necessity of health-related data in a Social Security Disability case Medical evidence is a must in a social security disability claim. It really is used to show which you carry a medical condition that prevents you against performing. A lawyer can help you obtain the mandatory medical proof and present it in a manner that is probably to be taken because of the social security organisation. They could also allow you to obtain medical records as well as other records that maintain your case. Common fallacies up to Social Security Disability and just how a legal professional can really help There are numerous misconceptions regarding social security disability. For example lots of people genuinely believe that only those people who are permanently disabled are qualified to receive benefits. Still it is not true. A legal professional can help you comprehend the eligibility requirements and dispel any misconceptions you have. They could also provide help with how exactly to present your case when you look at the most favorable light. The appeals plan for refused Social Security Disability cases and just how an attorney can help When your claim is denied there is the directly to appeal. A lawyer will allow you to comprehend the appeals process and represent you throughout the hearing. They could also allow you to gather additional evidence and develop a stronger case to boost your chances of winning. How to pick the proper Social Security Disability lawyer or attorney for the case It is essential to choose a legal professional who may have skills managing social security disability matters. Search for legal counsel that is knowledgeable about the social security administrations regulations and procedures. Its also advisable to feel comfortable chatting with them and trust their judgment. Try to find a legal professional who are able to offer apparent and truthful suggestions to your questions and offer assistance for the duration of the procedure. In closing a social security disability attorney at law can play a vital role into the application and appeals process. They could allow you to work through the method enhance your odds of getting sanctioned and appeal a declined claim. An attorney will also help you realize the eligibility criteria and drive out any wrong ideas youve probably. It is important to choose a lawyer that has experience dealing with social security disability matters in accordance with whom you feel safe communicating. If you wish to see more about this idea subject check up our Social Security Disability attorney website online: va disability advocate in Las Cruces NM
Hullo to every single one of our water relaxation fanatics Theres absolutely nothing quite like plunging into a hot hot tub after a stressful day. For those in search of the paramount tranquility experience a jacuzzi is truly unmatched. Diversity is certainly the essence of lives and we firmly pride ourselves on offering a broad assortment of spas to meet every whim. Superiority to us is not just a mere word. Its our benchmark. Every of our products go through intense testing to ensure they always provide the peak pleasure experience for numerous years to come. Our knowledgeable staff is always on hand to assist you in selecting the right hot tub for your wants and residence. Have you ever envisioned having your very own pleasure haven? What are your must-haves when it comes to choosing the optimal hot tub? Lets chat regarding this Be effervescent and laid-back Also I launched my own all new site url not long ago you can check out here: Hydropool swim spa Youngstown Arizona Using Colour Therapy Chromotherapy in Modern Hot Tubs 50ca043
We’ve been helping businesses grow online for over a decade. As an experienced SEO agency we focus on strategies that actually move the needle. That means no fluff—just solid technical work content optimization and link building. One of our recent clients saw a 60 increase in organic traffic in just four months. We believe in transparency so we provide clear reports and regular updates. Our team is always available to explain what we’re doing and why. If you’ve been burned by agencies in the past we get it—and we do things differently. We don’t lock clients into long contracts. We let the results speak for themselves. If you’re ready to grow we’d love to talk. Facebook Instagram Reddit LinkedIN
Finding a dependable appliance repair service in the Brooklyn area can be challenging with countless options out there. Whether your fridge fails to cool, your washing machine won’t spin, or your cooktop fails to heat, selecting the most qualified technician is essential to restoring your appliance’s efficiency.
In this guide, we’ll discuss methods for choosing the most reputable home appliance technicians in Brooklyn, what to look for in a service provider, and insider advice to ensure you obtain cost-effective, high-quality repairs.
Find Nearby Appliance Repair Professionals
When in need of home appliance repair services, focus on local companies that provide same-day or 24/7 repair solutions. Local businesses often provide faster service turnarounds, superior client support, and competitive pricing.
? Tip: Use search engines to find phrases like “same-day appliance repair Brooklyn” to discover highly reviewed technicians in your area.
Read Customer Testimonials
Before hiring an appliance repair technician, read customer feedback on platforms like Google Reviews, Yelp, and HomeAdvisor. Look for companies with:
• High ratings (4.5+ stars)
• Positive user experiences
• Fast appointment scheduling and repair assurances
Verify Technician Credentials
Trusted appliance repair companies in New York must be:
• Licensed and insured
• Factory-trained for leading brands (popular appliance makers)
• Providing guarantees on repairs performed
?? Pro Tip: Always ask, “What kind of repair warranty do you offer?”
Evaluate Repair Costs
The cost of fixing your appliances in your area is determined by:
• Which appliance needs repair (refrigerator, oven, dishwasher, washing machine)
• The complexity of the repair
• If spare parts are necessary
? Typical Charges:
• Refrigerator repair: $150–$400
• Washer & dryer repair: $100–$350
• Oven/stove repair: $125–$300
Make sure to get a no-obligation quote before confirming your repair request.
Find a Repair Service Offering Urgent Repairs
If your refrigerator isn’t cooling or your dryer won’t heat up, you may require same-day appliance repair. The best appliance technicians in Brooklyn provide 24/7 emergency repair services to restore functionality without delay.
?? Looking for a Trusted Repair Service? Reach out to a reliable qualified service provider today!
42_9f29
[url=hvacandapplianceprosny.com/]Electric home appliance service[/url]
We are experienced in repairing these top appliance brands: LG We proudly serve the following areas:
Brooklyn: 11230,
Manhattan: 10003,
Queens: 11361,
Staten Island: 10308
Vlashhibeyuganefe@gmail.com
MEJTYJY140679MARETRYTR
MEKYUJTYJ818633MAVNGHJTH
Listing a home extends beyond just displaying a sale indicator. Utilizing a certified expert can simplify the procedure guaranteeing a quick transaction at a favorable rate. These specialists possess in-depth understanding of the real estate landscape proficient at maximizing exposure and handling issues all of while managing the required paperwork. Realtor-Endorsed Tips to secure Marketing Homes Swiftly fe73c1d
variant5
Whats up to all our aquatic tranquility fanatics Theres absolutely nothing really like plunging into a soothing spa after a grueling day. For people in search of the paramount relaxation experience a spa is genuinely unparalleled. Multiplicity is really the spice of daily life and we firmly pride ourselves on offering a vast selection of whirlpools to meet every preference. Excellence to us is beyond just a word. Its our standard. Each of our products go through thorough testing to ensure they consistently provide the prime comfort experience for countless years to come. Our well-informed staff is always on hand to guide you in finding the perfect hot tub for your wants and lifestyle. Have you ever dreamed of having your very own comfort retreat? What else are your desires when it involves choosing the perfect jacuzzi? Lets talk about any of it Stay effervescent and at ease Incidentally I made my own brand-new site page recently you can check out it here: play pool San Tan Valley Arizona Warm Tubs and Stress Reduction: The actual Mind-Body Link f050ca0
Every couple wants their ceremony in the Northwest to be breathtaking. And when it comes to preserving the highlights, frames are what truly stand the test of time.
That’s where a review-backed lens expert comes in. Someone who’s not only creative, but also has the kind of portfolio that sets them apart. When looking at past feedback, you’ll find that great service and flawless galleries go hand in hand.
Your bridal images should feel as comfortable as your love. Whether it’s just the two of you or a full wedding party, a pro will highlight your best angles without it ever feeling awkward.
In PNW territory, that kind of ease matters. Light can shift, rain can fall, plans change—but your photographer shouldn’t miss a beat. With a deep understanding of mobility-conscious planning, your comfort will always be part of the plan—no matter what shoes you’re wearing or how long the ceremony runs.
One of the most overlooked things when choosing a photographer is how they interact with everyone involved, fellow creatives, and especially you. A true pro brings positivity from start to finish. You’ll see it in their process, and it shines through in their wedding photography delivery. Having no clarity shouldn’t be part of your wedding story.
So when you’re narrowing down your options for your cityside celebration, keep your eyes on more than just the package rate. Think about who you want to trust with the moments. Your five-star wedding shooter won’t just deliver images—they’ll give you legacy you’ll treasure forever.
[url=https://nickhanyokimaging.com/category/wedding/page/2/]admiral house wedding[/url]
[url=http://dswebb.com/]Capturing Love PNW Nuptial Imagery Candid Shots The Heart of Nuptial Photography[/url] 40_ace8
Join our affiliate community and earn more—register now! https://shorturl.fm/zx8Fm
Drive sales, collect commissions—join our affiliate team! https://shorturl.fm/yoTT4
Get paid for every referral—sign up for our affiliate program now! https://shorturl.fm/dEWrL
Earn passive income on autopilot—become our affiliate! https://shorturl.fm/UGHfC
Transforming your property transaction into a funds sale and flipping residences for gain can be a highly rewarding venture in the real estate sector, if you carefully plan and organize. Begin by accurately evaluating your house’s marketplace worth through licensed appraisals, relative marketplace comparisons, or web-based appraisal tools. Proper valuing is essential to prevent monetary setbacks or lengthy listing periods. Engaging a expert housing broker can offer valuable advice to establish a fair and practical demanding price matching present market trends.
Before listing your house for a cash deal, focus on conducting necessary repairs and enhancements, particularly in important spaces like the kitchen and restrooms, which can significantly boost your house’s price and buyer attractiveness. Keeping your estate well-maintained and orderly is essential to drawing possible investors promptly. Moreover, preparing your house by organizing, placing fixtures strategically, and adding attractive ornaments can form an cozy atmosphere that enhances purchaser attraction. Hiring a licensed home preparer can additionally enhance your house’s display.
For those aiming to renovate houses for gain, securing the appropriate investment is crucial. Consider alternatives such as standard lender loans, alternative credits, or private credits, and select one that aligns with your financial status and undertaking needs. Verify you have a solid repayment strategy in place. Partnering with the proper specialists, such as property professionals, builders, inspectors, and law professionals, is crucial for a effective revolving venture. These specialists can assist in finding the ideal home, overseeing renovations and enhancements, evaluating home conditions, and handling legal matters, guaranteeing a smooth and successful flipping process. For more insights and references on this topic, feel free to explore my preferred resource.
Should you are going to read more info on the item focus click on my personal websites:
[url=https://stephburtcashoffers.com/get-a-cash-offer-today/][color=#000_url]which to offer on a property by atlanta ga and Lithonia, StoneCrest Georgia 30058[/color][/url]
[url=http://recipes.medtour.info/5272]Explore the importance and Drawbacks of Tossing[/url] e73c1da
Join our affiliate community and start earning instantly! https://shorturl.fm/6nMM6
Start profiting from your network—sign up today! https://shorturl.fm/xKH8S
Grow your income stream—apply to our affiliate program today! https://shorturl.fm/JYM5A
Share your unique link and earn up to 40% commission! https://shorturl.fm/8gHs2
Get rewarded for every recommendation—join our affiliate network! https://shorturl.fm/nVnLm
How Hiring The Government Aid Disability Counsel Is Vital.
Recruiting A State Welfare Incompetence Counsel Can Be Compulsory.
The Senior Support Allowance Administers countless schemes from unemployment insurance to welfare assistance, and also administers incapacity remuneration for people powerless to work due to ongoing medical conditions or wound. As with any involved group, there are guidelines and policies which must be followed by the mentioned body in orderliness to acquire perks. Considering hiring an experienced SSA attorney May be essential.
Employing a experienced SSD legal representative might guide you navigate the complications of SSA SSI, increasing your chances of acceptance for perks. They can ensure that your proposal is lodged accurately and includes backing medical evidence; additionally, they are aware of how to accumulate this evidence quickly so it is not submitted late; in addition, they might circumvent giving irrelevant data that could lead to obstacles and dismissals by the Support for Sustained Aging.
Your disability specialist will also equip you for a hearing with SSA if your application is denied, by detailing what to expect at it and responding any of your doubts about what happens there. They can support with supplying additional supporting materials and querying the adjudicator who heard your matter to look over their ruling and question witnesses or vocational authorities called by Social Security to testify on your behalf, which might boost the opportunity that an introductory appeal for disability prevails if initially denied. Social security disability attorneys may recover any past due perks owing to changes in the starting date, which symbolizes when your situation began. Skilled champions for disabled individuals can assist with getting back any past due beneficial outcomes that would have been lost because of changes in the starting date or when your state began.
[url=https://disabilitysacramento.com/social-security-disability-reconsideration/]Understanding the eligibility conditions for Social Security Disability is crucial for a successful application[/url]
[url=https://forum.eliteshost.com/showthread.php?tid=5156&pid=43197#pid43197]Critical Reasons to Seek the Assistance of a Counsel Skilled in Disability Matters[/url] b58ae7f
Start sharing, start earning—become our affiliate today! https://shorturl.fm/Yesy3
Share our offers and watch your wallet grow—become an affiliate! https://shorturl.fm/FWwes
[url=https://chimmed.ru/products/2-bromomethyl-45-dimethyl-13-thiazole-hydrobromide-id=4433661]2 bromomethyl 4, 5 dimethyl 1, 3 thiazole hydrobromide – купить онлайн в интернет-магазине химмед [/url]
Tegs: [u]histomount mounting solution 15 ml – купить онлайн в интернет-магазине химмед [/u]
[i]histone 2a rbt rec oligo ab each – купить онлайн в интернет-магазине химмед [/i]
[b]histone acetyl transferase i 1pc x 10mg – купить онлайн в интернет-магазине химмед [/b]
2 bromomethyl 4, 5 dimethyl 1, 3 thiazole hydrobromide – купить онлайн в интернет-магазине химмед https://chimmed.ru/products/2-bromomethyl-45-dimethyl-13-thiazole-hydrobromide-id=4440646
Earn passive income with every click—sign up today! https://shorturl.fm/Gm6lb
Become our partner now and start turning referrals into revenue! https://shorturl.fm/DtsWs
Join our affiliate community and start earning instantly! https://shorturl.fm/mdgUe
1х слот регистрация в 1xslots casino 1хслотс 1хслотс регистрация перейти на 1xslots
Start sharing, start earning—become our affiliate today! https://shorturl.fm/d2sud
Promote our products and earn real money—apply today! https://shorturl.fm/SIbrt
Unlock exclusive rewards with every referral—apply to our affiliate program now! https://shorturl.fm/nBghJ
Partner with us for high-paying affiliate deals—join now! https://shorturl.fm/XckRK
Start profiting from your traffic—sign up today! https://shorturl.fm/pWZ7j
Safe shopping isnt just about picking any box with a lock; its about investing in the best protection for your belongings. In todays modern era where security threats are ever-present having a dependable safe is vital. Whether youre safeguarding cash important documents or sentimental items the right safe can provide a sense of security like no other. One of the most important aspects of a safe is its build. Premium safes are constructed from durable materials such as steel or titanium guaranteeing security against break-ins. Additionally state-of-the-art locking mechanisms such as biometric scanners or digital keypads add an extra layer of security to discourage unauthorized access. Another critical feature to consider is heat resistance. Quality safes are crafted to withstand high temperatures and safeguard your valuables in the event of a fire. Investing in a fireproof safe guarantees that even in the face of catastrophe your most precious possessions remain intact. Beyond security take into account the capacity and positioning of your safe. Choosing a size that holds your valuables without being too conspicuous is vital. Additionally strategically positioning your safe in a safe yet accessible spot ensures ease without compromising security. In conclusion committing in a top-notch safe is essential for protecting your important possessions. By emphasizing features such as design fireproofing and size you can ensure maximum security for peace of mind in any situation. https://mercurylock.com/contact
1xslots официальный сайт скачать на айфон 1xslots регистрацию более популярный вариант это
Drive sales and watch your affiliate earnings soar! https://shorturl.fm/umK2L
Converting your house sale into a cash sale and flipping real estate for profit can be a highly profitable venture in the real estate market, provided you thoroughly plan and arrange. Commence by correctly determining your home’s sector value through professional appraisals, comparative market comparisons, or digital appraisal instruments. Proper costing is essential to circumvent monetary shortfalls or prolonged offering durations. Consulting a experienced real estate professional can provide useful guidance to determine a reasonable and realistic asking cost in line with current sector conditions.
Ahead of marketing your property for a money transaction, concentrate on conducting critical improvements and upgrades, especially in important spaces like the kitchen and bathrooms, which can greatly increase your property’s worth and purchaser appeal. Maintaining your property well-maintained and orderly is essential to drawing potential buyers promptly. Moreover, presenting your home by decluttering, organizing furnishings thoughtfully, and introducing tasteful ornaments can generate an welcoming atmosphere that boosts buyer interest. Engaging a certified property arranger can further optimize your house’s display.
For those looking to flip homes for income, getting the proper financing is crucial. Review alternatives such as conventional bank funds, hard money credits, or private loans, and choose one that fits with your economic status and venture requirements. Verify you have a robust payback strategy in position. Partnering with the proper experts, including property agents, contractors, evaluators, and attorney experts, is essential for a profitable revolving project. These professionals can aid in discovering the ideal estate, managing fixes and improvements, assessing home status, and overseeing legal aspects, guaranteeing a efficient and profitable renovating journey. For more details and materials on this subject, kindly check my preferred resource.
Should you must learn about more info on this subject matter take a look at a web page:
[url=https://stephburtcashoffers.com/how-we-buy-houses/][color=#000_url]optimal approaches to market a home over Atlanta GA and South Fulton GA 30349[/color][/url]
[url=http://lacaritabella.com]Use Professional Photography in House Flipping[/url] 050ca04
Join our affiliate program and start earning commissions today—sign up now! https://shorturl.fm/azBnr
Share your link and rake in rewards—join our affiliate team! https://shorturl.fm/Qqgxj
Get started instantly—earn on every referral you make! https://shorturl.fm/8u7AQ
Get started instantly—earn on every referral you make! https://shorturl.fm/8u7AQ
OVI laws throughout Ohio can be complex, nevertheless it’s crucial to come with a great knowledge of them all if someone find expenditures. Operating under some sort of influence (DUI) was a serious offensive that can posses notable consequences on their future. In Ohio, all lawful limit for blood flow ethanol concentration (BAC) is 0.08% for a good number of motorists also 0.04% business vehicle operators.
If your are pulled over by law enforcement and accused of drunk driving, they may do field sobriety examinations or chemical tests, this type of because breathalyser or blood stream assessments, to establish their degree of harm. Declining these kind of tests can cause auto sanctions, including driving license suspension.
ovi offenses in Ohio carry different penalties, based on on factors love before judgment of conviction, BAC range, as well as regardless of whether online was ever an catastrophe or trauma active. Issues might involve penalties, license suspension system, mandatory alcohol remedies systems, liberation, and still offender time. Recurring offensive activity and angry conditions can result in more harsh penalties.
Achieving a experienced DUI security attorney is essential to manage the complexities of Ohio dwi statutes. They will analyze the proof, test the legalization of the stop, wonder the accurate of examinations, and uncover interested defenses to help offset the accusations. Further, an legal representative can plan you during the professional process, making sure their correct are guarded and urge for the top rated a possibility finish.
Keep in mind, being told concerning Ohio’s DUI regulations and finding the help of an encountered legal are major steps in effortlessly management a DUI rate furthermore guarding the later.
https://www.bouchardcincinnaticriminalduiattorney.com/practice-areas/sealing-records/
Why you should hire a licensed electrical contractor for any EV charger installation needs
Handling tasks like EV charger installation on your own can be unpredictable. Even though it may seem straightforward, it’s best to rely on a trained technician to get the job done safely.
Professional electricians have the tools and experience needed to diagnose hidden issues that DIYers may overlook. Using an expert means the installation is completed safely and complies with all electrical regulations.
In the end, it’s the safest bet to call on a qualified technician for your repair needs. You’ll gain peace of mind and stay protected.
[url=https://danmatthewselectric.com/about-us]commercial electrician Saratoga[/url]
[url=http://1000decor.com/]Key questions before hiring an professional installer[/url] 43_bbf4
Start earning instantly—become our affiliate and earn on every sale! https://shorturl.fm/uqvlm
[url=https://detikoptevo.ru/]Шары на день рождения[/url]: они вызывают улыбку, восторг и делают любое торжество незабываемым. Вы можете выбрать оформление под стиль и возраст именинника — быстро, удобно и по доступной цене.
Вы можете выбрать шары с надписями, цифрами, именами или просто любимыми цветами. Всё, что нужно — решить, каким будет ваш праздник, а мы доставим шары вовремя.
Пусть ваш день рождения будет не просто праздником, а волшебным событием.
Выберите идеальные шары уже сегодня — ведь день рождения бывает только раз в году.
https://detikoptevo.ru/
[url=https://detikoptevo.ru/]Шары на день рождения[/url]: они вызывают улыбку, восторг и делают любое торжество незабываемым. Вы можете заказать праздничные шары с доставкой на дом — быстро, удобно и по доступной цене.
Гелиевые, фольгированные, с конфетти — каждый вариант делает праздник особенным. Всё, что нужно — решить, каким будет ваш праздник, а мы доставим шары вовремя.
Пусть ваш день рождения будет не просто праздником, а волшебным событием.
Выберите идеальные шары уже сегодня — ведь день рождения бывает только раз в году.
https://detikoptevo.ru/
Refer friends, earn cash—sign up now! https://shorturl.fm/ioaZ9
Join our affiliate community and maximize your profits—sign up now! https://shorturl.fm/L3OsQ
Start sharing, start earning—become our affiliate today! https://shorturl.fm/z0eZ1
Promote our products and earn real money—apply today! https://shorturl.fm/7nfgT
Sign up and turn your connections into cash—join our affiliate program! https://shorturl.fm/IUgbT
Get paid for every referral—enroll in our affiliate program! https://shorturl.fm/BtIgQ
Promote our products and earn real money—apply today! https://shorturl.fm/Cwg22
Refer friends and colleagues—get paid for every signup! https://shorturl.fm/ChlUO
Selling a home extends beyond just showing a sell notice. Hiring a skilled professional can streamline the procedure making sure a prompt deal at a desirable price. Those experts have thorough understanding of the real estate scene skilled at boosting visibility and handling questions all as handling the needed documents. Realtor Advice & Strategies to Achieving Fast Home Sales 0ca041_
Maintaining pallet racks demands a proactive approach to reduce wear and tear. Inspect your racks frequently to spot any structural issues early.
Cleaning your racks is another important step. Remove debris and dirt, which can weaken the rack’s materials over time.
Make sure to train your team on proper loading techniques. Confirm that load capacities are followed at all times.
By following these maintenance tips, your pallet racks can stay safe, efficient, and durable.
[url=https://rgpalletracking.com/contact-us/]Pallet Rack Clubs[/url]
[url=http://1000decor.com/]Understanding Various Rack Configurations[/url] e73c1da
Thanks for some other fantastic article. Where else could anyone get that kind of information in such an ideal method of writing? I have a presentation subsequent week, and I am at the look for such information.
Limousine service near me
Sign up for our affiliate program and watch your earnings grow! https://shorturl.fm/vcRpo
Tap into unlimited earning potential—become our affiliate partner! https://shorturl.fm/dOySM
Refer and earn up to 50% commission—join now! https://shorturl.fm/Vw7jn
Refer and earn up to 50% commission—join now! https://shorturl.fm/Vw7jn
https://shorturl.fm/oVm1s
https://shorturl.fm/1H1kh
https://shorturl.fm/DeCml
Novyny
https://shorturl.fm/iWDlT
Частный мастер натяжные потолки – качественно и выгодно Большой выбор фактур и цветов. Сатиновые пленочные потолки. Монтаж за пару дней. Warranty до 10 лет. Выездной замер. Опыт работы свыше 10 лет. Все районы города. Обращайтесь прямо сейчас
Heya are using WordPress for your blog platform? Im new to the blog world but Im trying to get started and create my own. Do you need any html coding knowledge to make your own blog? Any help would be greatly appreciated риобет казино
I have fun with lead to I found exactly what I used to be having a look for. Youve ended my four day long hunt God Bless you man. Have a nice day. Bye https://oost-west.com/
https://shorturl.fm/1qyUN
Admiring the persistence you put into your blog and in depth information you present. Its awesome to come across a blog every once in a while that isnt the same out of date rehashed material. Fantastic read Ive saved your site and Im adding your RSS feeds to my Google account. https://english2017.ru/virtualnyy-nomer-chto-eto-takoe-i-zachem-on-nuzhen-v-sovremennom-mire
https://shorturl.fm/AQJ6q
https://shorturl.fm/bvYkw
Im not sure exactly why but this web site is loading incredibly slow for me. Is anyone else having this issue or is it a problem on my end? Ill check back later on and see if the problem still exists. number
Chess Matches in addition to Critical Thought
Game of chess is a powerful game to creating evaluative thinking. Even if someone is new for the game & a seasoned participant, game of chess challenges someone for think deeply and strategically. Begin learning essentials, understanding the way each figure moves & acquainting someone with the playing field. Consistent practice could be key; competing regularly, even within nearby associations also virtually, helps develop strategies also enhance your abilities. Watching matches by chessboard pros could give useful insights into complex tactics & decision-making approaches. Foreseeing one’s competitor’s strategies and thinking several actions in advance is essential regarding chessboard. Keeping relaxed amid tension, especially inside competitive matches, sharpens analytical thinking processes. Chess should constantly prove enjoyable, including each game offering an possibility towards learn. Engaging through the game of chess network, through forums, clubs, or activities, provides support and different insights. Chess is a constant path for study also strategic thinking. So, immerse yourself in game of chess to improve critical thinking, continue competing, continue understanding, also most importantly, delight!
[url=https://chessmaxacademy.com/]Checkers school Upper West Side Manhattan[/url]
[url=https://webysoporte.es/hola-mundo/#comment-138]Chessboard aimed at Retirees and Benefits as well as Top Techniques[/url] a040_44
Квиз — это увлекательная игра-викторина, которая сочетает в себе элементы развлечения и интеллектуального состязания. Они могут проходить в различных форматах: от настольных игр до онлайн-викторин и живых мероприятий в кафе или клубах. Популярность квизов растет, поскольку они позволяют людям не только проверить свои знания, но и провести время в компании друзей или незнакомцев, создавая атмосферу дружеского соперничества – [url=https://mymoscow.forum24.ru/?1-3-0-00000647-000-0-0-1750920914]квиз в москве[/url]
https://shorturl.fm/Rnela
https://shorturl.fm/FoaD3
https://shorturl.fm/mJX1e
Professional Roofing Companies Who Focus at Coastal CoveringsCoastal areas display some of Earth’s most stunning homes though their climate also susceptibility to moisture can lead to detrimental consequences upon tops such as rust moisture absorption and weather damage. For protecting these homes from these risks residents frequently rely on expert covering businesses that focus at shoreline roofing with those distinctive difficulties in mind and help property owners choose resources styles and finishes offering better protection against conditions.Property owners searching for a roof supplier ought to make sure they select a contractor with a excellent track record and pleased clients and who are licensed having insurance for laborer reimbursement and liability losses. In addition these specialists should hold adequate skill also experience for conducting an exhaustive inspection and recommend any required restorations in addition to offering exact estimates with any charges or further costs related to the task.Quality roof providers offer residents with detailed estimates that explicitly outline the scope and costs linked with the job like resources needed and charges. Furthermore they must provide no less than 30 year quality guarantees and also be ready for answering any questions that arise in this procedure.Though top roofing contractors will be truthful and direct with the patrons they must never aggressive when making selections. Prior to making a last selection they ought to take the time to clarify all aspects of this project and answer any inquiries from customers prior to coming up with the response. Likewise they should operate within clients timeframes to make sure completion within the deadline.An experienced covering provider should have strong partnerships with nearby distributors and have an in-depth knowledge of regional resources available for purchase allowing them best equipped to advise items that fit the nearby climate and can be acquired at a reasonable cost. They must be knowledgeable aware of all assurances or assurances given by makers so as to homeowners increase their covering investment.Reputable roof providers utilize modern CRM software for improving internal and increase customer contentment. These tools provides real-time financial oversight and analytics features allowing contractors to keep an eye on revenue expenditures and profitability more effectively while enhancing project management skills and for making better decisions – with increased productivity enhanced margins and better viability in mind. Inclement Weather damage roof control services in Castle Hayne NC Expert Rooftop Examinations: Justifications They Are Crucial 3c1dafe
https://shorturl.fm/ZrTJ1
https://shorturl.fm/xLwvS
The Ultimate Guide to Snorkeling in Ft. Lauderdale and Lauderdale-by-the-Sea Snorkeling in Ft. Lauderdale and Lauderdale-by-the-Sea is a exciting activity for locals and visitors alike. With warm crystal-clear waters vibrant marine life and some of the best shore snorkeling on the East Coast this area provides a unique opportunity to discover the subaquatic realm. Whether youre a first-time snorkeler or an experienced snorkeler knowing the best techniques locations and equipment can elevate your journey. In this guide we’ll go over everything you need to know about snorkeling in Ft. Lauderdale and LBTS so you can dive in with confidence. Why Snorkeling in Fort Lauderdale and Lauderdale-by-the-Sea is a Top Activity Unlike deep-sea diving snorkeling requires very little gear and preparation making it an easy and cost-effective way to experience Florida’s beautiful ocean waters. The reefs off the coast of Ft. Lauderdale and Lauderdale-by-the-Sea are filled with tropical fish sea turtles and coral formations offering an unforgettable encounter. Plus with year-round warm temperatures and excellent visibility this region is a premier snorkeling destination. Essential Snorkeling Gear Before heading out on your snorkeling excursion bringing the right equipment is key. Here’s what you need: Mask: A properly fitted mask provides clear vision beneath the surface. Choose anti-fog-treated lenses for the best viewing. Snorkel: A dry snorkel blocks water from entering making breathing easier. Fins: Fins allow you to move smoothly through the water reducing fatigue. Wetsuit or Rash Guard: Since Florida waters are warm most of the year a rash guard is typically ideal for shielding against the sun and marine irritants. Top Snorkeling Spots in Ft. Lauderdale and Lauderdale-by-the-Sea If you’re looking for the most scenic snorkeling spots in this region these should be on your list: LBTS Reef – One of Florida’s most famous shore snorkeling spots located just off the beach. Swim out a few hundred feet to explore the reef teeming with tropical fish lobsters and even the occasional sea turtle. Anglin’s Pier Reef – A popular spot for viewing stingrays parrotfish and barracudas near the Anglin’s Fishing Pier. The Nursery Reef – A fantastic offshore snorkeling location where you can observe juvenile fish and small reef sharks. Vista Park Reef – Located in Ft. Lauderdale this reef is reachable by a short swim from shore and is home to a diverse array of marine life. Hollywood North Beach Park – A scenic beach with convenient snorkeling access and a rich ecosystem just offshore. Tips for a Safe and Enjoyable Snorkeling Experience Practice in shallow waters first to get comfortable with your gear. Use defogging techniques like applying baby shampoo or anti-fog spray on your mask. Float and relax to preserve energy and prevent panicking. Respect marine life by not touching corals or harassing wildlife. Check weather conditions to verify safe snorkeling opportunities with calm waters. Use a dive flag when snorkeling offshore to alert nearby vessels to your presence. The Health Benefits of Snorkeling Snorkeling in this area isn’t just enjoyable; it also offers several health benefits: Improves cardiovascular health by boosting heart and lung function. Strengthens muscles in the legs core and arms due to natural resistance training. Reduces stress by immersing you in a tranquil natural environment. Conclusion Snorkeling in Ft. Lauderdale and LBTS is an exciting way to immerse yourself in the wonders of the ocean whether youre visiting this beautiful region or call this place home. With easy access to picturesque reefs and abundant marine life its a ideal experience for marine life admirers and thrill-seekers. By equipping yourself with the right essentials choosing highly recommended snorkeling spots and following crucial safety tips you can make the most of your subaquatic explorations. So grab your snorkel gear and get ready to dive into an once-in-a-lifetime experience right off the shores of Ft. Lauderdaleexciting way to explore the wonders of the ocean whether youre vacationing in South Florida or are a local. With easy access to breathtaking reefs and abundant marine life its a perfect activity for nature lovers and thrill-seekers. By bringing the right equipment choosing top snorkeling destinations and following essential safety tips you can make the most of your underwater adventures. So grab your snorkel gear and get ready to immerse yourself in an unforgettable experience right off the shores of Ft. Lauderdale Best paddleboard rental service in Fort Lauderdale with flexible hours Most scenic paddleboarding routes near South Florida 50ca045
Столица ночью не спит а наша команда аналогично всегда на страже: эксклюзивная центр лечения алкоголизма клиника mcnl.ru доступна 24/7. Без очередей и формальностей — выезд нарколога по вашему звонку щадящий детокс под седацией ультрабыстрая капельница психологическая поддержка на дому бессрочное сопровождение. Тихо анонимно эффективно — вернем вам трезвость без боли.
https://frasesmotivacional.com/
кайтсёрфинг Безопасность – это приоритет номер один в кайтсёрфинге. Всегда проверяйте оборудование следите за прогнозом погоды и не выходите на воду если не уверены в своих силах.
https://shorturl.fm/I0D7E
https://shorturl.fm/HklUS
https://shorturl.fm/romnM
https://shorturl.fm/312Jf
https://shorturl.fm/hd8QV
кайт Трюки в кайтсерфинге: от простых к сложным
http://ilianicolaevichzavialov.ru/
https://shorturl.fm/SKVbR
Fabulous what a weblog it is This blog presents useful facts to us keep it up. big ass porno
I loved as much as you will receive carried out right here. The sketch is attractive your authored material stylish. nonetheless you command get bought an impatience over that you wish be delivering the following. unwell unquestionably come further formerly again since exactly the same nearly very often inside case you shield this hike. Luxury limo near me
доставка морем из Китая Авиаперевозки из Китая – самый быстрый но и самый дорогой способ доставки. Он идеально подходит для срочных заказов ценных или скоропортящихся товаров. Необходимо учитывать таможенные сборы и требования а также правильно упаковать груз чтобы обеспечить его безопасность во время транспортировки. Скорость доставки компенсируется более высокой ценой. Авиация – выбор для тех кому важна скорость.
https://shorturl.fm/qvZqo
Металлическая мебель Офисная мебель в Москве от производителя: гарантия качества и индивидуальный подход. Забудьте о переплатах и ненадежных поставщиках. Мы предлагаем широкий выбор мебели напрямую от производителя с возможностью индивидуальной разработки. Создайте уникальный офис отражающий идентичность вашей компании.
https://shorturl.fm/7WDeo
https://shorturl.fm/9M701
https://shorturl.fm/GzXlX
Химчистка мебели ростов
внутренняя реклама wildberries создание логотипа для wildberries магазина Логотип должен быть запоминающимся и отражать суть вашего бренда.
https://shorturl.fm/g7gtD
каркасные дома Каркасные дома с панорамными окнами: современный дизайн и прекрасный вид. Особенности конструкции выбор окон советы по дизайну.
стеклянная перегородка в душевую Стеклянные перегородки в квартирах: создание стильного и функционального интерьера. Разделение зон визуальное расширение пространства и улучшение освещенности.
тепловизор гайд guide teplovizor ru противоосколочный жилет Противоосколочный жилет – необходимый элемент индивидуальной защиты. Он предназначен для защиты жизненно важных органов от осколков и рикошетов. При выборе жилета обращайте внимание на класс защиты вес и удобство ношения.
Novyny
https://servicestat.ru/service-krd Servicestat.ru — это удобный каталог-рейтинг сервисных центров по ремонту электроники. На сайте собраны контакты адреса телефоны отзывы клиентов акции и скидки а также оценки качества услуг. Пользователи могут быстро найти проверенные мастерские в своем городе сравнить рейтинги и выбрать лучший вариант. Полезен для тех кто хочет отдать технику в надежные руки. ? Поиск сервисов по местоположению и брендам ? Реальные отзывы и оценки клиентов ? Акции скидки и спецпредложения ? Удобный фильтр для сравнения услуг Идеальный помощник в поиске надежного ремонта
https://shorturl.fm/J1koR
https://shorturl.fm/Yxdv7
https://shorturl.fm/Ah4m5
Cryptocurrency Payments Bazaar Drugs Marketplace: A New Darknet Platform with Dual Access Bazaar Drugs Marketplace is a new darknet marketplace rapidly gaining popularity among users interested in purchasing pharmaceuticals. Trading is conducted via the Tor Network ensuring a high level of privacy and data protection. However what sets this platform apart is its dual access: it is available both through an onion domain and a standard clearnet website making it more convenient and visible compared to competitors. The marketplace offers a wide range of pharmaceuticals including amphetamines ketamine cannabis as well as prescription drugs such as alprazolam and diazepam. This variety appeals to both beginners and experienced buyers. All transactions on the platform are carried out using cryptocurrency payments ensuring anonymity and security. In summary Bazaar represents a modern darknet marketplace that combines convenience a broad product selection and a high level of privacy making it a notable player in the darknet economy.
https://shorturl.fm/IhJSS
кайт Обучение кайтсёрфингу
https://shorturl.fm/x9k71
Если вы давно мечтаете изучать психологию онлайн но не знаете с чего начать — рекомендую обратить внимание на ILM Академию. Это современная платформа где можно пройти курс по психологии с дипломом без отрыва от работы или семьи. Программа идеально подойдёт новичкам: всё объясняется простым языком много практики и живых встреч с преподавателями. В конце обучения вы получите европейский диплом который ценится и в Украине и за её пределами. Отличный выбор для тех кто хочет начать карьеру в психологии или лучше понять себя и окружающих. Вариант второй текста: Хочешь получить профессию психолога не выходя из дома? ILM Академия — это современное онлайн-обучение психологии с упором на практику и живое общение с опытными преподавателями. Обучение доступно из любой точки мира Подходит для начинающих — всё с нуля Практика супервизии и поддержка кураторов Европейский диплом после окончания курса Ты сможешь освоить профессию понять людей глубже и возможно даже изменить свою жизнь. Подробнее о курсе на официальном сайте: ILM Академия психологии курсы психологии онлайн с сертификатом
обучение кайтсёрфингу Уход за кайтом: чистка хранение и мелкий ремонт
https://shorturl.fm/uSfJc
https://shorturl.fm/8sHD3
https://shorturl.fm/JlPuy
https://shorturl.fm/vh9MC
[url=https://paulinadreamteam.ru]Психолог онлайн[/url]
https://shorturl.fm/JIxXM
Драгон Мани Dragon Money – это не просто название это врата в мир безграничных возможностей и захватывающих азартных приключений. Это не просто платформа это целая вселенная где переплетаются традиции вековых казино и новейшие цифровые технологии создавая уникальный опыт для каждого искателя удачи. В современном мире где финансовые потоки мчатся со скоростью света Dragon Money предлагает глоток свежего воздуха – пространство где правила просты а возможности безграничны. Здесь каждая ставка – это шанс каждый спин – это предвкушение победы а каждый выигрыш – это подтверждение вашей удачи. Но Dragon Money – это не только про выигрыши и джекпоты. Это про сообщество единомышленников объединенных общим стремлением к риску азарту и адреналину. Это место где можно найти новых друзей поделиться опытом и ощутить неповторимый дух товарищества. Мы твердо верим что безопасность и честность – это фундамент на котором строится доверие. Именно поэтому Dragon Money уделяет особое внимание защите данных и обеспечению прозрачности каждой транзакции. Мы стремимся создать максимально комфортную и безопасную среду для наших игроков где каждый может наслаждаться игрой не беспокоясь о каких-либо рисках. Dragon Money – это не просто игра. Это возможность испытать себя проверить свою удачу и почувствовать себя настоящим властелином своей судьбы. Присоединяйтесь к нам и пусть дракон принесет вам богатство успех и процветание Да пребудет с вами удача
https://pcpro100.info/
I blog frequently and I genuinely thank you for your information. The article has really peaked my interest. Im going to bookmark your blog and keep checking for new information about once a week. I subscribed to your RSS feed as well. https://maps.google.ba/url?q=https://premierlimousineservice.net
обучение кайтсёрфингу Кайт лагерь: активный отдых и кайтсёрфинг нон-стоп. Кайт лагерь – это возможность совместить обучение кайтсёрфингу с веселой компанией яркими вечеринками и незабываемыми приключениями.
https://theshaderoom.com/
https://shorturl.fm/FmnuU
обучение кайтсёрфингу Почувствуй ветер: Как выбрать кайт под свой уровень и стиль чтобы не облажаться на споте
Do you have any video of that? Id like to find out more details. https://www.google.co.ls/url?q=https://seattlelimorates.com/
https://shorturl.fm/SMMRw
Lopesan Costa Bavaro Airport Shuttle The Lopesan Costa Bavaro Airport Shuttle is a private direct transfer for groups of up to six ensuring no stops or delays with other passengers. Distance from Lopesan Costa Bavaro Resort to Punta Cana Airport How far is Lopesan Costa Bavaro from airport? how far is lopesan costa bavaro from airport The Lopesan Costa Bavaro Resort Spa & Casino is approximately 10.9 miles 18 km from Punta Cana International Airport PUJ. The drive typically takes about 17-30 minutes depending on traffic conditions.
Lopesan Costa Bavaro Airport Shuttle The Lopesan Costa Bavaro Airport Shuttle lopesan costa bavaro to airport is a private direct transfer for groups of up to six ensuring no stops or delays with other passengers. Distance from Lopesan Costa Bavaro Resort to Punta Cana Airport How far is Lopesan Costa Bavaro from airport? The Lopesan Costa Bavaro Resort Spa & Casino is approximately 10.9 miles 18 km from Punta Cana International Airport PUJ. The drive typically takes about 17-30 minutes depending on traffic conditions.
Hello excellent blog Does running a blog like this require a lot of work? I have virtually no knowledge of computer programming but I had been hoping to start my own blog in the near future. Anyways if you have any ideas or tips for new blog owners please share. I know this is off subject nevertheless I simply wanted to ask. Appreciate it порно рассказы
Whats up mates how is the whole thing and what you want to say concerning this article in my view its actually amazing designed for me. https://maps.google.com.jm/url?q=https://seattlelimorates.com/
https://shorturl.fm/46Z2G
кайт школа Кайт
https://shorturl.fm/s1BDm
https://shorturl.fm/mO7L5
кайт школа Сноукайтинг: кайтинг на лыжах или сноуборде – техника и безопасность
https://shorturl.fm/AtuF8
Hi friend!
Check this out – [url=https://digitalroulette.cfd/]join now digital roulette win real money[/url]
Enjoy your game!
https://shorturl.fm/FTuhR
Whats up to every for the reason that I am actually eager of reading this web sites post to be updated regularly. It carries pleasant material. https://tennis-club.kiev.ua/chomu-poliruvannya-ne-zamina-skla-fary.html
кайт лагерь Кайт школа: ваш путь к мастерству. Профессиональные инструкторы безопасное обучение и индивидуальный подход. Станьте уверенным кайтсёрфером
[url=https://chimmed.ru/products/drossnpa520726f-each-id=434097]dros.snpa520726f each – купить онлайн в интернет-магазине химмед [/url]
Tegs: [u]ethyl 5 chloro 8 methyl 4 oxo 1, 4 dihydroquinoline 3 carboxylate – купить онлайн в интернет-магазине химмед [/u]
[i]ethyl 5 chloro 8 methyl 4 oxo 1, 4 dihydroquinoline 3 carboxylate – купить онлайн в интернет-магазине химмед [/i]
[b]ethyl 5 chloromethyl isoxazole 3 carboxylate – купить онлайн в интернет-магазине химмед [/b]
drostanolone enanthate – купить онлайн в интернет-магазине химмед https://chimmed.ru/products/drostanolone-enanthate-id=4951406
кайт Кайтсёрфинг оборудование – это инвестиция в вашу безопасность и комфорт. Выбирайте качественные кайты доски и трапеции соответствующие вашему уровню подготовки и стилю катания.
Thank you for any other informative site. The place else may just I get that type of information written in such an ideal way? Ive a challenge that I am just now operating on and Ive been on the glance out for such info. spin city kasyno
What’s up!
Read the link – [url=https://blackjackstrategy.cfd/]blackjack strategy to always easily win[/url]
Have a great day!
https://dtf.ru/id2915936/3931207-promt-dlya-sozdaniya-patcha-iz-kartinki-dlya-odezhdy
обучение кайтсёрфингу Погодные условия играют ключевую роль в кайтсёрфинге. Следите за прогнозом ветра ищите споты с подходящими условиями и не рискуйте в плохую погоду.
проститутки Макеевка Проститутки Макеевка: Досуг на любой вкус. Широкий выбор анкет фото и видео. Звони и выбирай
code promo 1xbet pres de cocody abidjan
Good day Do you know if they make any plugins to safeguard against hackers? Im kinda paranoid about losing everything Ive worked hard on. Any suggestions? vermox capsule 100mg pregnancy
https://shorturl.fm/n1yIN
https://shorturl.fm/9ycRF
t.me/wine_it
подписчики тт Привлечение участников в группу ВКонтакте: эффективные стратегии. Контент-планирование и продвижение группы для роста. подписчики тик ток
Лазерная гравировка 3D печать революционизирует производство предоставляя беспрецедентную гибкость и скорость создания объектов. От прототипирования до кастомизированных изделий эта технология открывает новые горизонты для дизайнеров и инженеров. Выбор материалов огромен: от пластиков до металлов что позволяет создавать детали с различными свойствами.
кайт лагерь Соревнования по кайтсерфингу: мировые туры и чемпионаты
кайт Кайтсёрфинг – это комьюнити где люди разных возрастов и профессий объединены общей страстью к приключениям и адреналину. Найдите своих единомышленников путешествуйте вместе и делитесь опытом.
https://possible11.com
warface аккаунты Все очень просто рекомендую аккаунты варфейс купить без проблем
https://shorturl.fm/ZjAxC
индивидуалки донецк днр Запрос шлюхи Донецк – грубый но отражает реальность. Важно помнить что за этим словом стоят живые люди попавшие в трудную ситуацию.
https://shorturl.fm/dEhpP
кайт школа Кайтинг
кайтинг Оберег смелости: трапеция защита комфорт словно объятия матери оберегающей от невзгод.
https://shorturl.fm/CQkMc
кайтинг Обучение кайтсёрфингу: от новичка до профи
Thanks for another wonderful article. Where else may anybody get that type of information in such a perfect means of writing? I have a presentation subsequent week and Im on the search for such info. buy doxycycline 200 mg online
https://sukkaphap-d.com
https://www.sfrcollege.edu.in/vendor/pgs/?1xbet_promo_code___welcome_bonus_130.html
https://primiumpoppypods.com/pages/1xbet_promo_code___welcome-bonus.html
обучение кайтсёрфингу Кайтсёрфинг споты: лучшие места для катания. Откройте для себя новые локации с идеальным ветром и волнами.
https://www.businesslist.pk
https://l-w.jp
https://cascadeclimbers.com
https://shorturl.fm/N2JCJ
https://thermo-up.com/contract/pgs/1xbet_promokod_na_segodnya_besplatno.html
кайтинг Кайт школа
кайтсёрфинг Кайтсерфинг в Египте: Хургада Дахаб
кайтсёрфинг Кайтсёрфинг трюки: от простого к сложному. Освойте базовые трюки и двигайтесь к новым высотам.
обучение кайтсёрфингу Маврикий – мечта: Ле Морн: кайтсерфинг на Маврикии
обучение кайтсёрфингу Кайтсёрфинг для начинающих: первый шаг к покорению стихии. Советы рекомендации и необходимое оборудование для новичков.
https://shorturl.fm/MEvvw
Can I simply say what a comfort to uncover a person that truly knows what theyre discussing on the net. You actually realize how to bring an issue to light and make it important. More and more people have to look at this and understand this side of the story. I cant believe youre not more popular given that you surely have the gift. https://maps.google.lv/url?q=https://premierlimousineservice.net
туры с экскурсиями и проживанием
https://shorturl.fm/TezWo
https://www.jec.qa/
Gözəl gün!!
Bu linkə keçin – [url=https://casinofreebets.cfd]Й™n yaxЕџД± onlayn kazino indi pulsuz[/url]
Uğurlar olsun!
https://www.feldbahn-ffm.de/
ремонт холодильников гарантия Наш сервисный центр оснащен всем необходимым для проведения качественной диагностики и ремонта стиральных машин любой сложности.
https://shorturl.fm/Hq6rV
проститутки донецка Проститутки Киевский район: Услуги проституток в Киевском районе Донецка.
code promo 1xbet de Use 1xBET promo code 2025: GO333 for VIP bonuses – 130 up to €150 sportsbook offer plus up to €1950 150 free spins for casino games. 1xBET launches an exciting offer for new registrants this year. This bonus is only for new customers aged 18. Sports offers need 5x-10x betting on accumulators with 3 or more events with odds of 1.40 or higher within 30 days. Use the 1xBet official promo code 2025: GO333. By using this bonus code while registering on the 1xBet platform you will be awarded an exclusive 100 bonus of up to 130€/ for sports. Use it for sports wagering. To activate this offer create an account on 1xBet and use the code when prompted for a code. See details at 1xBet to ensure compliance.
https://shorturl.fm/KVcGX
Агропартнер су новые агро объявления: Свежие агро объявления: не пропустите выгодные предложения.
биткоин
https://shorturl.fm/cFup4
https://shorturl.fm/cFup4
https://shorturl.fm/Y6tnH
https://bet88ku.com/keo-nha-cai-va-cach-doc-keo/#comment-183699
стиральная машина не сливает воду ремонт стиральных машин indesit wise: Ремонт стиральных машин Indesit Wise с выездом на дом.
https://shorturl.fm/Zjpoc
hollywood mobile login
Как только начал играть — сразу почувствовал волну. Если ищешь что-то настоящее, что держит от начала до конца — начни с https://vodka-registration.site. Можно играть хоть с утра до ночи. Тут главное — динамика и отдача. Промокоды придают игре вкус. Игры продуманы до деталей. Бонусы не просто на словах — они реально работают. Выплаты приходят стабильно, это главное. Кто не рискует — тот не выигрывает. А здесь рискуют с удовольствием.
beteum bet
yes play bonus
bogdanmtgyio@gmail.com
https://www.trub-prom.com/catalog/truby_neftyanye/ российские производители труб: Обзор российских производителей труб: рейтинг продукция контакты.
https://m-bs2best.at
blood suckers how to play
Теннис теннисные прогнозы Прогнозы на спорт: Анализ и стратегии для успешных ставок. Прогноз: Как правильно анализировать спортивные события для успешных ставок. Прогноз прогноз: Ежедневные прогнозы от экспертов повышающие шансы на выигрыш. Прогноз на: Прогнозы на футбол хоккей баскетбол и другие виды спорта. Ставки: Руководство по ставкам на спорт для начинающих и опытных игроков. Ставка: Как сделать ставку и не проиграть: советы и стратегии. Ставки на спорт: Обзор букмекерских контор бонусы и акции. Спорт: Анализ спортивных событий новости результаты. Спортивный: Спортивный анализ и прогнозы: секреты успешных ставок. Беттинг: Беттинг как способ заработка: стратегии риски и возможности. Букмекер: Как выбрать букмекера: рейтинг лучших букмекерских контор. Букмекерские конторы: Букмекерские конторы: сравнение коэффициентов и линий. БК: Обзор популярных БК: бонусы акции выплаты. Тотал: Что такое тотал и как делать ставки на тотал больше/меньше. Тотал больше: Стратегии ставок на ТБ: как найти прибыльные варианты. Тотал меньше: Как анализировать матчи для ставок на ТМ. ТБ: Расшифровка ТБ и примеры ставок на тотал больше. ТМ: Что означает ТМ и как делать ставки на тотал меньше. Фора: Фора в ставках: объяснение примеры и стратегии. Фора минус: Как работает фора минус и когда ее использовать. Фора плюс: Стратегии ставок с форой плюс для увеличения шансов на выигрыш. Ф1: Что означает Ф1 и как делать ставки на победу первой команды с форой. Ф2: Как использовать Ф2 в ставках и понимать значение форы для второй команды. Исход: Анализ исхода матча: победа ничья поражение. Победа: Стратегии ставок на победу: факторы влияющие на результат. Ничья: Когда стоит ставить на ничью и как анализировать вероятность ничейного исхода. П1: Что такое П1 и как делать ставки на победу первой команды. П2: Как использовать П2 в ставках и анализировать шансы второй команды на победу. Х: Х в ставках: что означает ничья и как ее предсказать. Кэф: Как формируется коэффициент и как его использовать в ставках. Коэффициент: Анализ коэффициентов: как найти валуйные ставки. Коэффициент на: Коэффициенты на спорт: сравнение предложений разных букмекеров. VIP: VIP прогнозы: стоит ли покупать платные прогнозы. Вип прогнозы: Преимущества и недостатки VIP прогнозов от капперов. Платные прогнозы: Анализ эффективности платных прогнозов на спорт. Каппер: Кто такой каппер и как выбрать надежного консультанта. Экспресс: Как составлять экспрессы и увеличить шансы на выигрыш. Паровоз: Что такое паровоз и почему не стоит злоупотреблять экспресс ставками. Система: Ставка системой: как рассчитать выигрыш и минимизировать риски. Ординар: Преимущества и недостатки ставок ординарами. Одиночная ставка: Как правильно делать одиночные ставки и выбирать наиболее вероятные исходы. Сингл: Сингл в ставках: простота и надежность основа успешной стратегии. Лайв прогнозы: Как делать ставки в лайве и использовать прогнозы в реальном времени. Лайв: Стратегии для успешных ставок в режиме лайв. Live: Live ставки: анализ матча вЛайв прогнозы лайв live: Преимущества и недостатки лайв-ставок как правильно анализировать матч в реальном времени. Футбол: Анализ футбольных матчей стратегии ставок обзоры чемпионатов. Футбольные прогнозы: Ежедневные футбольные прогнозы от экспертов. Хоккей: Хоккейные ставки: как анализировать матчи и делать выигрышные прогнозы. Хоккейные прогнозы: Прогнозы на хоккейные матчи КХЛ НХЛ и других лиг. Баскетбол: Ставки на баскетбол: как учитывать статистику и особенности игры. Баскетбольные прогнозы: Прогнозы на матчи NBA Евролиги и других баскетбольных турниров. Теннис: Теннисные ставки: анализ покрытия формы игроков и других факторов. Теннисные прогнозы: Прогнозы на теннисные турниры Grand Slam ATP и WTA. Волейбол: Стратегии ставок на волейбол как учитывать расстановку и тактику команд. Волейбольные прогнозы: Прогнозы на волейбольные матчи Лиги чемпионов и других турниров. Киберспорт: Беттинг на киберспорт: как ставить на Dota 2 CS:GO и другие игры. Кибер: Анализ киберспортивных матчей стратегии ставок и прогнозы. Esports: Руководство по ставкам на Esports для начинающих. Прогнозы на киберспорт: Ежедневные прогнозы на киберспортивные события. Бокс/MMA/UFC: Ставки на бокс и MMA: как анализировать бойцов и выбирать победителя. Единоборства: Анализ поединков в единоборствах: подготовка бойцов тактика статистика. Анализ букмекерских ошибок: Как находить ошибки в линиях букмекеров и использовать их в свою пользу. Психология ставок: Как контролировать эмоции и принимать рациональные решения в беттинге. Управление банкроллом: Как правильно управлять своим банкроллом чтобы не проиграть все деньги сразу. Стратегии ставок на фаворитов: Как ставить на фаворитов и получать стабильную прибыль. Стратегии ставок на аутсайдеров: Когда стоит ставить на аутсайдеров и как найти выгодные варианты. Виды тоталов в футболе: Индивидуальный тотал азиатский тотал тотал по таймам. Виды фор в баскетболе: Азиатская фора европейская фора фора по четвертям.
tripscan войти трипскан вин: Путешествуйте с умом и выигрывайте с Tripscan. Мы помогаем вам находить лучшие предложения и экономить деньги.
wild swarm rtp
https://abs2best.at
blood suckers slot game
https://shorturl.fm/nxXEj
ёлка с доставкой в Нижневартовск Ёлка сосна купить Нижневартовск: Пушистая красавица для новогоднего настроения Сосна отличается пышной кроной и длинными иголками создавая ощущение настоящей лесной сказки в доме.
dragon money промокод Как правильно управлять банкроллом и выводить выигрыши на Dragon Money. Советы и рекомендации по финансовому планированию. Dragon Money: мир развлечений и возможностей
https://bsme-at.at
https://bs2besd.cc
https://shorturl.fm/NjMwb
https://bs2vveb.at
https://m-bs2best.at
Keep on working great job Confronto farmacie affidabili
chiken road
bgaming aviamasters
lottostar register
Thanks for sharing useful and clear home care advice. Many people hesitate to start repairs, but posts like this encourage action by breaking down steps. I recently applied some [url=https://domo-remonjo.ru/]basic maintenance tips[/url] that worked well with this content, improving my home’s condition.
https://bs2beast.cc
Услуги интернет маркетолога Услуги интернет маркетолога: Ключ к успеху в цифровой эпохе В эпоху интернета где львиная доля бизнеса перешла в онлайн услуги интернет-маркетолога становятся критически важными. SEO-оптимизация контент-маркетинг SMM email-маркетинг – лишь малая часть инструментов с помощью которых он помогает бизнесу найти свою аудиторию и увеличить продажи.
https://b2best.at
https://bs-bsme.at
https://bs2bet.at
консультации маркетинг Частный маркетолог услуги В отличие от работы с крупным агентством сотрудничество с частным маркетологом предоставляет ряд преимуществ. Это более гибкий и персонализированный подход более тесное взаимодействие и возможность оперативно реагировать на изменения рынка. Частный маркетолог как правило глубже погружается в специфику вашего бизнеса что позволяет ему разрабатывать более эффективные и адресные стратегии продвижения.
https://chickenroad-2.it.com/
sunbet welcome bous
https://shorturl.fm/uDdxJ
https://bs2bsme.at
https://bsme-at.at
Tripscan зеркало Tripscan войти – это значит присоединиться к сообществу единомышленников где каждый может поделиться своим опытом и получить поддержку. Tripscan win – это не просто выигрыш это признание вашего мастерства и удачи. Tripscan личный кабинет – это ваш персональный центр управления где вы можете контролировать свои достижения настраивать параметры безопасности и получать эксклюзивные предложения. Tripskan и Tripscan зеркало гарантируют бесперебойный доступ к платформе независимо от внешних обстоятельств.
Трипскан Tripscan: Tripscan top: узнайте о самых популярных направлениях и предложениях. Вдохновляйтесь и путешествуйте
https://bsmc.at
Thanks for sharing such clear and accessible home improvement advice. Many people avoid repairs because they seem too difficult, but this post makes the process straightforward. I combined this with some [url=https://domo-remonjo.ru/]helpful DIY strategies[/url] that helped me successfully complete a few tasks.
code promo gratuit 1xbet
promo code 1xbet
https://bs2vveb.at
https://shorturl.fm/ccrm1
https://abs2best.at
https://b2best.at
ламинирование бровей севастополь Оформление бровей Севастополь
https://bsmc.at
Ankaradaki guncel olaylar Gunluk Burc Yorumu: Y?ld?zlar Ne Soyluyor? Burc yorumlar? bircok insan icin gunluk yasam?n eglenceli bir parcas?. Gunluk burc yorumlar? y?ld?zlar?n hareketlerine gore kisisel ozellikler ve olas? olaylar hakk?nda ipuclar? sunuyor. Kimi insanlar icin sadece eglence kaynag? olsa da kimileri icin yol gosterici olabiliyor.
tripscan зеркало
http://legend.seaward.ru/tools/pages/?bk_betwinner_promokod_pri_registracii_2020.html
https://bs2beast.cc
https://blockchair.com/ru/bitcoin/transaction/f9e3f8aac40a635492b42fe8c564820b50a6ee8e884eea0a8af8dd3382504876
casino verde
winpot
https://b2best.at
Finding your way about the todays Social Security Disability application system may be a daunting task for some. The procedure may be complex and time-consuming, therefore the odds of getting dismissed are increased. This is when a social security disability lawyer is available in. A legal professional will allow you to navigate the application form process, raise your odds of becoming approved, as well as appeal a denied claim. In this essay, we’re going to explore 5 various subject areas associated with the position of a social security disability attorney.
Trying to find your way around the Social Security Disability application procedure by using a legal professional
The social security disability application process may be perplexing and also complicated. A legal professional will allow you to comprehend the requirements and make suggestions through the method. They could also allow you to gather the necessary medical-related facts and certification to aid your very own request. They are able to also help out with prepping one for the case, if required.
The necessity of health related data in a Social Security Disability claim
Medical evidence is essential in a social security disability claim. It really is utilized to show that you maintain a medical condition that prevents you against doing work. Legal counsel will allow you to assemble the mandatory medical information and provide it in a manner that is probably to be authorized because of the social security organisation. They could also allow you to obtain medical records as well as other documentation that support your claim.
Frequent wrong ideas up to Social Security Disability and exactly how a legal professional can really help
There are lots of misguided beliefs more than social security disability. For instance, lots of people think that only those who are permanently disabled are qualified to receive benefits. Then again, it is not true. A lawyer will allow you to comprehend the eligibility requirements and dispel any misconceptions you might have. They are able to also provide assistance with simple tips to present your case when you look at the most favorable light.
The appeals procedure for dismissed Social Security Disability scenarios and just how a legal professional can help
In case the claim is denied, there is the straight to appeal. A lawyer will allow you to comprehend the appeals procedure and serve you through the hearing. They are able to also assist you to gather additional evidence and improve a stronger case to boost your odds of winning.
How to pick the best Social Security Disability legal practitioner for the case
It is critical to choose a legal professional who has got working experience managing social security disability matters. Try to find a lawyer who is knowledgeable about the social security administration’s guidelines and processes. It’s also advisable to feel comfortable chatting with them and trust their judgment. Try to find legal counsel who are able to give apparent and truthful suggestions to your questions and offer guidance all through the method.
In summary, a social security disability solicitor can play a crucial role when you look at the application and appeals process. They can help you traverse the procedure, raise your likelihood of getting sanctioned, and appeal a refuted claim. Legal counsel will also help you realize the qualifications criteria and run off any wrong ideas you have. You need to choose a lawyer who may have experience dealing with social security disability matters, and with whom you feel at ease communicating.
If you want to gain knowledge of more about this idea matter have a look at the ssa lawyer firm internet site:
[url=https://elpasodisabilitylawyer.com/][color=#000_url]top disability lawyers in Albuquerque[/color][/url]
https://bs2-bs2site.at
https://shorturl.fm/aIhZq
https://abs2best.at
Elevating Real Estate Worth Through Renewing Roof Structures Ahead of ListingUpgrading roofs may notably boost the price of properties before putting on market. Interested clients often search for residences having recently updated or preserved roofing since they see such as an indicator of comprehensive maintenance and reduced future costs. An updated roofing can make a home more appealing and garner an increased offer during sale. Investing in roof replacement turns into a wise plan for property owners seeking to enhance their return on sale.For instance An landlord by the sea decides to replace their roofing before listing their property on the market. The modern roofing renders the house more desirable to purchasers leading to multiple offers and a higher closing price.For the purpose of illustration An estate holder recommends a client to upgrade their worn covering with updated supplies. The expenditure in roofing renewal pays off as the property sells rapidly and at a top value. Reliable roof repair services by Southport NC Picking the Optimal Roof Configuration ca045_8
The Ultimate Resource to Snorkeling in Ft. Lauderdale and Lauderdale-by-the-Sea Snorkeling in Ft. Lauderdale and Lauderdale-by-the-Sea is a must-try experience for locals and tourists alike. With warm crystal-clear waters colorful marine life and some of the most breathtaking shore snorkeling in Florida this area provides a unique opportunity to discover the underwater world. Whether youre a novice or an seasoned snorkeler understanding the best techniques locations and gear can enhance your experience. In this resource we’ll go over everything you need to know about snorkeling in Fort Lauderdale and LBTS so you can jump in with ease. Why Snorkeling in Ft. Lauderdale and LBTS is a Top Activity Unlike deep-sea diving snorkeling requires very little gear and preparation making it an easy and affordable way to experience Florida’s stunning ocean waters. The coral formations off the coast of Ft. Lauderdale and Lauderdale-by-the-Sea are teeming with tropical fish sea turtles and coral structures offering an unforgettable encounter. Plus with year-round warm temperatures and excellent visibility this region is a premier snorkeling location. Essential Snorkeling Gear Before heading out on your snorkeling adventure having the right gear is essential. Here’s what you need: Mask: A snug-fitting mask ensures clear vision beneath the surface. Opt for fog-resistant lenses for the best experience. Snorkel: A dry snorkel blocks water from getting in making airflow more comfortable. Fins: Fins allow you to glide smoothly through the water minimizing fatigue. Wetsuit or Rash Guard: Since Florida waters are warm most of the year a rash guard is often sufficient for protection against the sun and jellyfish stings. Top Snorkeling Spots in Ft. Lauderdale and LBTS If you’re looking for the most scenic snorkeling spots in South Florida these should be on your list: Lauderdale-by-the-Sea Reef – One of Florida’s top-rated shore snorkeling sites located just off the beach. Paddle out a few hundred feet to discover the reef packed with exotic marine life lobsters and even the rare sea turtle. Anglin’s Pier Reef – A popular spot for spotting stingrays parrotfish and barracudas near the Anglin’s Fishing Pier. The Nursery Reef – A ideal offshore snorkeling location where you can observe juvenile fish and small reef sharks. Vista Park Reef – Located in Fort Lauderdale this reef is reachable by a short swim from shore and is home to a diverse array of marine life. Hollywood North Beach Park – A scenic beach with convenient snorkeling access and a vibrant ecosystem just offshore. Tips for a Safe and Enjoyable Snorkeling Experience Practice in shallow waters first to get comfortable with your gear. Use defogging techniques like using baby shampoo or anti-fog spray on your mask. Float and relax to conserve energy and avoid panicking. Respect marine life by not touching corals or harassing wildlife. Check weather conditions to verify safe snorkeling conditions with calm waters. Use a dive flag when snorkeling offshore to alert nearby boaters to your presence. The Health Benefits of Snorkeling Snorkeling in this area isn’t just enjoyable; it also offers several health benefits: Improves cardiovascular health by boosting heart and lung function. Strengthens muscles in the legs core and arms due to water resistance. Reduces stress by immersing you in a peaceful natural environment. Final Thoughts Snorkeling in Fort Lauderdale and Lauderdale-by-the-Sea is an amazing way to explore the wonders of the ocean whether youre touring this coastal paradise or live here. With direct access to stunning reefs and thriving marine life its a must-try adventure for nature lovers and adventure seekers. By using the right gear choosing must-visit snorkeling spots and following key safety tips you can make the most of your oceanic adventures. So grab your snorkel gear and get ready to embrace an once-in-a-lifetime experience right off the shores of Fort Lauderdalethrilling way to experience the wonders of the ocean whether youre visiting this coastal paradise or are a local. With convenient entry to breathtaking reefs and diverse marine life its a perfect activity for outdoor enthusiasts and thrill-seekers. By bringing the right gear choosing top snorkeling destinations and following essential safety tips you can make the most of your underwater adventures. So grab your snorkel gear and get ready to dive into an unforgettable experience right off the shores of Ft. Lauderdale Underwater adventures in South Florida Safe for kids snorkeling experiences around Lauderdale Beach 0ca040_
https://bs-bsme.at
ремонт швейных машин телефон мастер по ремонту швейных машин
1с бухгалтерия облако цена аренда 1с в облаке цена
https://shorturl.fm/Audff
https://shorturl.fm/Jlgfd
https://shorturl.fm/95PEo
https://shorturl.fm/2fTiv
бровист севастополь Брови Симферополь – это профессиональный подход к созданию идеального образа доступный каждой женщине. Коррекция бровей Севастополь – важный шаг к совершенству. Сделать брови в Севастополе – это легко и удобно
Ценю, что статья сосредоточена на реальных жизненных ситуациях, а не абстрактных теориях. Всегда приятно читать что-то практичное. При чтении вспомнились [url=https://rjadom.ru/]надёжные решения для дома[/url], которые очень хорошо сочетаются с вашими рекомендациями. Будь то ремонт протекающего крана или организация пространства, разные источники полезной информации очень помогают.
уроки вокала куркино Школа музыки в Куркино – это место где мечты становятся реальностью. Мы поможем вам подготовиться к поступлению в музыкальный колледж или консерваторию а также просто научиться играть для себя и получать удовольствие от музыки.
Каршеринг Краснодар
нержавеющие перила цена Перила для лестницы из дерева – это экологически чистое и эстетичное решение которое создает атмосферу тепла и комфорта в доме. Дерево – это приятный на ощупь материал который не вызывает аллергии и хорошо сохраняет тепло.
casino bonus expert
итальянское вино И так далее до 150 статей.
Аренда авто Краснодар жд
где оформить визу в китай в новосибирске Виза в Китай в Новосибирске ближе к середине следующей декады: Планируем заранее. Время летит быстро и приближается тот год когда ваша мечта о путешествии в Китай станет реальностью. Заранее изучите требования к оформлению визы чтобы быть готовыми к подаче документов как только откроется окно возможностей.
Обучение недвижимости Обучение недвижимости: Инвестируйте в себя и получите максимальную отдачу. Вложения в образование – это самые выгодные инвестиции которые вы можете сделать в своей жизни. Обучение недвижимости поможет вам не только зарабатывать больше но и принимать более обоснованные решения избегать рисков и строить карьеру которая будет приносить вам удовлетворение и стабильный доход.
Прокат авто Краснодар жд
экскурсия казань Остров-Град Свияжск: Духовный Центр и Историческое Наследие Остров-град Свияжск – это уникальный исторический и культурный памятник расположенный на острове в месте слияния рек Свияги и Волги. Это место где история переплетается с духовностью где можно увидеть древние храмы и монастыри а также узнать о жизни и культуре русского народа. На острове расположены многочисленные памятники архитектуры включая Успенский собор Троицкую церковь и другие исторические здания. Вы сможете прогуляться по живописным улочкам насладиться красотой природы и почувствовать атмосферу умиротворения.
elekt_riki Электричество в умном доме: Комфорт и эффективность
academic essay writers Professional Essay Writing Services: Excellence Guaranteed We provide a range of professional essay writing services ensuring top-notch quality and adherence to deadlines. Rely on us for essays that make a lasting impact.
Онлайн курсы по недвижимости Онлайн курсы по недвижимости: Получите качественное образование в удобное для вас время и в любом месте. Современный мир предлагает гибкие решения для обучения. Онлайн курсы по недвижимости позволяют получить необходимые знания не выходя из дома или офиса и адаптировать обучение под свой личный график.
экскурсии по казани Благовещенский Собор: Величественный Памятник Православия Благовещенский собор – это один из старейших православных храмов Казани расположенный на территории Казанского Кремля. Он является важным памятником русской архитектуры и истории. Собор поражает своим величием и красотой. Вы можете посетить его чтобы прикоснуться к истории православия в Татарстане.
https://shorturl.fm/5nnGg
https://kazan.land/ Мечеть Кул-Шариф: Символ Возрождения и Духовности Мечеть Кул-Шариф – это главная мечеть Казани и одна из самых красивых мечетей в России. Она была построена в память о разрушенной мечети Казанского ханства и является символом возрождения татарской культуры и духовности. Мечеть поражает своей архитектурой и великолепием. Вы можете посетить ее чтобы узнать больше об исламе и татарской культуре.
https://shorturl.fm/2ZP5x
спросить юриста чат бесплатная юридическая консультация по интернету
Нужен вентилируемый фасад: https://podsistema-dlya-ventfasada.ru
Нужны пластиковые окна: пластиковые окна алматы
экскурсия казань Галерея Современного Искусства: Вдохновение и Новые Горизонты Галерея современного искусства – это место где представлены работы современных художников и скульпторов работающих в различных стилях и направлениях. Здесь можно увидеть произведения отражающие современные тенденции в искусстве а также принять участие в выставках и мастер-классах. Галерея поможет вам открыть для себя новые горизонты в искусстве и получить вдохновение.
Аренда авто в Краснодаре бизнес Прокат авто в Краснодаре: Оптимальное решение для любых задач Прокат авто в Краснодаре – ваш надежный помощник в решении деловых и личных задач предлагающий широкий выбор автомобилей на любой вкус и бюджет.
https://www.avito.ru/naberezhnye_chelny/predlozheniya_uslug/manikyur_pedikyur_sterilno_kofe_v_podarok_7532940513 Маникюр Челны: Современные Тенденции и Традиционное Качество В Челнах маникюр – это искусство где каждый мастер стремится к совершенству. Используются только высококачественные материалы и передовые технологии чтобы ваши ногти выглядели безупречно долгое время. Независимо от того предпочитаете ли вы строгий минимализм или яркий дизайн вы обязательно найдете то что вам по душе.
https://mulenpay.ru/ С помощью Mulen бизнес может организовать систему приема онлайн-платежей без лишних усилий.
тик ток мод на андроид последняя версия Тик Ток Мод на Андроид: Персонализация и адаптация под ваши нужды Тик Ток Мод на Андроид – это возможность настроить приложение в соответствии со своими личными предпочтениями и потребностями создав уникальную среду в которой ваше творчество будет раскрываться в полной мере.
https://igrozavod.ru/ Скачать игры с Яндекс Диска: Надежное хранилище ваших игровых сокровищ Яндекс Диск – это не просто облачное хранилище это ваш личный сейф где вы можете безопасно хранить свои любимые игры и делиться ими с друзьями. Удобный интерфейс высокая скорость загрузки и надежная защита от вирусов делают Яндекс Диск идеальным партнером для любого геймера.
донецк проститутки Проститутки в Донецке: Реальность военного времени Война часто приводит к ухудшению моральных норм и росту проституции.
Understanding Eye Movement Emotional Desensitization and Reprocessing the certification process: what insights on the journey in addition to criteria?
Embarking on the journey to become a certified EMDR (Eye Movement Sensory Desensitization and Reprocessing) therapist demands prudent consideration of the certification procedure and its associated specifications. This message board thread endeavors to present perspective into finding your way through the path to the point of Eye Movement Desensitizing and Reprocessing certification.
To start with and chiefly, keen EMDR therapy therapists ought to experience thorough training from an accredited Eye Movement Desensitizing and Reprocessing training center. These training regimens normally consist of both instructional coursework and supervised practical sessions, ensuring therapists foster the necessary abilities to engage in EMDR therapy effectively.
After the accomplishment of training, therapists are obligated to accrue a specified total of clinical hours carrying out EMDR treatment therapy under supervision. This hands-on practice is vital for honing medicinal skills and using EMDR therapy techniques in real-world settings.
Upon the training and clinical conditions are met, therapists can then pursue EMDR certification through organizations such as the EMDR International Association (EMDRIA). Certification involves submitting documentation of training and clinical experience, clearing an EMDR competency examination, and adhering to ethical guidelines set forth by the approving body.
While the certification system may appear to be daunting, attaining Eye Movement Emotional Desensitization and Reprocessing certification represents a remarkable milestone in a therapist’s career, demonstrating their commitment to delivering high-quality trauma-focused care to their clients.
[url=https://lkinstitute.com/]Adolescent mental health support[/url]
ffe73c1
https://kwikplay.ru/ Купить ПК: Разумный выбор в море предложений. Приобретение готового ПК – это компромисс между скоростью и индивидуальностью. Важно учитывать не только технические характеристики но и репутацию производителя гарантийные обязательства и возможность модернизации в будущем. Внимательно изучите отзывы сравните цены и убедитесь что выбранная модель соответствует вашим потребностям.
Гештальт терапевт Москва Психолог очно в Москве: Личный контакт для глубокой проработки проблем. Очные консультации с психологом в Москве – это возможность установить доверительные отношения с терапевтом и получить индивидуальный подход к решению ваших проблем. Личная встреча создает атмосферу безопасности и способствует более глубокой проработке сложных вопросов.
https://tenmoscow.ru/nabor-5-sht-salnik-baka-25h47_60h9_135-sf-zanussi-slb003zn-zn1002-10702902-kms003zn
Видит Бог кого наказывать люди никто
Запчасти для плиты ARDO C 604 Запчасти для мясорубок Vitek VT-1671W: Фарш без хлопот. Обновите вашу мясорубку заменив изношенные компоненты и она будет служить вам верой и правдой.
скачать игры без торрента Скачать игры с Яндекс Диска: Надежное хранилище ваших игровых сокровищ Яндекс Диск – это не просто облачное хранилище это ваш личный сейф где вы можете безопасно хранить свои любимые игры и делиться ими с друзьями. Удобный интерфейс высокая скорость загрузки и надежная защита от вирусов делают Яндекс Диск идеальным партнером для любого геймера.
shipping nyc delivery new york city
Amazing Its truly remarkable paragraph I have got much clear idea regarding from this paragraph. Cheap limo near me
Новости Украины https://gromrady.org.ua в реальном времени. Экономика политика общество культура происшествия и спорт. Всё самое важное и интересное на одном портале.
Современный автопортал https://automobile.kyiv.ua свежие новости сравнительные обзоры тесты автострахование и обслуживание. Полезная информация для водителей и покупателей.
Строительный сайт https://vitamax.dp.ua с полезными материалами о ремонте дизайне и современных технологиях. Обзоры стройматериалов инструкции по монтажу проекты домов и советы экспертов.
кто мы Здесь и сейчас: Единственная реальность которую мы можем контролировать. Цените каждый момент будьте благодарны за то что имеете и не позволяйте беспокойству о будущем омрачать настоящее.
raja999
I found this piece very useful because it focuses on beginner-friendly-to-understand solutions. Not everyone has the time or skills for complicated fixes, so posts like this make a real difference. Some [url=https://kotelinaya.ru/]living space improvement techniques[/url] I tried recently were simple but effective, similar to what’s described here. It’s encouraging to see hands-on guidance presented clearly.
Nice post. I learn something new and challenging on websites I stumbleupon every day. Its always interesting to read articles from other writers and practice a little something from their sites. https://atlantic-club.com.ua/chomu-sklo-fary-vplyvaye-na-blyzhnye-svitlo.html
freight company new york shipping new york
freight shipping nyc delivery new york
https://prometei.online/ the Best
Аффилейт покер Poker Agent — выгодная регистрация в покер-румах. Дополнительный рейкбэк эксклюзивные бонусы акции и VIP-преимущества. Подключайтесь к лучшим предложениям и играйте в покер с максимальной выгодой.
Hello everyone its my first go to see at this web page and post is genuinely fruitful in support of me keep up posting such content. https://www.iasi.org/chyste-svitlo-led-pered-halogenom
https://shorturl.fm/VZ3A8
Рабочие тетради и учебники по английскому языку для 5 класса на 2025-2026 год – Заказать и купить учебники и школьная литература: учебники рабочие тетради методические материалы и другая учебная литература по низким ценам с доставкой по Москве и в другие регионы России на сайте интернет-магазина
Hello to every body its my first visit of this webpage; this blog consists of awesome and truly fine stuff designed for visitors. http://blooms.com.ua/vybir-linz-dlya-avto-na-shcho-zvernuty-uvahu.html
студии во вторичке Московского района Казани Вторичка у метро Суконная слобода Казань: Исторический центр и квартиры с историей Вторичное жилье у метро Суконная слобода в Казани – это исторический центр и квартиры с историей.
Maintaining a living space doesn’t have to be complicated or expensive. This write-up breaks down hands-on steps anyone can take to keep things running smoothly. I not long ago discovered some [url=https://rja-dom.ru/]simple living space repair ideas[/url] that fit well with these tips and helped me avoid costly fixes. I believe adding such recommendations to everyday routines can make upkeep far less stressful and much more rewarding.
fingercheck
https://shorturl.fm/NocQ2
Hi Dear are you truly visiting this web page daily if so afterward you will definitely get pleasant knowledge. https://kacca.in.ua/Sklo-far-Vidguki-ta-rekomendatsiyi-vid-avtovlasniki.html
Zentrader is an online platform focused on binary options trading and has been gaining attention among Japanese traders. Its interface is designed to be simple and intuitive making it easy to use for beginners while also earning trust from experienced users. With a minimum trade amount starting from 500 yen it allows users to begin trading with lower risk. The platform offers full Japanese-language support so users can get help whenever they have questions or concerns. Withdrawals are processed quickly which contributes to high user satisfaction. Since trading can be done directly in the browser there’s no need to install any software and the platform is accessible even from smartphones. Overall the system is designed with simplicity and reliability in mind making it a great choice for those new to binary options. For more in-depth information and real user experiences check out the trusted investment resource locamaga.jp. It’s a helpful reference if youre considering using Zentrader.
Comprehending Why Materials Matter for Projects Selecting the correct materials for any undertaking is essential whether you are designing a home working on an outdoor space or just doing a small craft. The resources you pick will directly affect how durable your work will be and how reliable and appealing it appears to others. Various resources offer distinct benefits. For instance wood can offer a earthy atmosphere to areas while stone can contribute durability and style. When picking resources take into account how they will be utilized. Will they be open to the outdoors like sun? Some resources such as treated wood or certain types of plastic can survive tough elements better than others. Other resources might be more ideal for indoor use where they are protected from the elements. Another aspect to keep in mind is the expense. Sometimes the most high-cost element isn’t always the ideal choice for your project. Researching inexpensive resources that still deliver strength can help you stay within your spending while achieving the quality of your work. In conclusion don’t forget about green materials. Green components like recycled wood or bamboo are more popular as people seek ways to lower their effect on the planet. These materials not only assist the environment but can also bring your creation a special look. In short deciding on the right elements involves thinking about your needs the project’s demands and your spending. Making informed choices will allow your task to stand the test of time and appear beautiful. Maintenance stone steps. 0ca043_ Stair covers designed for external stairways
https://shorturl.fm/fPUEA
I found this piece very valuable because it focuses on beginner-friendly-to-understand solutions. Not everyone has the time or skills for complicated fixes, so posts like this make a real difference. Some [url=https://domo-graph.ru/]living space improvement techniques[/url] I tried recently were simple but practical, similar to what’s described here. It’s encouraging to see hands-on guidance presented clearly. I believe adding such suggestions to everyday routines can make upkeep far less stressful and much more rewarding. I find that sharing such experiences motivates others as well, making house care a more collective learning journey.
https://shorturl.fm/Ajlxb
Тикток мод 2025
оценка арендной ставки оценочная компания официальный сайт
оценка бизнеса компании оценочные компании оценка бизнеса
Последний мод на тик ток Тикток мод 2025 – это не просто модификация приложения это целая экосистема новых возможностей и функций разработанных для того чтобы сделать ваш опыт использования TikTok еще более захватывающим и интересным.
https://shorturl.fm/ZofGt
DeflationCoin – Invest in ecosystem with automatic value growth
Colleagues! Presenting a unique investment opportunity – DeflationCoin is raising Series A $1-6M to complete an ecosystem of 7 revenue-generating products. We’re not just making another token, but building a full entertainment conglomerate with its own currency.
Our model is brilliantly simple – each product (casino, premium dating, exchange, social network) generates profits in dollars, and 20% automatically goes to buying back our own tokens. This creates a closed growth loop: more users = more profits = more buybacks = higher token price = higher company valuation.
We’ve already shown proof-of-concept – token grew from $0.000001 to $0.31 on trading fees alone, with market cap reaching $6.58M. Now launching core products and expecting exponential growth. By investing now, you get equity in a company at $10M valuation that could grow to $1B+ in 3-5 years.
This is a rare case where a crypto project has clear revenue streams from proven industries – gambling, dating and finance always work. We’re simply bringing them to crypto with innovative tokenomics.
Inviting participation in the round before it closes.
[url=https://deflationcoin.com/?utm_source=forum]deflationcoin.com[/url]
перила из нержавейки Перила для лестницы из дерева – это сочетание традиций и современных технологий обеспечивающее прочность и долговечность.
Здравствуйте Долго анализировал как поднять сайт и свои проекты и нарастить CF cituation flow и узнал от крутых seo топовых ребят именно они разработали недорогой и главное буст прогон Хрумером – https://www.bing.com/search?q=bulletD0BFD180D0BED0B3D0BED0BD Прогон ссылок через Xrumer ускоряет рост DR. Программа массово размещает ссылки на форумах и блогах. Это экономит время и силы специалистов. Чем больше качественных ссылок тем выше позиции. Прогон ссылок через Xrumer – эффективный метод продвижения. онлайн сервис продвижения сайта seo продвижения в барнауле линкбилдинг план Ускоренный рост ссылочного профиля web разработки и продвижение сайтов сео отдела Удачи и роста в топах
vps server hosting vps hosting windows
tripscan Трипскан – это сообщество единомышленников где можно делиться своим опытом получать советы и находить новых друзей.
Welcome towards the exciting universe of chess! Even if you’re a novice just beginning or an experienced participant aiming to hone your competencies, there’s constantly something different to find out also uncover inside this traditional game. The chessboard is not just a pastime; it’s a workout for the brain that enhances problem-solving skills, boosts memory, & boosts critical thinking. Moreover, it is a superb approach to connect with others & push your skills.
If you’re new to the game, start by understanding the fundamentals. Understand how every unit functions also get used with the board. Do not worry if it seems overwhelming at first; every player starts somewhere. There exist numerous virtual lessons and applications to help you understand the fundamentals of the moves. The trick to getting better at the chessboard is playing as frequently as possible. Locate a nearby chess group or become part of digital networks to engage with different opponents. The more you play, the better you’ll comprehend different strategies also improve your skills
Observing matches by chess experts is a great way to study. Aim to comprehend why they perform specific actions also how they deal with diverse circumstances. A vital ability on the chessboard is strategizing in advance—predict your rival’s actions and arrange multiple moves ahead to keep the advantage. Keep relaxed during tension, particularly in competitions. Remember to have fun; the chessboard meant to be enjoyed, and each defeat is a chance to learn.
Join the vibrant chess community through clubs, forums, or events to improve your adventure. Discuss your stories, gain knowledge from fellow players, and build new relationships. The game of chess is an adventure with countless possibilities to understand and develop. So pick up your playing field, find an opponent, and enjoy the wonderful world of chess! Continue playing, stay studying, and essentially, keep enjoying!
[url=https://chessmaxacademy.com/6th-ave-nyc/winter-semester/]NYC checkers seminars Upper West Side Manhattan[/url]
[url=http://finppi.com/]Chessboard for Psychological Well-being and Therapeutic Benefits of the Game[/url] a044_60
https://www.med2.ru/story.php?id=147094
vps hosting server rental cheap vps hosting
тележка косметолога купить тумба для косметолога
https://sonturkhaber.com/
кресло для косметолога лампа лупа косметологическая цена
https://shorturl.fm/UeJkm
https://www.europneus.es/talleres/arcls/?gratuit_1xbet_code_promo_pour_aujourd_hui.html
бетон официальный сайт бетон прайс саратов
куб бетона цена саратов https://beton-saratov64.ru
https://www.med2.ru/story.php?id=147093
подобрать подшипник по размерам онлайн Приобретение промышленных подшипников BBCR – инвестиция в стабильную работу оборудования и длительный срок службы механизмов. Выбор проверенного поставщика – залог успеха вашего бизнеса.
https://shorturl.fm/62Wwj
http://alcosystems.se/wp-content/pages/1xbet_promo_code___welcome_bonus_code.html
https://www.grossarltal.at/artcls/?stily_modern_kak_oformity_gostinuyu.html
https://yil-edition.com/art/kleymo_na_mozge_2006_recenziya.html
Изготовитель подшипников Российский рынок предлагает широкий выбор поставщиков подшипников готовых предложить продукцию для различных отраслей промышленности.
https://bio.site/melbetpromocode2026
porno Г§inli tecavГјz
https://alquilerkaraokemurcia.es/inicio/camara
danny porno
https://instaconnect.co//create-blog/
[url=https://paulinadreamteam.ru]Психолог онлайн[/url]
сколько стоит собрать игровой компьютер 2025 цена : Сколько стоит собранный игровой ПК: Готовое решение.
https://service116.ru/
Делал тёплые полы — изучил сотни страниц форумов. То пишут «делайте стяжку 6 см» то «достаточно 3 см». После долгих поисков обнаружил сайт где собрали адекватные материалы: с действующими нормативами обсуждениями практиков минус лже-специалистов. Наконец разобрался как правильно Сайт
трипскан вход На Tripskan вы найдете вдохновение для новых путешествий полезные советы от опытных путешественников и подробную информацию о различных направлениях.
Its amazing designed for me to have a web site which is good in favor of my know-how. thanks admin Seattle area town car
https://shorturl.fm/3CwEn
https://medteh5.ru/forums/topic/kto-nibud-proboval-cardirin/
https://www.nkj.ru/forum/forum12/topic21202/messages/message415972/?result=new#message415972
https://разработка.site/
https://forum.marino-grad.ru/topic/5144-borba-s-gribkom/
Азия Роль Путина и Зеленского в урегулировании конфликта трудно переоценить. Политика требует от них взвешенных решений и умения находить компромиссы. СВО оказала серьезное влияние на мировую экономику. Финансы торговля инвестиции – все это оказалось под ударом.
Учебники и рабочие тетради для 10 класса
What strikes me is that reading through this post does a excellent job explaining how small fixes can prevent bigger issues down the line. it’s encouraging for anyone hesitant to start fixes. i also found some [url=https://domo-remonjo.ru/]practical upkeep strategies[/url] that complement these suggestions well, making residence care more manageable. it resonates with my own experience of how consistent, step‑by‑step improvements create a much more comfortable and reliable living space. i find that sharing such experiences motivates others as well, making house care a more collective learning journey. It gives me a chance to analyze things differently and maybe apply it in practice.
shane diesel porno
Certified Roofing Contractors in Wilmington NC
Dwelling near the coastline has many benefits: salty breezes, beautiful landscapes and the recognizable noise of breakers crashing on the coast are some of them. However, living in such areas also brings unique challenges: wind, showers and the constant salt-filled air can affect roofing causing drips, moisture penetration and potentially mold formation beneath slates, thus necessitating hiring an professional roofing expert in Wilmington NC to address these challenges properly. That is why maintaining access to trustworthy roofers in Wilmington North Carolina is crucial!
Roofers accredited with the State of NC can examine likely concerns and take precautionary actions to keep rooftops in good order – this could save expenses in fixes while providing a safer residential area or job site for residents or workers.
These firms specialize in house and business roof services such as steel roof installs, spray foam roofing applications, thermal roof coating jobs, roof covering repair methods, entire replacements of both residential and commercial roofs and maintenance tasks. Additionally, they can take care of fittings for HOAs to meet requirements.
Roof experts certified in Wilmington must carry liability and bonding coverage when performing roofing tasks at houses and companies, to safeguard property owners against potential harm that may occur during a task and guarantee their roofing system is fixed or renewed by qualified experts. Additionally, it aids the homeowner validate whether their selected licensed roof contractor has the experience and expertise to provide top-notch work.
[url=https://portcityexteriors.com/roofing/]Free roof quote near me in Wilmington NC[/url]
[url=http://chezspace.com/uncategorized/pasos-registrar-una-marca-la-republica-dominicana/]Dealing with Roofing Leaks Efficiently[/url] ae7f050
ryan porno
porno en
720p porno
https://www.wisla-plock.pl/pages/articles/?1xbet-promo-code_bonus-code.html
история обычных людей Таинственные истории случившиеся с обычными людьми Иногда жизнь подбрасывает нам загадки объяснить которые рационально невозможно. Истории о встречах с непознанным о предчувствиях и знаках судьбы заставляют нас задуматься о границах реальности и о том что существует за пределами нашего понимания. Они наполнены тревогой и любопытством заставляя нас верить в чудеса.
куда поехать на кавказ летом Семейные путешествия на Кавказ – это возможность провести время вместе увидеть новые места и познакомиться с культурой региона. Советы для путешествий по Кавказу
https://t.me/zachashkoichaya_books Литература как источник вдохновения для художников
乱伦色情
купить аллилпродин
乱伦色情
купить трава
psychotropic salts
кетамин
https://dadfencing.com/tomball/ Cedar Fence Cost Per Foot Calculating cost per linear foot simplifies budgeting enabling precise material quantity estimation. Remember to account for waste and overage to avoid project delays.
Remarkable Its truly awesome article I have got much clear idea about from this paragraph. https://http-kra38.cc/
продаю гера
кайт лагерь
http://gzew.phorum.pl/viewtopic.php?p=357655#357655
mostbet казахстан
Современный рынок онлайн-гемблинга в Казахстане представлен множеством международных операторов, среди которых особое место занимает платформа MostBet. Данная букмекерская контора и онлайн-казино предлагает казахстанским пользователям широкий спектр развлечений — от спортивных ставок до игровых автоматов. Mostbet Казахстан работает на территории республики уже несколько лет, предоставляя качественные услуги игрокам старше 18 лет с различным уровнем дохода.
мостбет официальный сайт вход
Современный рынок онлайн-гемблинга в Казахстане представлен множеством международных операторов, среди которых особое место занимает платформа MostBet. Данная букмекерская контора и онлайн-казино предлагает казахстанским пользователям широкий спектр развлечений — от спортивных ставок до игровых автоматов. Mostbet Казахстан работает на территории республики уже несколько лет, предоставляя качественные услуги игрокам старше 18 лет с различным уровнем дохода.
мостбет скачать на айфон
Современный рынок онлайн-гемблинга в Казахстане представлен множеством международных операторов, среди которых особое место занимает платформа MostBet. Данная букмекерская контора и онлайн-казино предлагает казахстанским пользователям широкий спектр развлечений — от спортивных ставок до игровых автоматов. Mostbet Казахстан работает на территории республики уже несколько лет, предоставляя качественные услуги игрокам старше 18 лет с различным уровнем дохода.
мостбет регистрация
Современный рынок онлайн-гемблинга в Казахстане представлен множеством международных операторов, среди которых особое место занимает платформа MostBet. Данная букмекерская контора и онлайн-казино предлагает казахстанским пользователям широкий спектр развлечений — от спортивных ставок до игровых автоматов. Mostbet Казахстан работает на территории республики уже несколько лет, предоставляя качественные услуги игрокам старше 18 лет с различным уровнем дохода.
https://shorturl.fm/E7nhK
https://shorturl.fm/bTIRB
Why you should hire a certified electrician for services related to LED lighting conversions
Tackling tasks like LED lighting conversions on your own can be dangerous. Even though it may seem cost-effective, it’s best to trust a trained technician to get the job done to code.
Certified experts have the skills and training needed to fix hidden issues that non-professionals may overlook. Hiring an expert means the repair is completed safely and complies with all electrical regulations.
In the end, it’s worth the investment to trust a experienced electrician for your repair needs. You’ll gain professional results and avoid future problems.
[url=https://danmatthewselectric.com/]property CCTV systems installation service and configuration[/url]
[url=https://thelawyer.africa/author/daniel-and-kenneth-advocates-llp/]EV charger home install: Top reasons it’s critical to use a professional electrical contractor[/url] ae7f050
EMDR Therapy for Persistent Discomfort: Tackling the Mind-Body Connection Continuous suffering is definitely a new intricate along with disabling condition in which can easily have deep effects on individuals real and also emotional and also social well-being. Eye Movement Desensitizing and also Reprocessing Eye Movement Desensitization and Reprocessing therapeutic approach presents some sort of valuable resource regarding people battling with long-term pain aiding their journey toward healing symptom regulation as well as improved quality of way of living. In the platform thread all of us explore the utilization of EMDR therapeutic approach in chronic pain management along with discuss its likely benefits and advantages for tackling the mental-physical relationship as well as promoting holistic recovery and also wellness. One of those with the principal tests gone through by persons with long-term problems will be the interplay between physical symptoms in addition to psychological distress. EMDR therapeutic approach offers the structured along with information based plan to be able to trauma treatment in which can easily help men and women process distressing stories as well as emotions challenge negative beliefs about their pain as well as build more adaptive problem management ways. Furthermore EMDR therapeutic approach may address the underlying trauma in addition to emotional distress of which often contribute in order to the onset in addition to management of persistent ache issues aiding in persons escape from the cycle of pain in addition to suffering. By providing some sort of safe in addition to supportive space regarding exploration in addition to healing EMDR therapy empowers individuals to be able to retrieve their sense of agency along with take an active character in their particular pain management. Also EMDR counselings focus about dealing with the psychosomatic connection accords with the actual goals linked with many men and women with chronic pain who are usually seeking holistic as well as integrated approaches to help their care. By offering effective and efficient in addition to accessible trauma treatment EMDR therapeutic approach supports individuals throughout finding relief from their pain and also reclaiming their particular quality of lifestyle. EMDR IOP personalized treatment 0ca041_
https://wakelet.com/wake/GXZCmXUT-GJHU-ssqq5N4
[b]Join our reseller and affiliate program and promote a powerful and efficient automation tool that posts to Facebook groups and FB communities directly from your browser.
– Perfect for real estate, e-commerce, automotive, services, B2B
– Suitable for traffic arbitrage, CPA, gambling & betting, dating, crypto projects, info business
– Passive income from client subscriptions
– Unique promo code = best prices for your clients
– Free 30-day access
– Discounts for multiple licenses and annual plans[/b]
– Convenient categorization of groups – by niche, client or language
– Spintax support – each message is unique
– Automatic addition of the first comment with a delay
– Integration with RSS and Facebook pages – new publications appear automatically
– Scheduling by phone – publishing from a computer
– Мы говорим по-русски
– Wir sprechen Deutsch
[u]Try[/u] [url=https://noblesseexport.com]free for 30 days![/url] +420 735 308 990 ([url=viber://chat?number=420735308990]Viber[/url]/[url=https://wa.me/420735308990?text=]WhatsApp[/url]/[url=https://telegram.me/noblesseexport]Telegram[/url])
Historia Vavada rozpoczęła się w 2017 roku, gdy grupa doświadczonych graczy postanowiła stworzyć „idealne kasyno online”. Miało ono zapewniać komfort, bezpieczeństwo i maksymalną dawkę emocji. Ten cel został osiągnięty w 100. Właścicielem projektu jest spółka Vavada B.V., zarejestrowana na Cyprze.
homemade zoo porn