


3D
Photoshop 3D beginners Tutorial (Part 3)
Photoshop 3D Beginners tutorial (Part 3)
This post follows on from Photoshop 3D beginners tutorial (Part one) and Photoshop 3D beginners tutorial (Part two) . We will start with the object created previously and I will be assuming that you are familiar with Photoshop outside of the 3D environment.
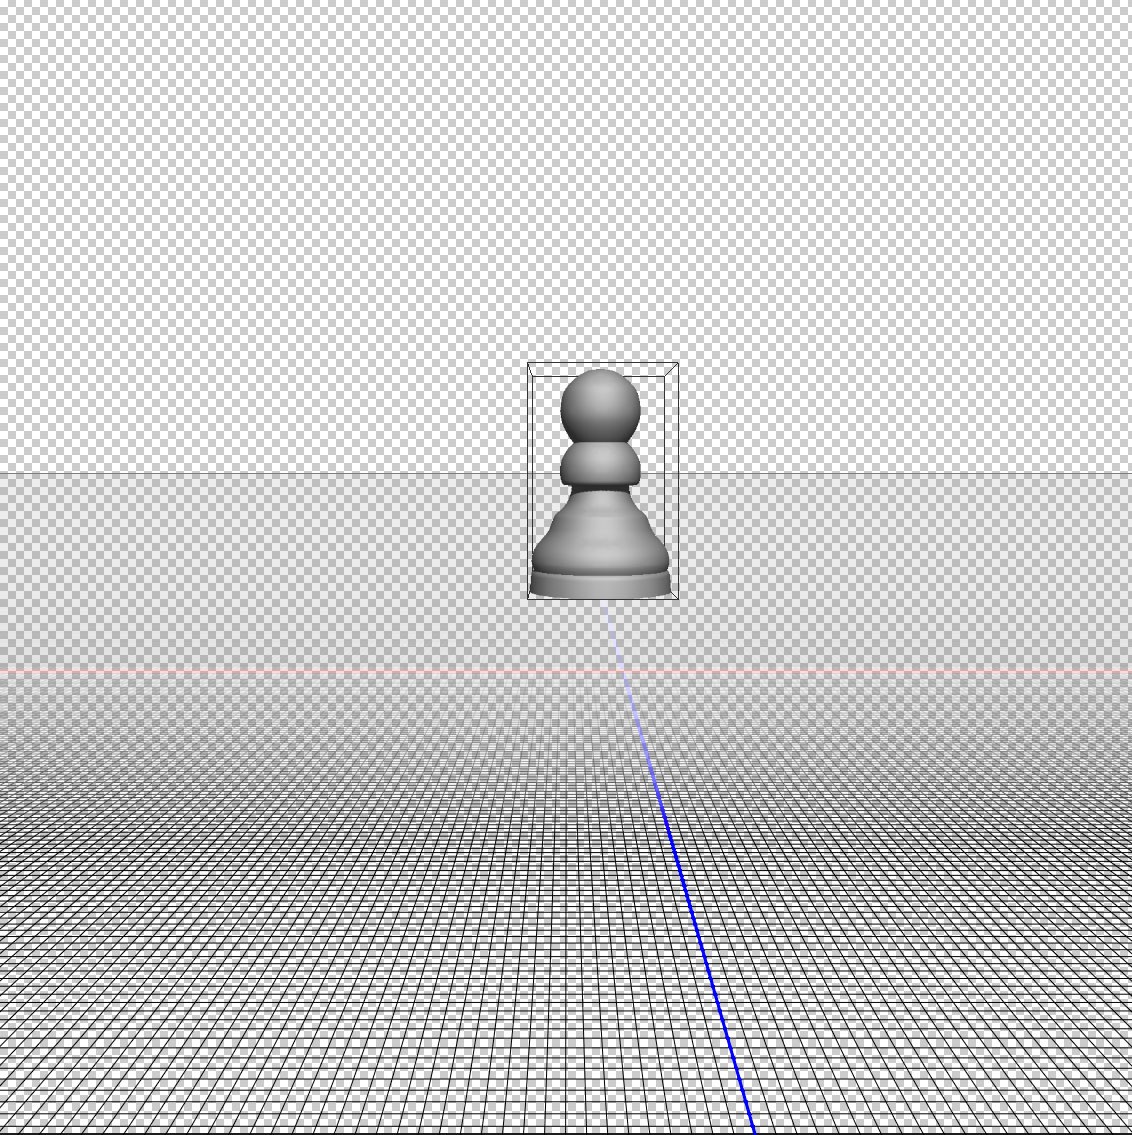
Here’s the image as we left it at the end of Part 2:
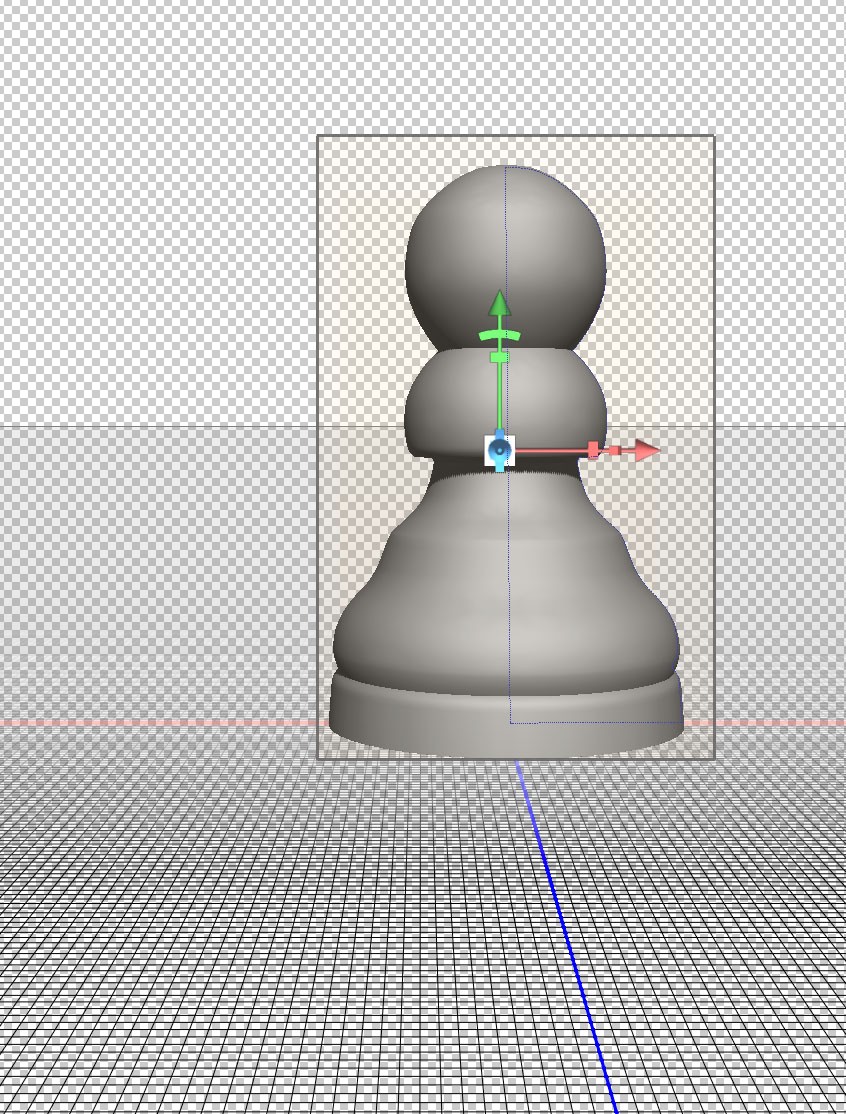
Starting image
The object is resting on the ground plane at the intersection of x and z axes. If your object does not look like this you can reset it via the co-ordinates pallet as described in the previous blog.
Firstly let’s look at moving around within the 3D environment. This is very different from moving the object, which is what you were doing in the last post. You will be using the same move tools found at the top of the page when in Photoshop’s 3D mode. They will only be visible when the move tool is selected in the tools pallet on the left hand side of the screen. You will also notice that the object stays on the ground plane at the intersection of the x and z axes and that the shadow always falls on the same area of the ground plane. You will just be changing the viewing position. The light source object and ground plane remain fixed in relation to each other.
To move around the 3D environment you need to de-select the object. To do this make sure the move tool is selected and click anywhere outside the object. The box will disappear from around the object and there will be minor changes to the move tool options:
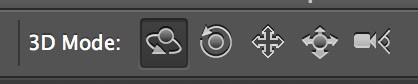
Move Tool Options
The far right hand move option now appears as a camera icon. We will come back to this later.
Rotate Camera Option
The rotate camera option is found on the far left hand side:
Rotate Camera.
Click and drag on the background to get a feel for this. It allows you to move freely and look at the object from any angle. You may think this is all you need when first trying it, but there are several things you cannot do:
1.You will notice that the horizon line stays at the same angle, which is set as horizontal in this case.
2.You cannot go closer or further away from the object.
3.You are always looking directly at the object.
Roll Camera Option.
Moving to the next option along you access the roll camera option:

Roll Camera Option.
Imagine you are holding a camera and you tilt it at an angle. This is the effect of the Roll Camera option. Click and drag and you will notice the horizon change angle. Here’s the effect of using the Roll Camera option:

Effect of Roll Camera Option.
Pan Camera Option.
Moving along, the next option is Pan camera:

Pan Camera Option.
Imagine you are moving the camera on a plane parallel to your monitor when using this option. This is the plane defined by the x and y axes. You can therefore move up, down, left and right.
Slide Camera Option.
Now lets look at the Slide Camera option:
Slide Camera Option
Imagine you are moving the camera on a plane perpendicular to the monitor, or parallel to the ground plane. This is the plane defined by the x and z axes. You can therefore move left, right, closer and further away. You may find this tool particularly useful when needing to look at close up details or zooming out to view the whole scene.
Zoom Camera Option.
This is the option on the far right and has a different icon to when moving a selected object.
Zoom Camera Option.
This is fairly self explanatory as it has the effect of zooming in on an object. It is similar to the slide option, but does not allow left and right movement.
The three blogs so far should have given you a good understanding of how to create a 3D object with rotational symmetry, how to move that object around and how to view it from any angle.
Working with multiple objects.
You are now going to look at creating a scene such as the one below:
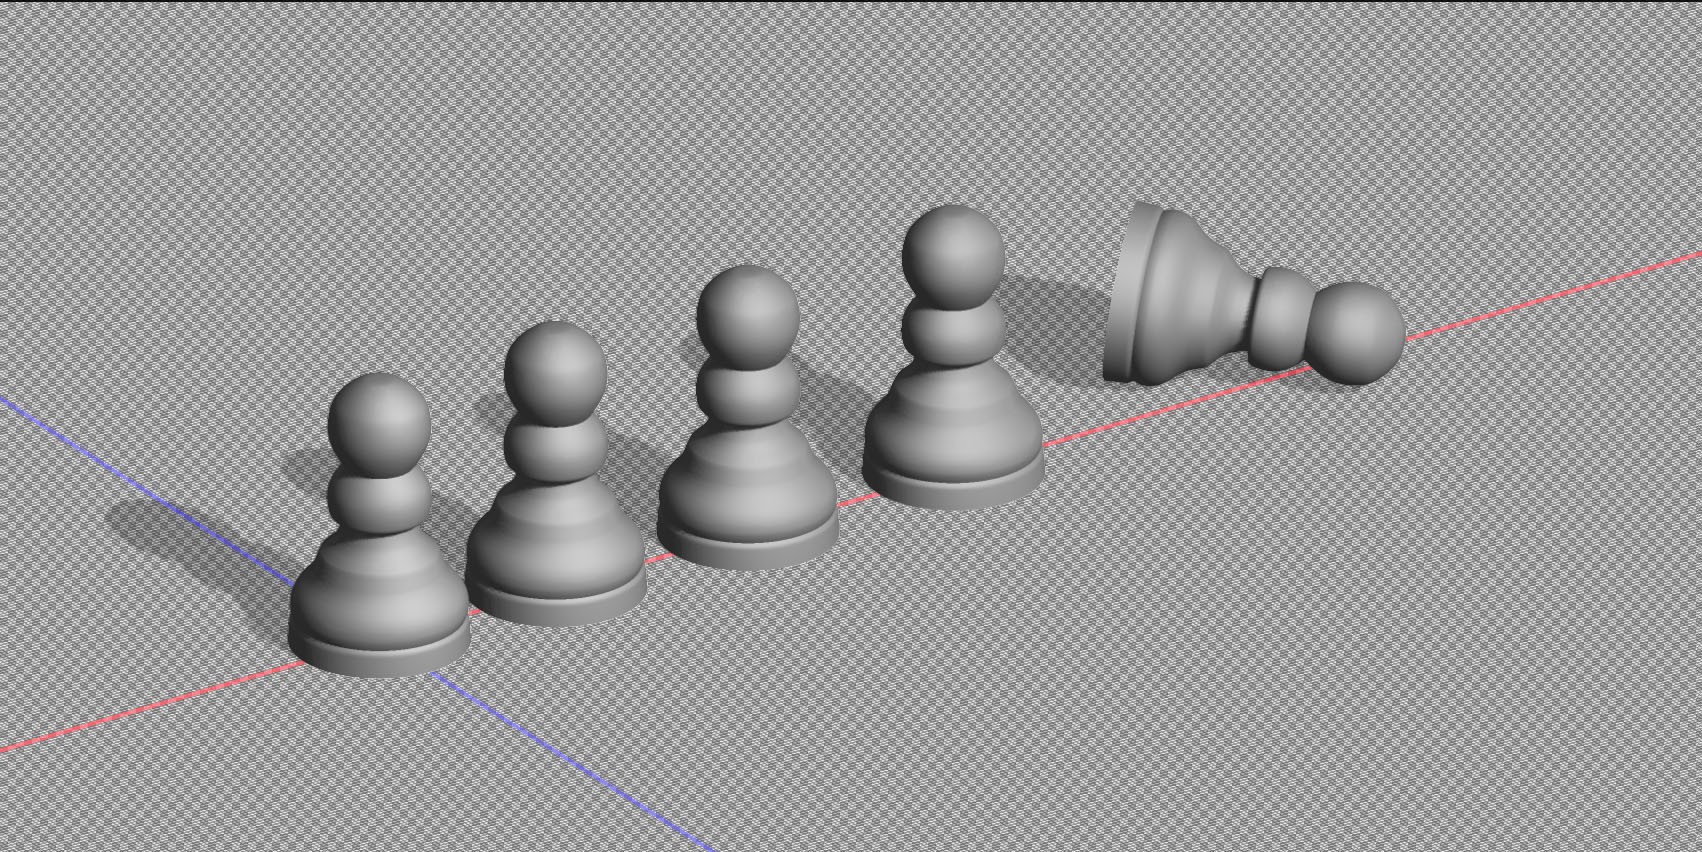
Photoshop 3D Multiple objects.
To Start, increase your canvas size to allow extra space to the right where you are going to put the duplicate objects and change your viewing angle to something more pleasing if you wish. Increasing canvas size is done in the same way as when working in normal two dimensional mode.
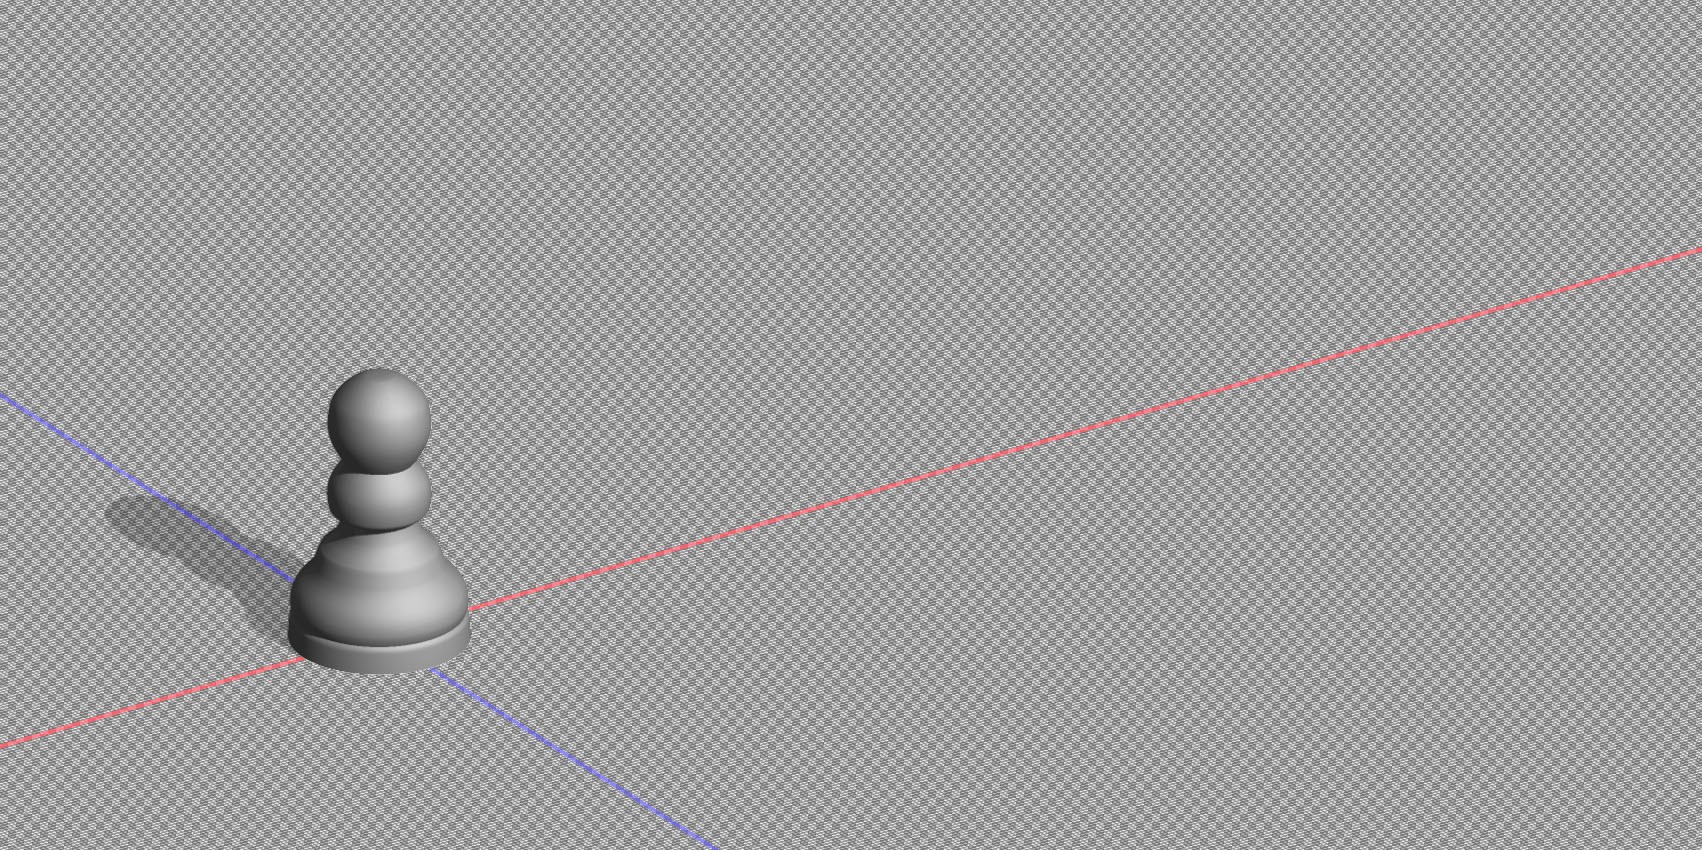
Increase Canvas Size.
Now make three copies of your layer so you have four objects in total. This is done in the same way you would duplicate a layer when working normally in Photoshop, i.e. Layer>Duplicate Layer or the Mac shortcut Cmd⌘ and J keys. Your layers pallet should now look like this:
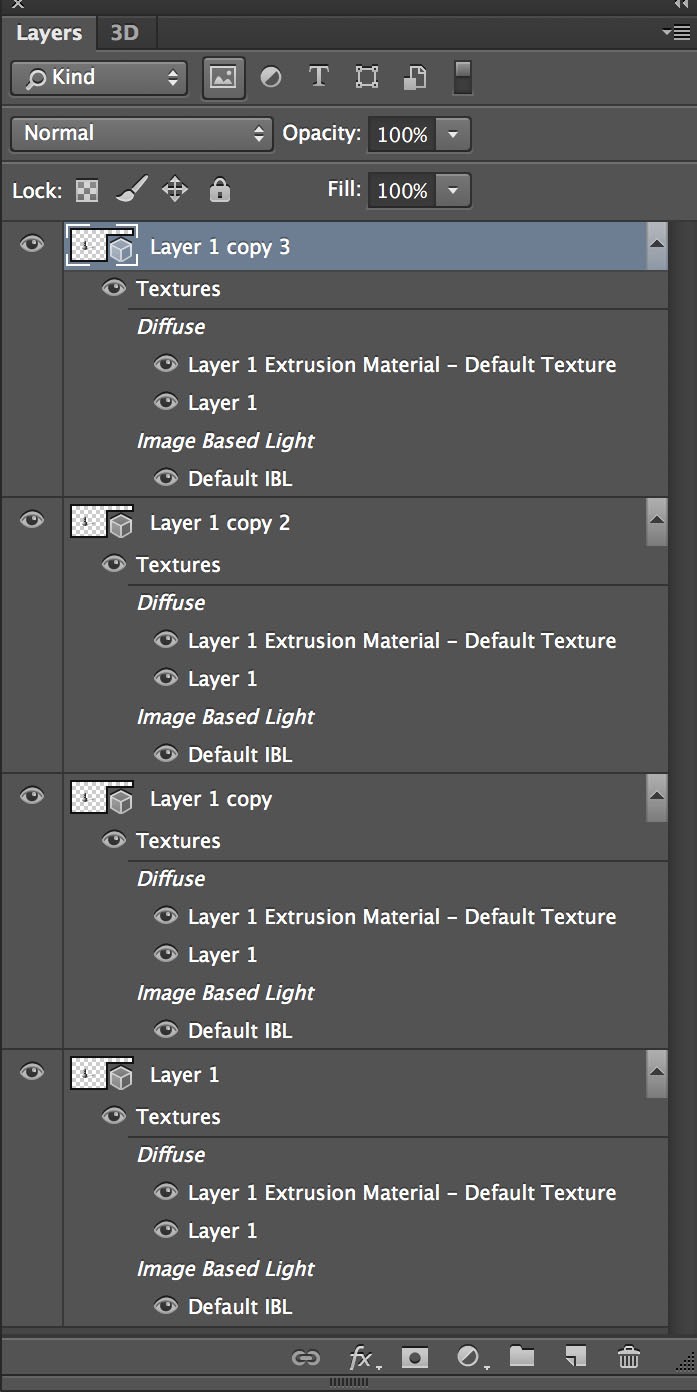
Layers pallet
What you have here is not only four identical objects, but also four identical backgrounds and four identical light sources. Each layer acts independently, which means the objects will only cast shadows on the background and not on each other. Also the objects take up the same space so they will appear as one object at the moment. What you want is four objects moved to different locations on one background with one light source.
Logically you would think that you could position the four objects where you want them to be, merge the layers and the job would be done. that’s how you would work with two dimensional objects normally in Photoshop. There are several problems with this when working in 3D: Firstly your layers may have different light sources and the ground plane may be viewed from different angles meaning Photoshop has to choose which ground plane and which light source to choose; secondly, as in this case, even when the backgrounds and light sources match exactly Photoshop doesn’t place the objects accurately; lastly you will lose a lot of 3D data if you merge layers via the standard Layer>Merge Layers command.
Here’s the easiest way of combining these layers and positioning them. Shift select all four layers in the layers pallet and merge the layers by going to 3D>Merge 3D Layers:
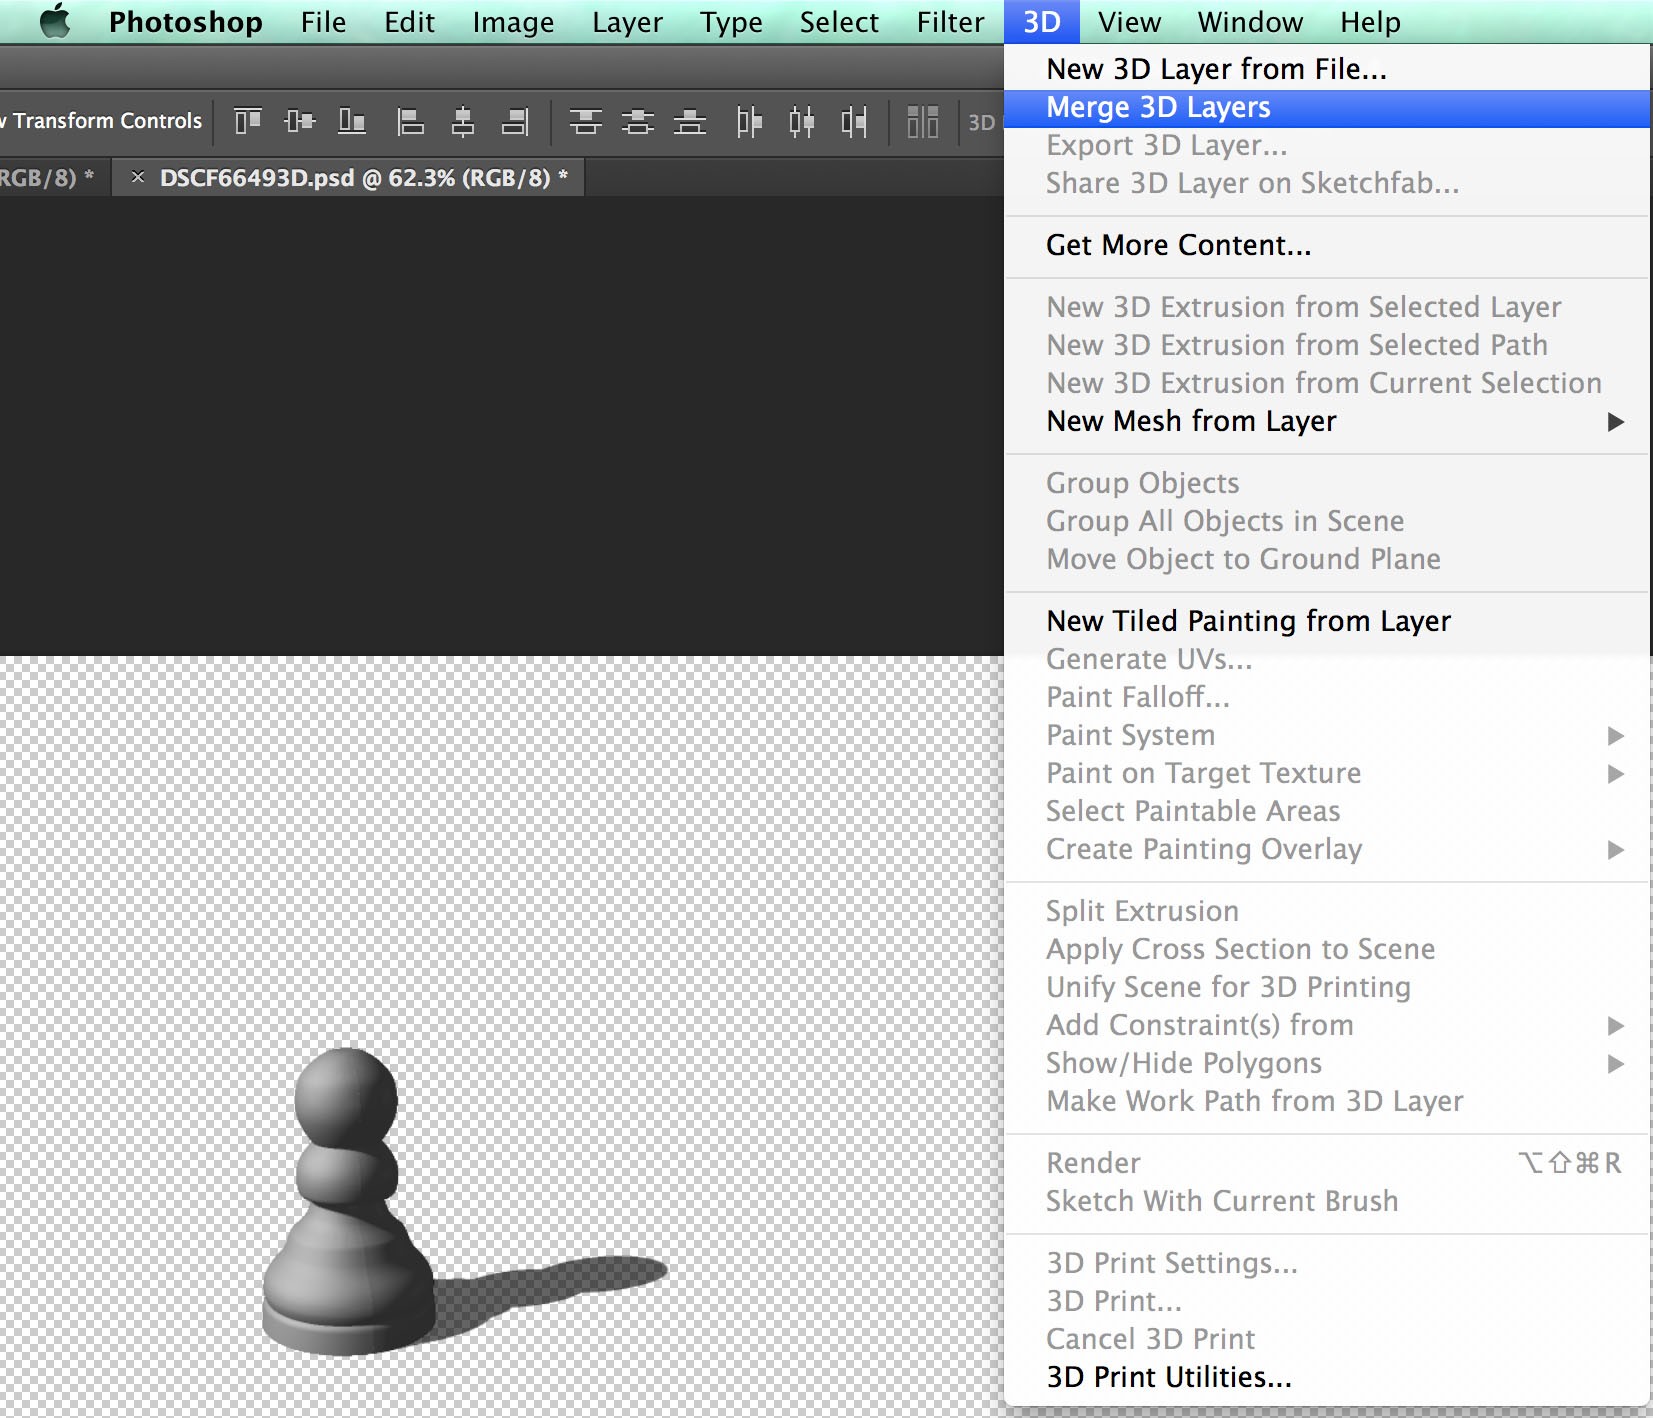
Merge 3D Layers
I’m working in Photoshop cc 2014 here, but pre cc versions of Photoshop only allow you to merge two layers at a time. This means you will need to work in stages until you have just one layer in the layers pallet. You now have four objects that appear to be one, as they are directly on top of each other. There is only one ground plane and one light source.
Now look at the 3D Pallet. The four objects can be seen and manipulated here.
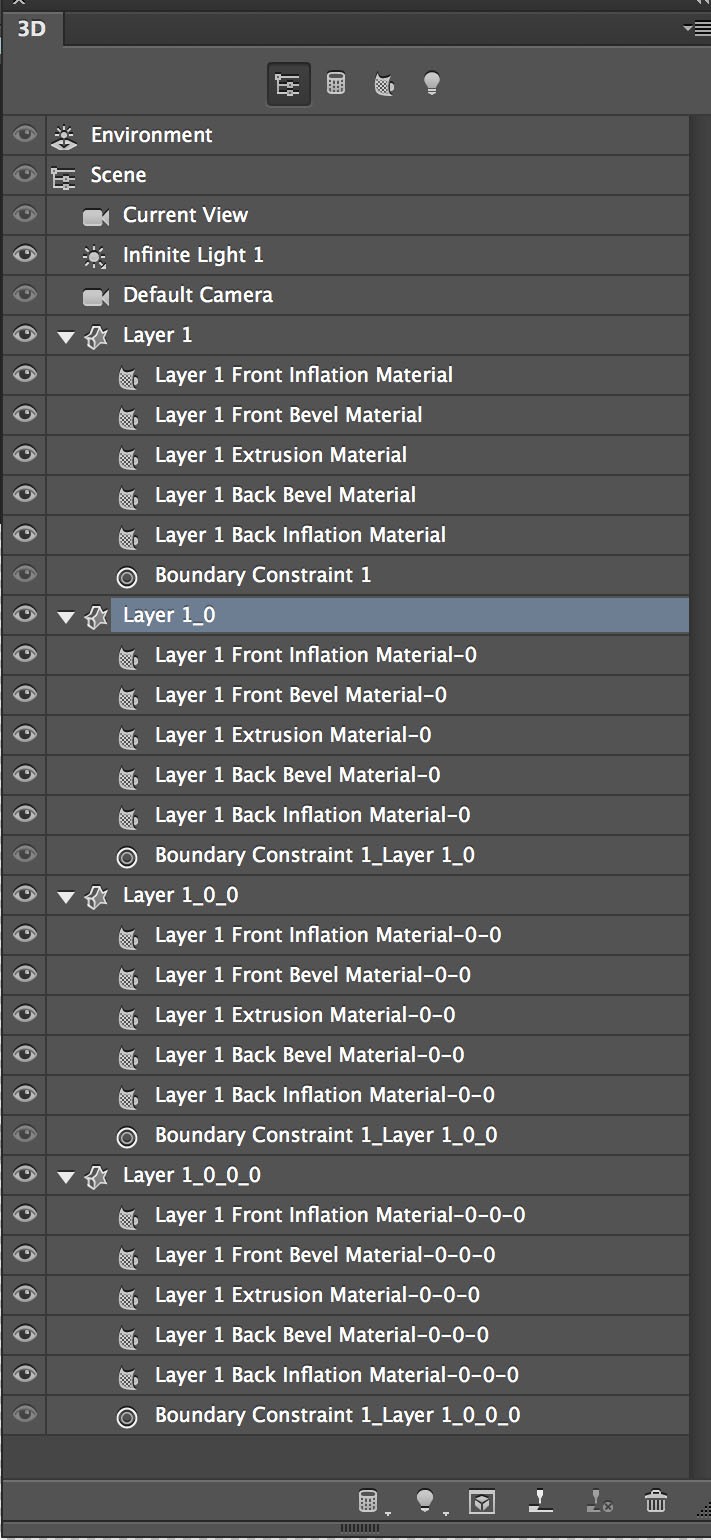
3D Pallet.
The four objects are labelled Layer 1, Layer 1_0, Layer 1_0_0 and Layer 1_0_0_0. A closer look at the co-ordinates area of the properties pallet may show that all four objects are not aligned on the ground plane and at the intersection of the x and z axes. I’m not sure why this should be, but Photoshop seems to shift things around in the merging of layers. I like to reset all the co-ordinates and move the objects onto the ground plane to start with.
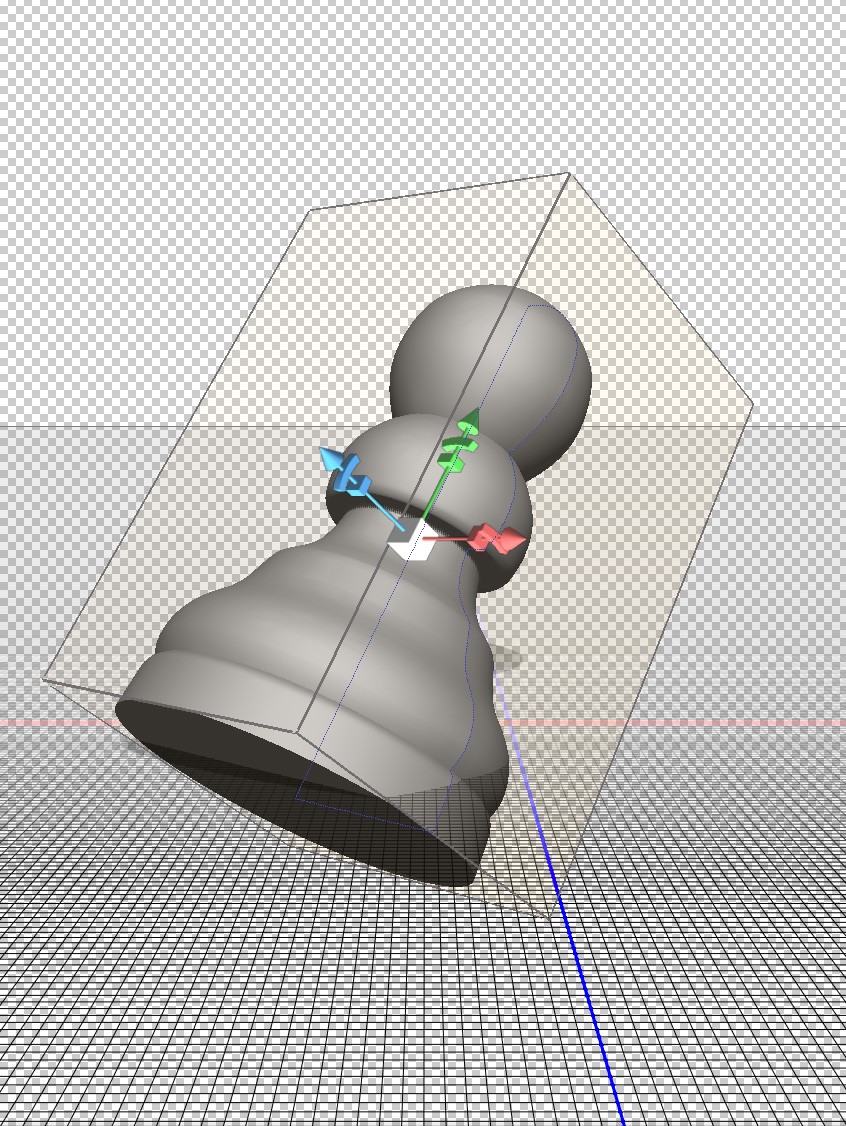
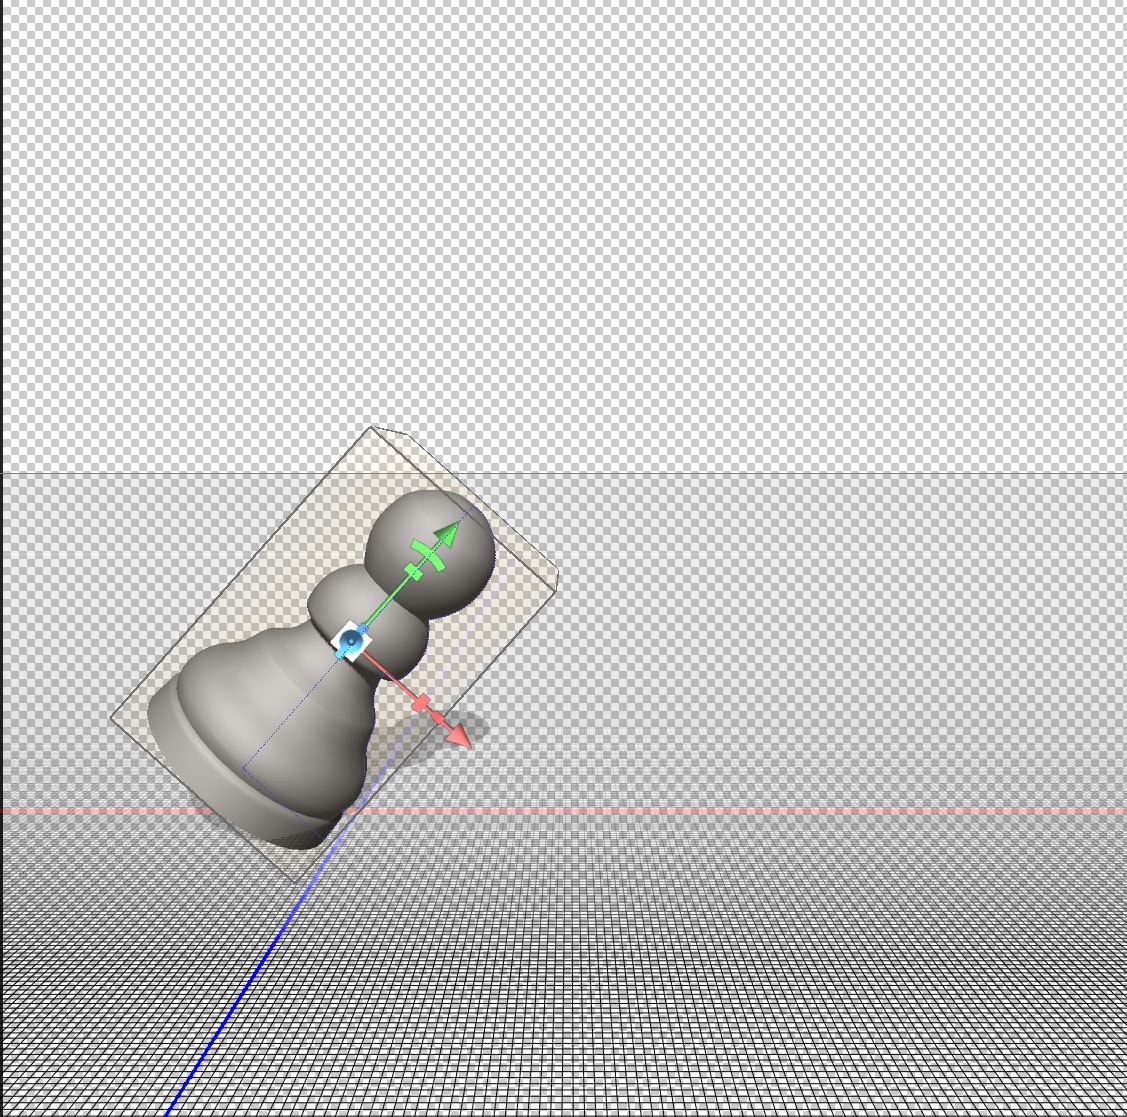
I want to leave the original, which is labelled “Layer 1”, in it’s original position. The image of the 3D pallet above shows Layer 1_0 selected. This object can now be moved using one of the methods described in the previous blog. If you want even spacing between objects, typing in coordinates may be the easiest method. I used the move tool options to lay a pawn on it’s side. Also useful was the “Move to Ground” option in the co-ordinates tab on the properties pallet and the use of the secondary view window. If the secondary view window isn’t visible you can open it by going to View>Show>3D Secondary View.
You should now have the knowledge to create a scene with several objects. My example uses duplicate objects, but you can make several different objects using the methods described to make up a scene of your own.
Photoshop 3D Beginners Tutorial (Part 2)
Photoshop 3D Beginners Tutorial (Part 2)
In this second part of my Photoshop 3D beginners tutorial I will assume you have created the object in Part 1 and that you are reasonably proficient in other functions of Photoshop outside the 3D working space.
Moving objects within the 3D workspace.
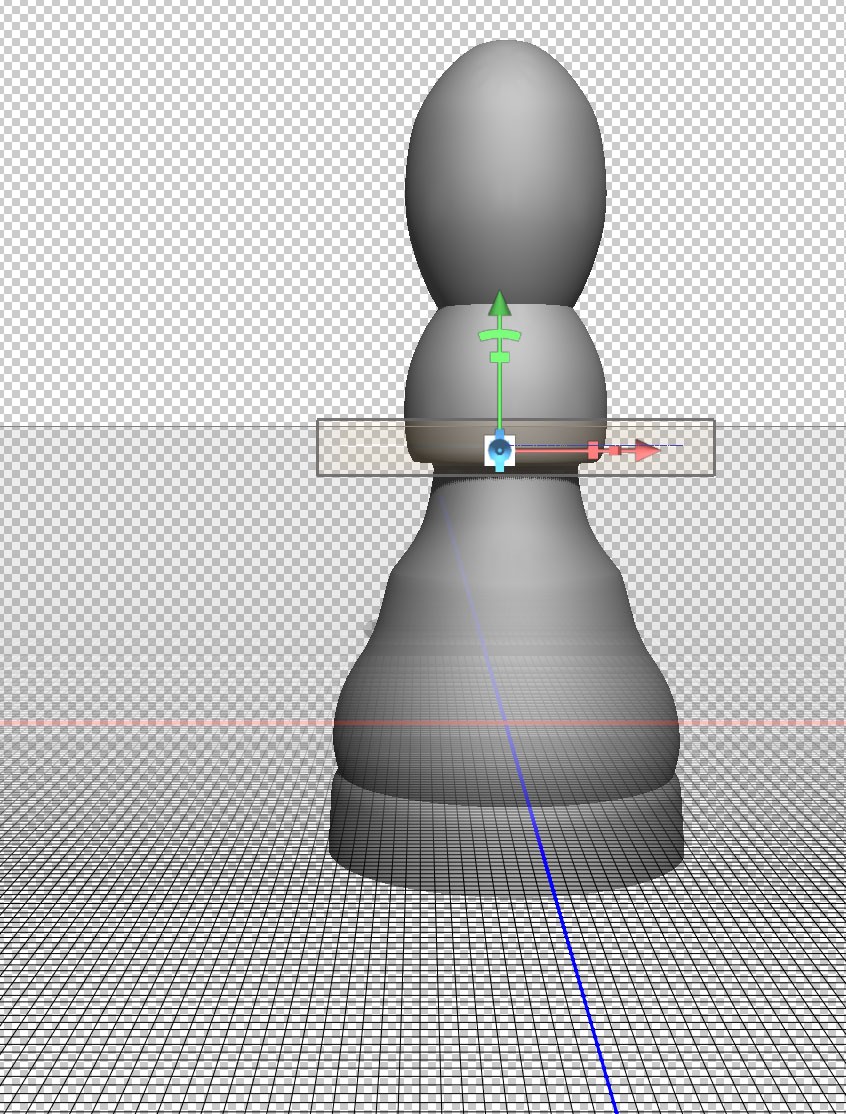
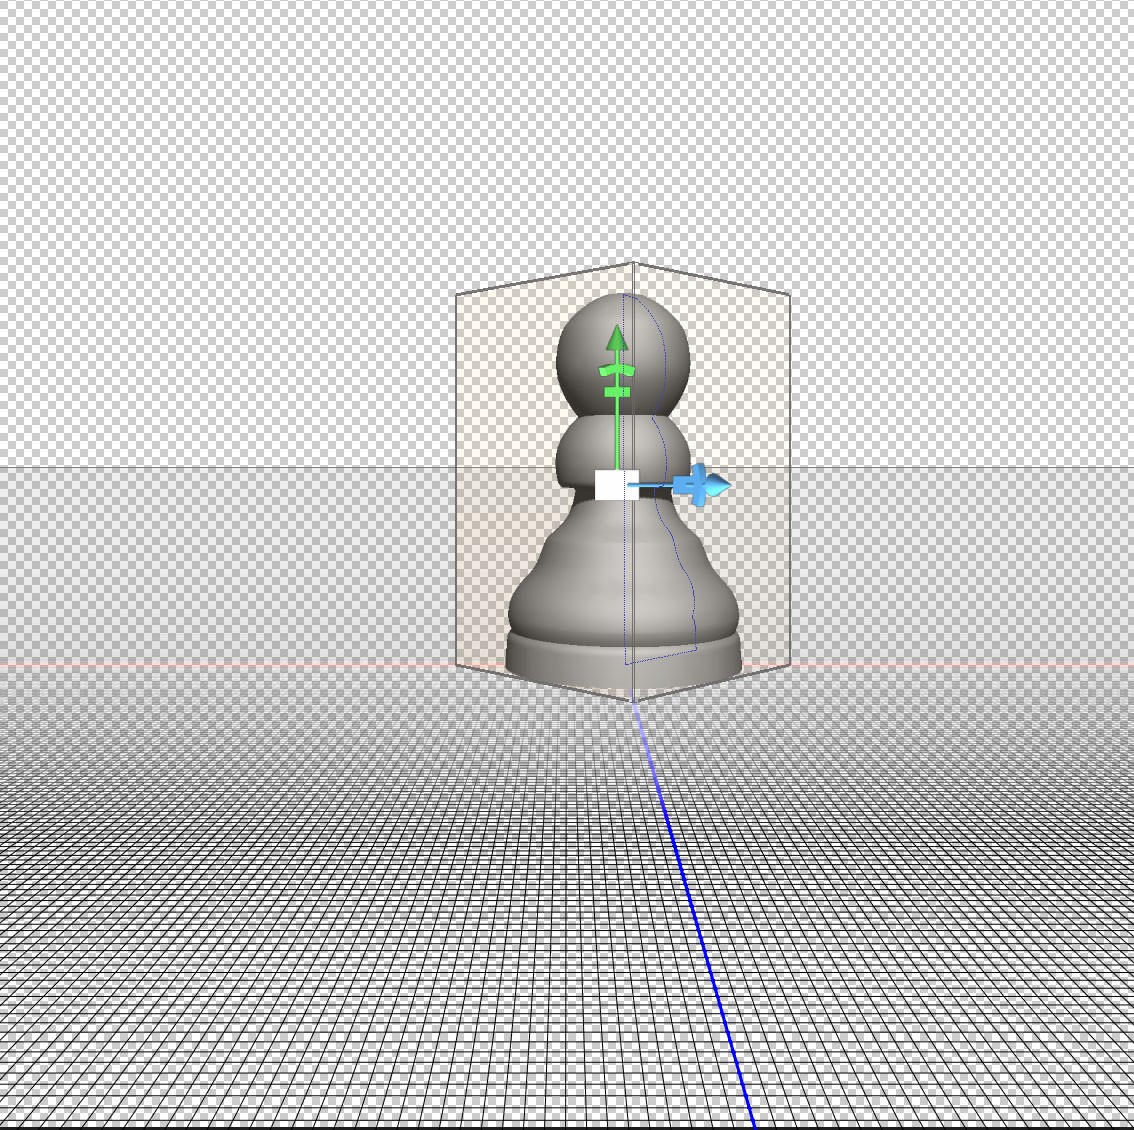
Here’s the object created in the last tutorial. If you prefer, you can use any other object you have created. The principles in this tutorial will be the same.

Starting Image
I’ve moved the object around intentionally to illustrate how you can re-set to a starting position. Firstly you need to select the move tool (shortcut “V”):
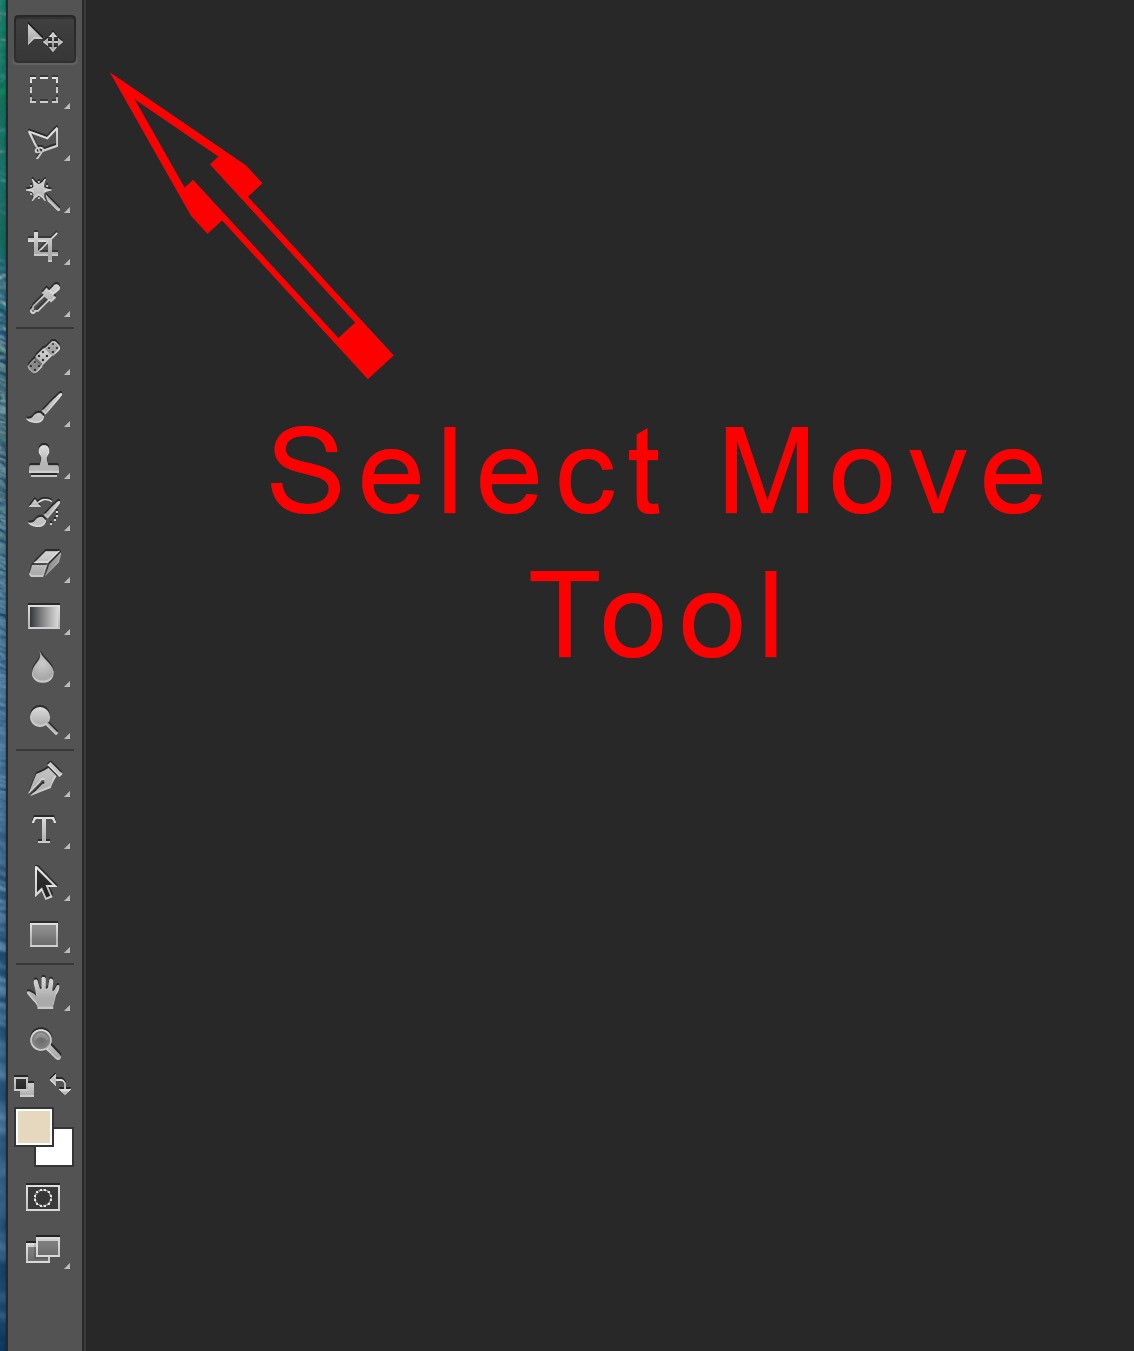
Select Move Tool
Click on the object you want to move. You should then see the ground plane and a box around the object as shown:
Object Selected
To set your object centrally on the intersection of the blue and white axis so that it is resting on the ground plane, you need to click on the last icon at the top of the Properties pallet:
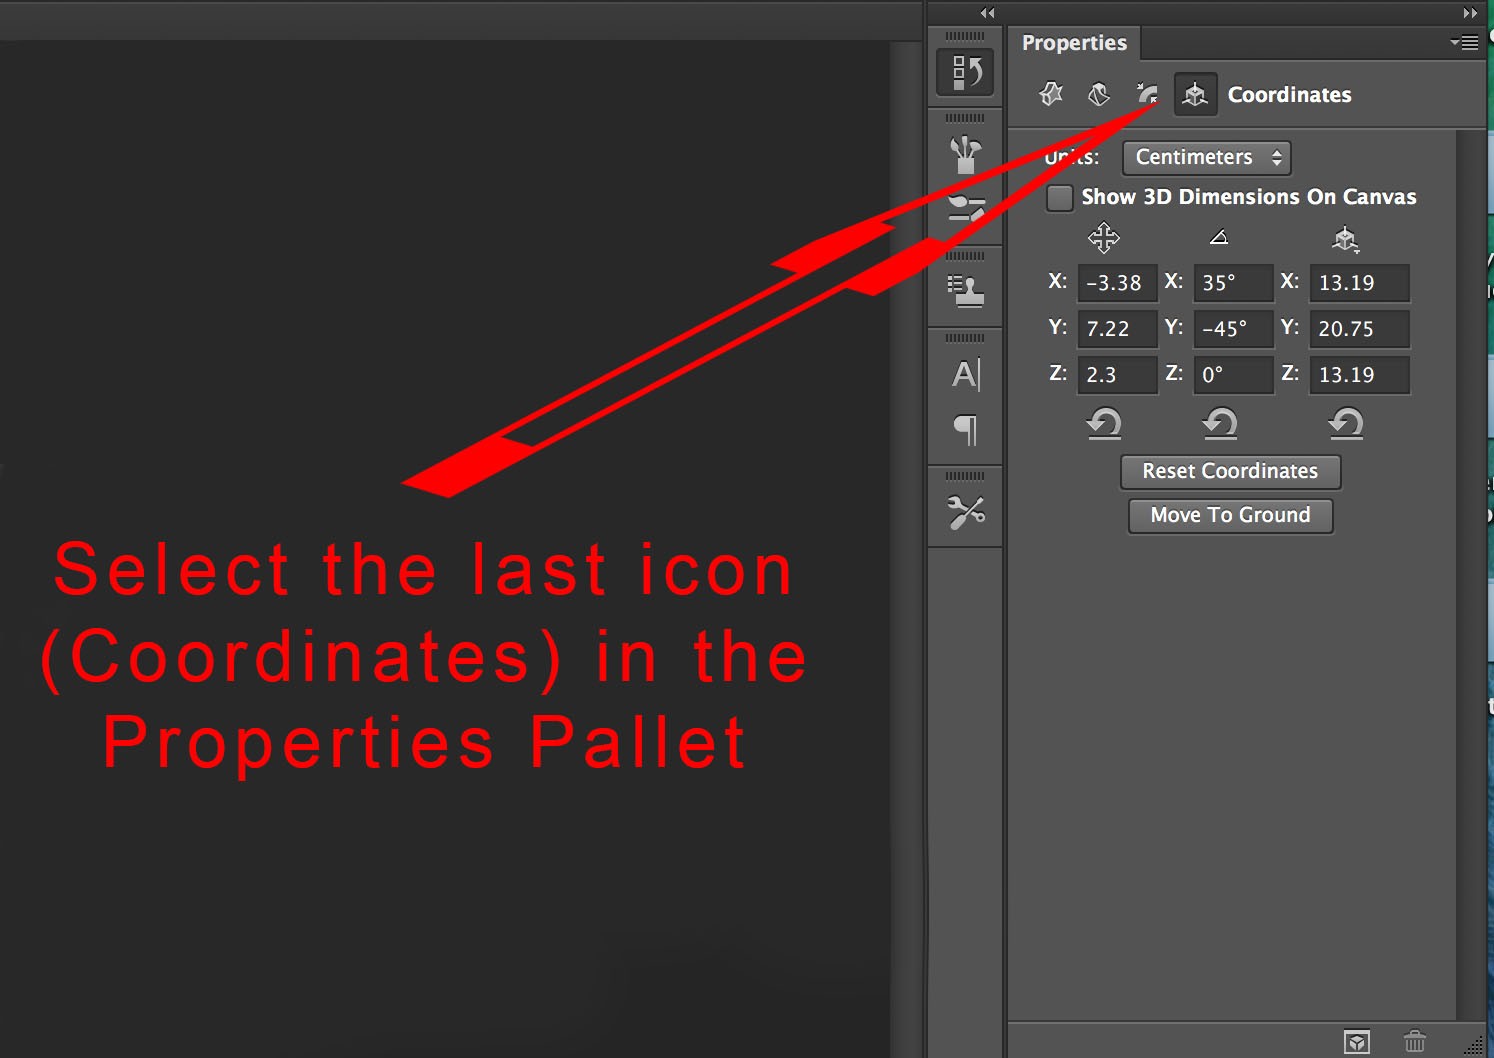
Select Coordinates from properties Pallet
Click on the “Reset Co-ordinates” button. This will set the first two columns all to “0”. The third column will stay the same as these numbers are the height, width and depth of your object. You will notice at this point that the ground plane intersects the object exactly half way up:
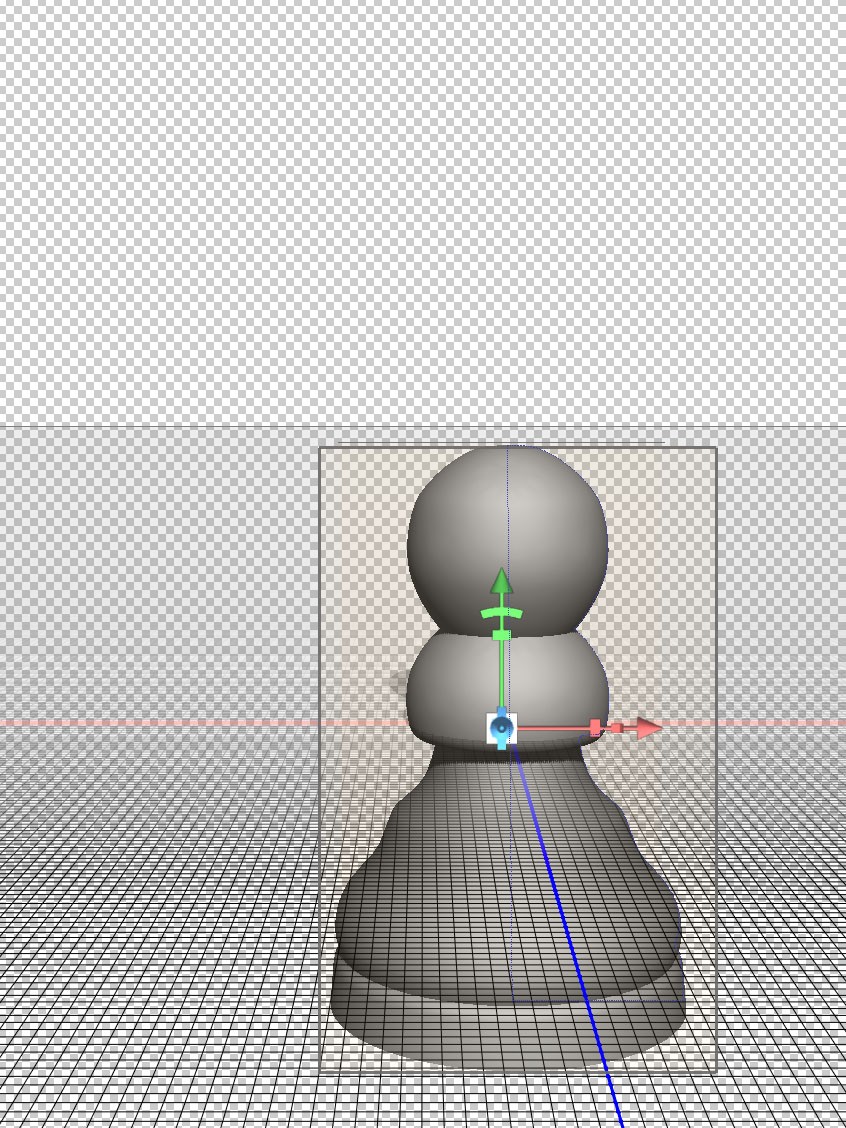
Coordinates reset
Click on the button labelled “Move to ground”, which is directly below the “Reset Co-ordinates” to shift your object up so it is resting on the ground plane:
Move to Ground
The above object can be moved anywhere in the 3D space. There several ways of doing this. Working in the Co-ordinates area of the properties pallet is a good place to start as this will help you understand exactly what’s happening. First here’s an explanation of the 3 axes;
The “x” axis is marked in red on the ground plane, going from left to right. You will also notice a red arrow with a couple of other symbols on it within the box showing the image is selected. This is for controlling movement in relation to the “x” axis, and we will take a closer look at this later.
The “y” axis is not marked on the background, but is the up/down axis marked by a green arroow on the 3D object.
Lastly the “z” axis is marked in blue on the background layer and is used to move the object closer or further away. Again there is a blue arrow on the object when it is selected. It is pointing straight forward and is therefore not easy to see in the example above.
Moving and scaling 3D objects using the Properties Pallet.
Looking at the coordinates on the far right you will see 13.19cm for both the x and z axes. This shows that the object has rotational symmetry. If you changed one of these you would have more of an oval shape, which is not what’s needed here but may be relevant for different objects. The reading of 20.75cm for the y axis shows the height of the object. These are just the dimensions of the object and do not change if the object is moved about within the 3D space.
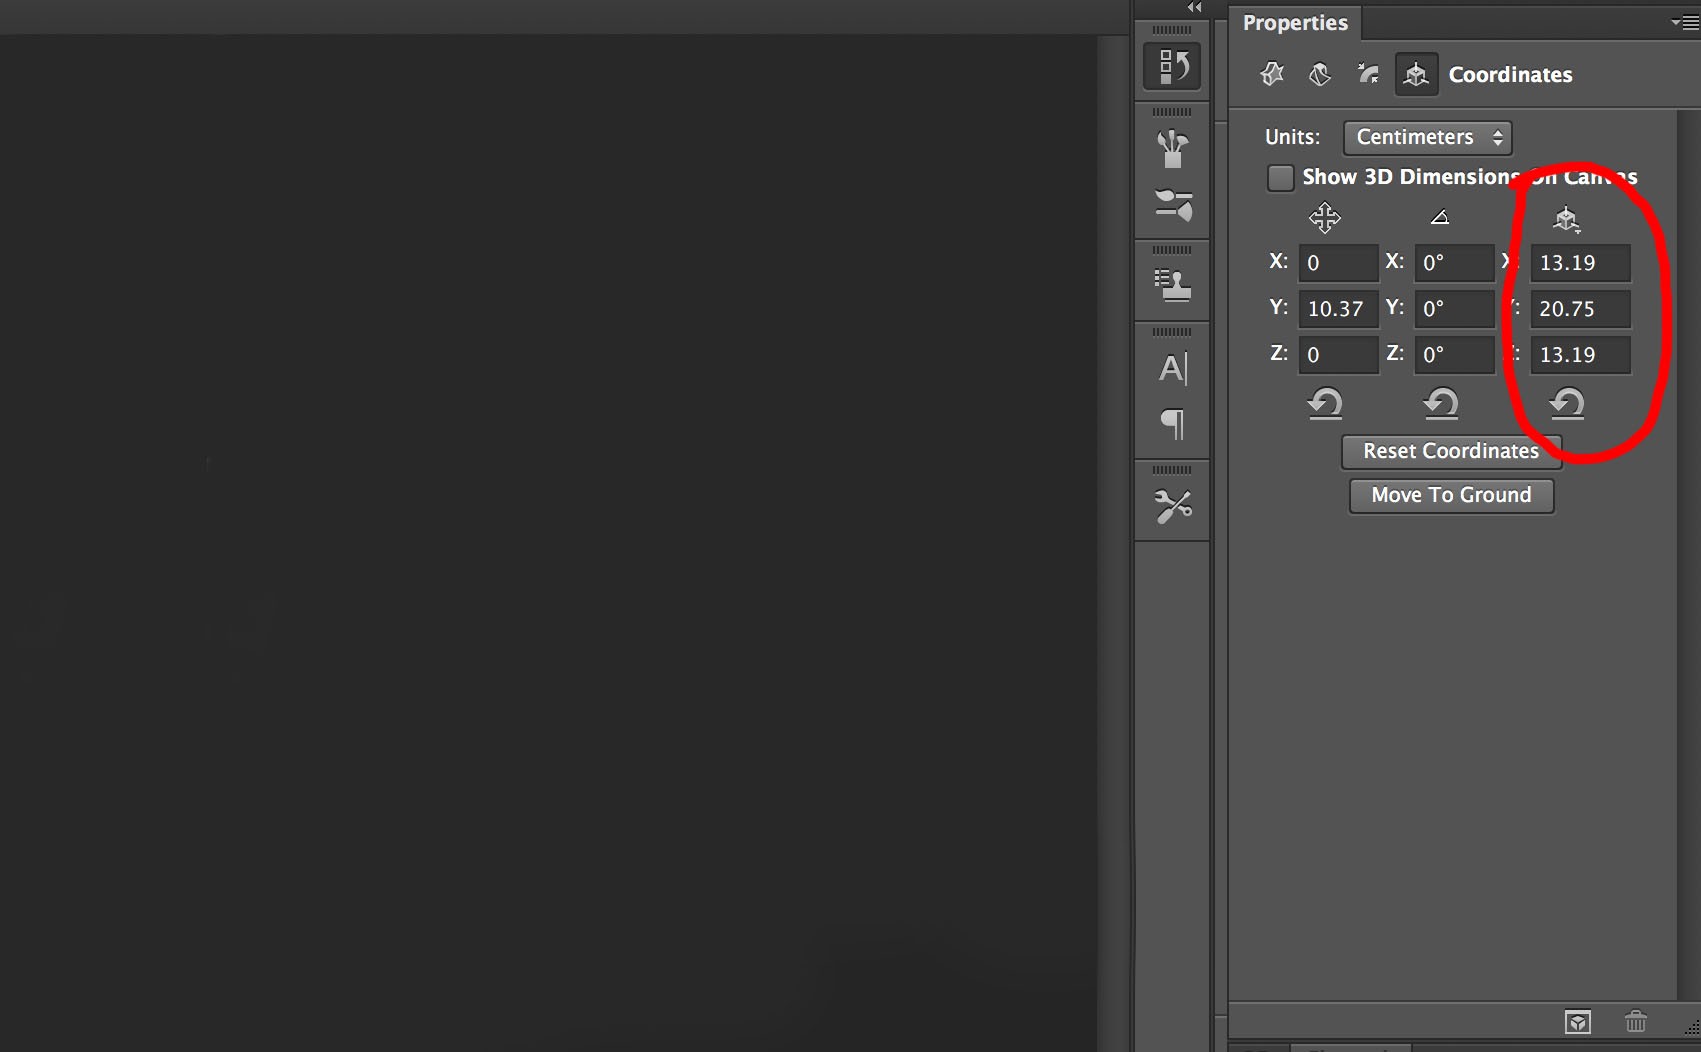
Dimensions of object.
You can use the right hand column to change dimensions on any of the three axes. As an experiment here’s the object showing the height increased on the “y” axis:
Increase size on y axis
The central point of the object has not changed. This means that it still lies on the intersection of the red “x” axis and blue “z” axis. Because it has increased in height from a central point the lower part now goes below the ground plane.
Step back in the history pallet so you have the original dimensions (x at 3.19, y at 20.19 and z at 3.19).
Now look at the far left column of numbers:
Position of object.
x has a reading of 0cm. This shows that the central point of the object is on the red line.
z has a reading of 0cm showing the object is also on the blue line.
As x and z both have a reading of 0cm the object is on the intersection of the 2 lines.
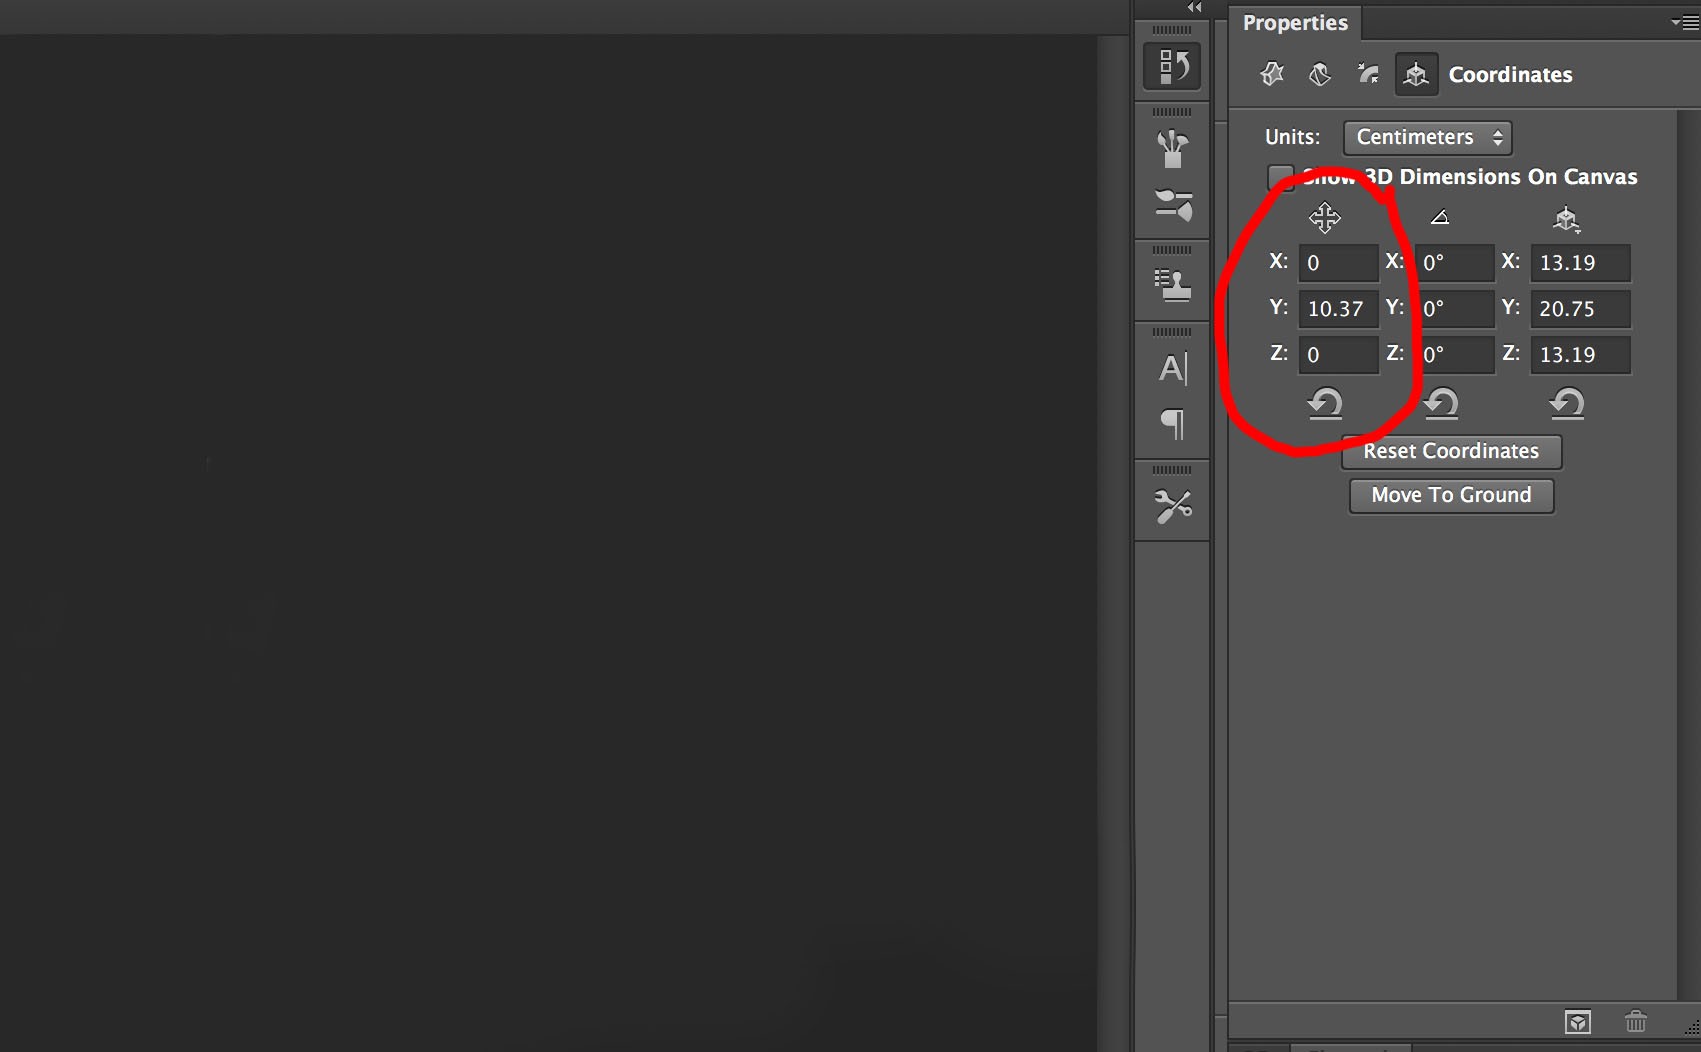
Now for the y axis. This shows a reading of 10.37cm. This may seem strange at first. The y axis is the up/down positioning of the object. If you reset the coordinates this reading becomes 0cm. You then see half the object above the ground plane and half below. If you then click on the “Move to Ground” button the y axis reading will show half the height of the object.
I have made some changes to the positioning of the object in the next few examples which involves altering figures in the first column. Have a look at the captions under each image to see what alteration has been done to each. I have also increased the canvas size, which you do exactly the same way you would when working on a two dimensional image.
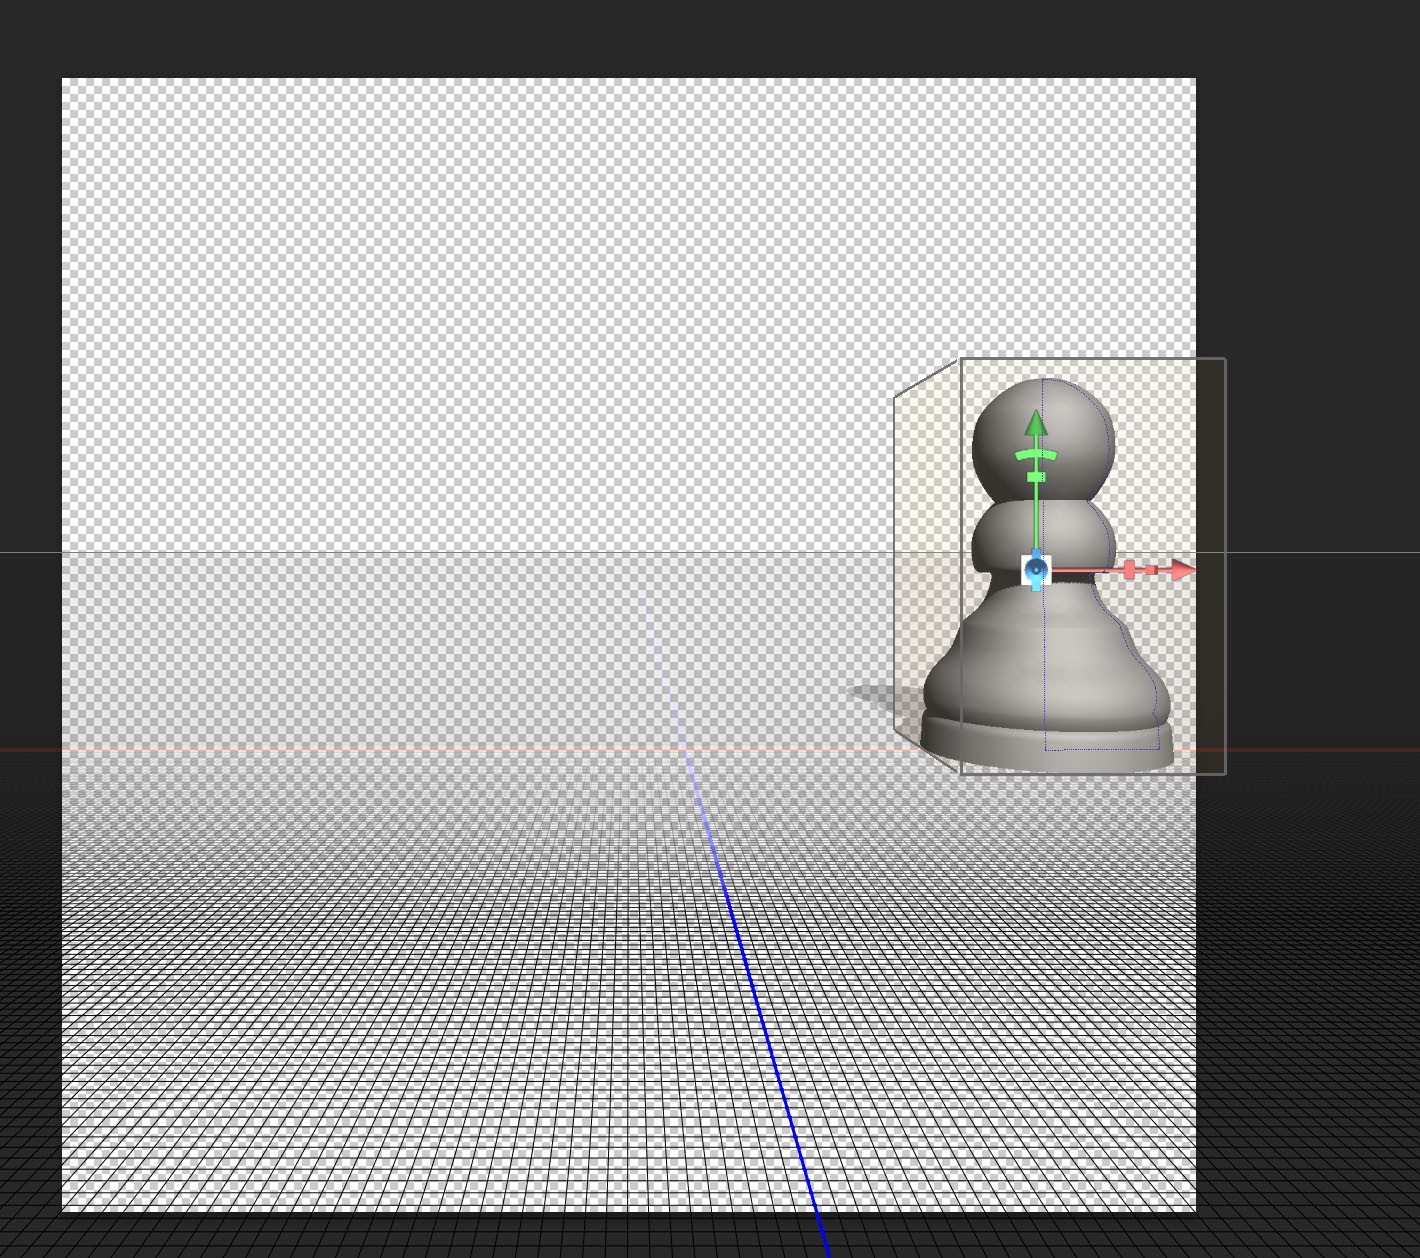
“x” Coordinate set at 20cm
The object has been moved along the red “x” axis. It has moved to the right because a positive value has been entered. A minus value would have moved it to the left of the blue “z” axis.
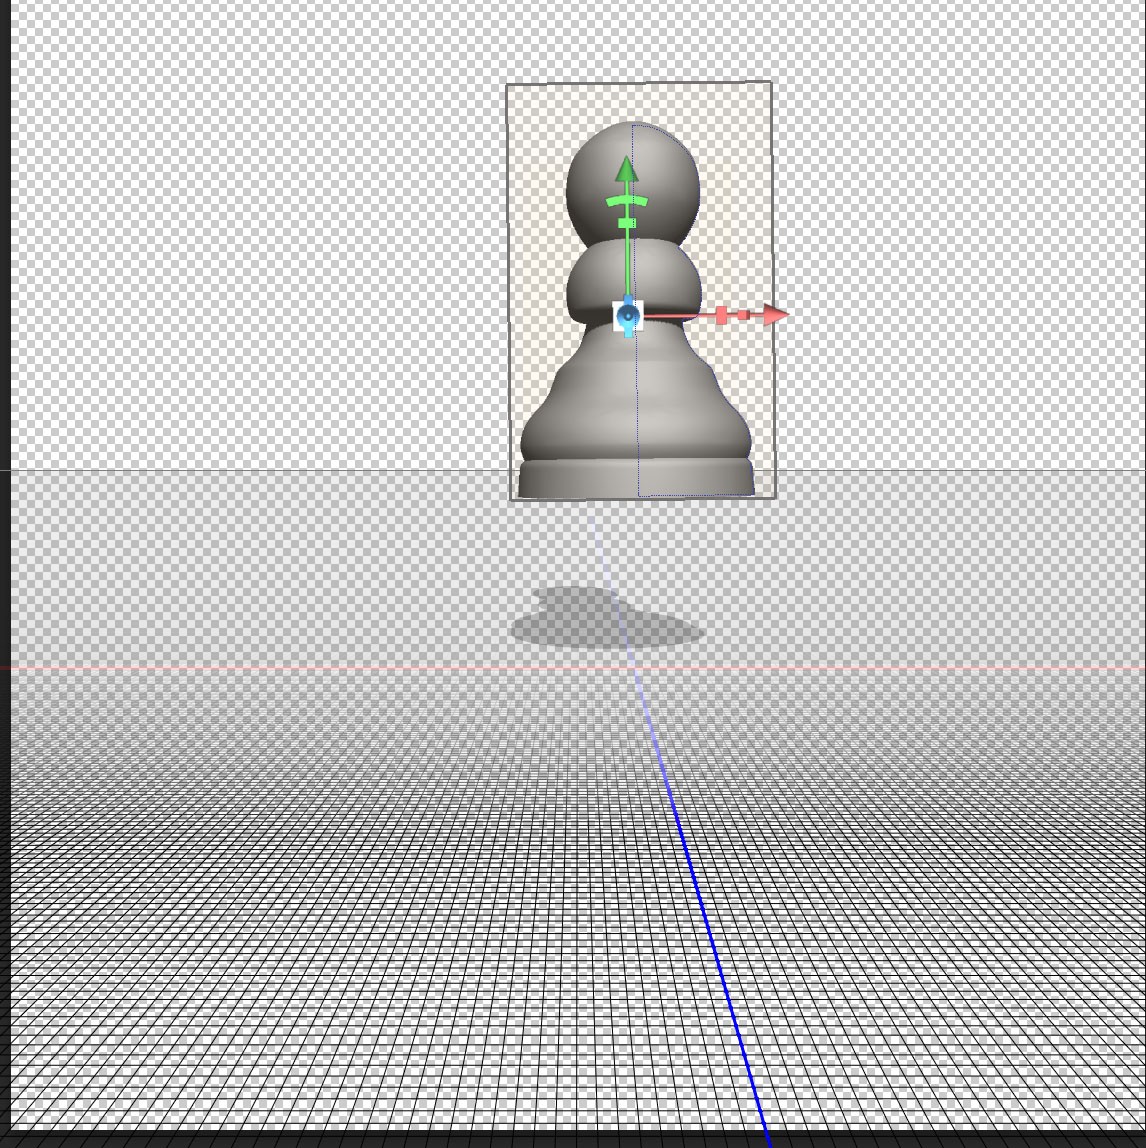
“y” coordinate set at 20cm
A positive value in the “y” coordinate setting will float the 3D object above the ground plane. It is also possible to enter a negative value to put the object below the ground plane.
“z” coordinate set to -20
I have entered a negative value on the z axis, moving the object away from the viewer along the blue line. A positive value would have moved the object to a position in front of the red “y” axis.
“x” set to -10 “z” set to 20
A minus setting on the “x” axis means the 3D object has moved to the left. A positive setting on the “z” means it has also moved forward to a position in front of the red “x” axis.
Looking at rotational angles.
The 3D object can also be rotated about any of the x, y and z axes. The amount of rotation can be set in the middle column shown:
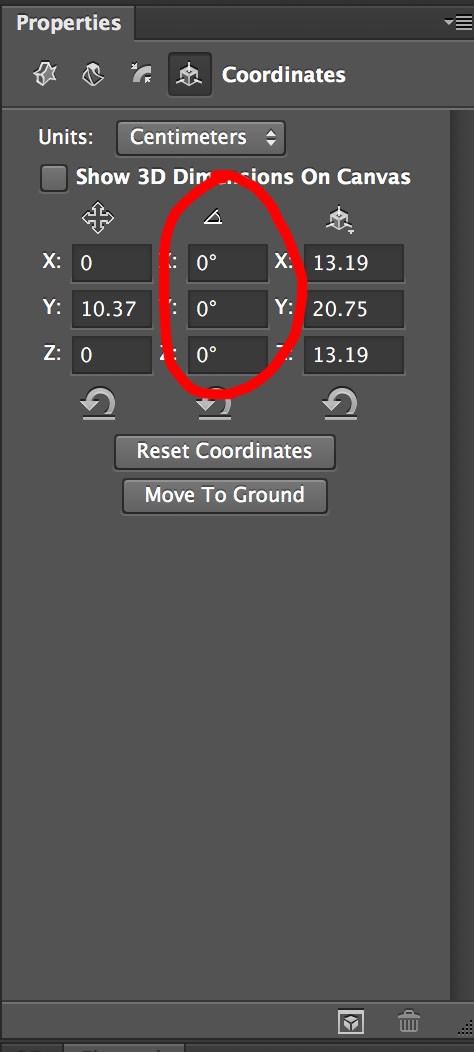
Rotation about axis
Here are three images to show how rotation about each axis looks. The caption under each image gives the settings.
45 rotation on x axis
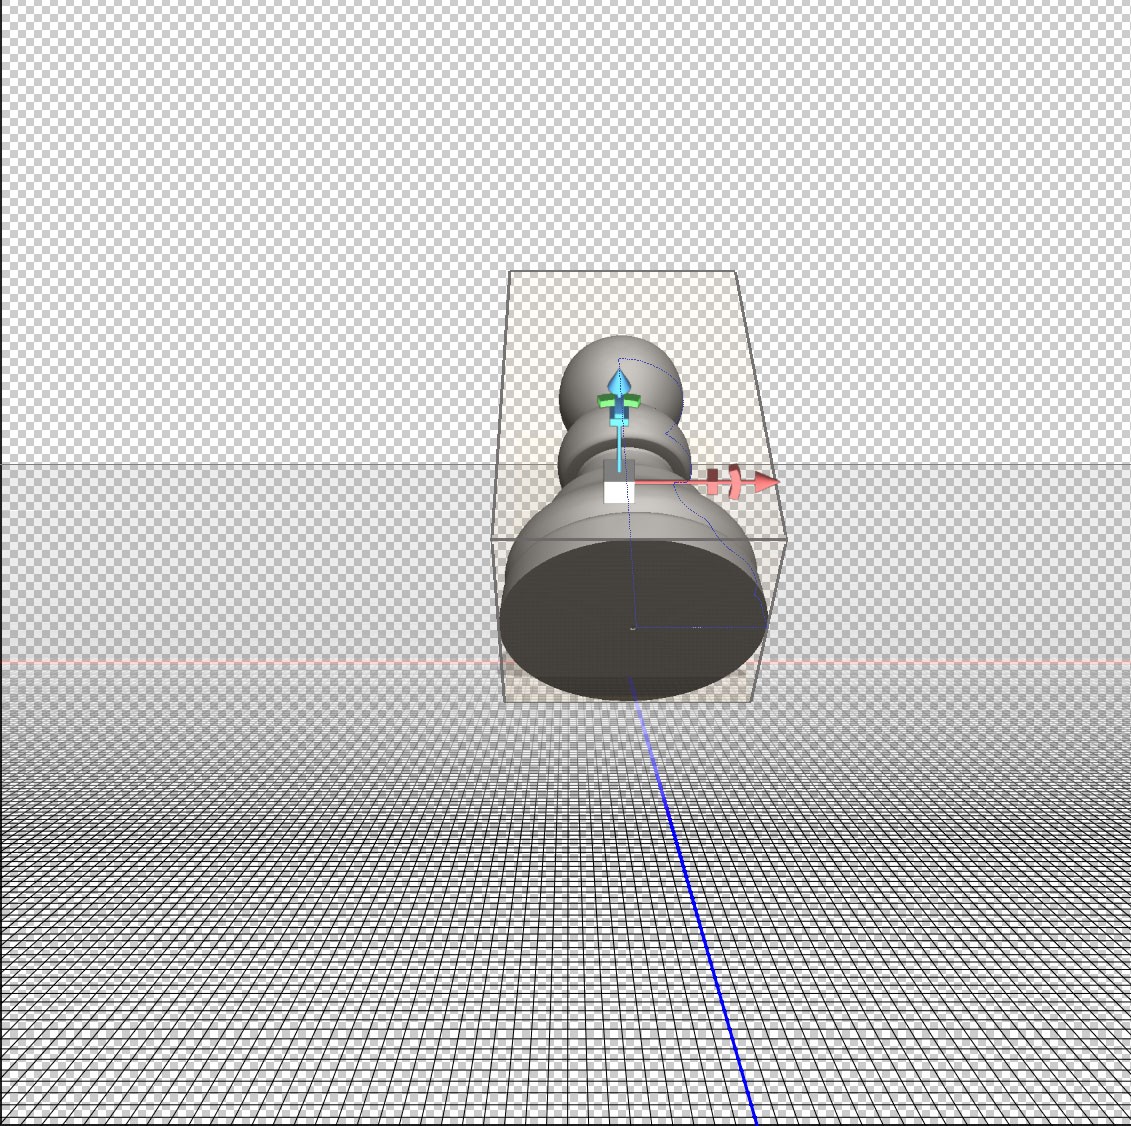
45 rotation on y axis.
Rotation about the “y” axis makes no difference to the object, as it has rotational symmetry about this axis. You will notice that the box around the 3D object now appears with it’s corner pointing towards us.

90 Rotation on z axis
Notice that rotation “x” and “z” axes will result in the object no longer being on the ground plane as rotation is always about the central point.
Entering numbers in the Properties pallet is useful for accurately positioning 3D objects. However there are quicker more intuitive ways of working.
Moving and scaling a 3D object using the controller axes
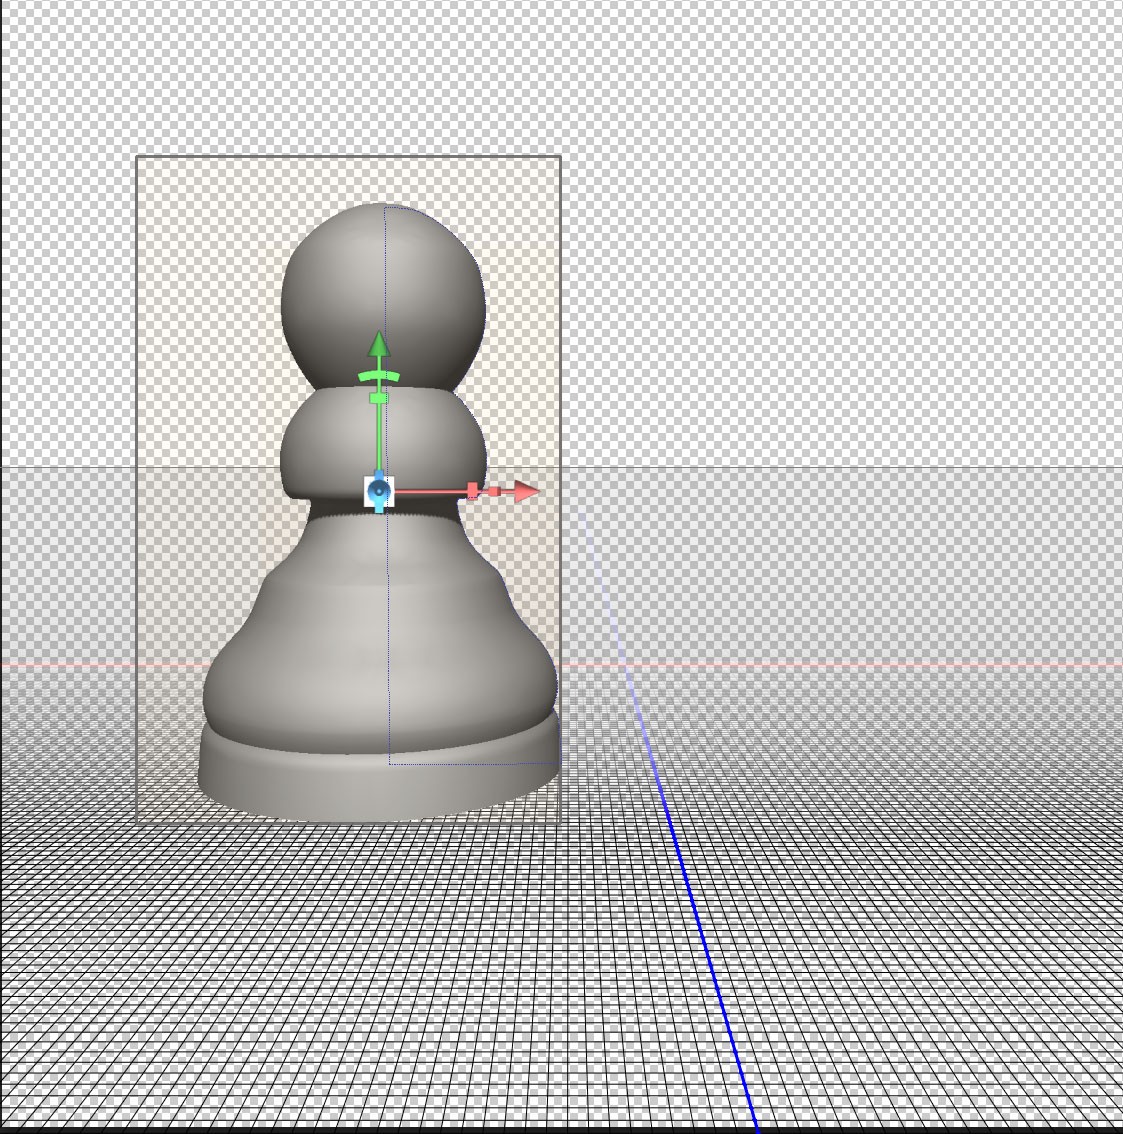
The image below shows the object viewed from a different angle so you can see the red green and blue arrows that appear when a 3D object is selected. The red arrow corresponds to the “x” axis marked in red on the ground plane, the “y” axis corresponds to the green arrow, and the “z” axis corresponds to the blue arrow. You will notice that if you hover over the tip of each arrow it will be highlighted as shown below. You can then click and drag along the relevant axis.
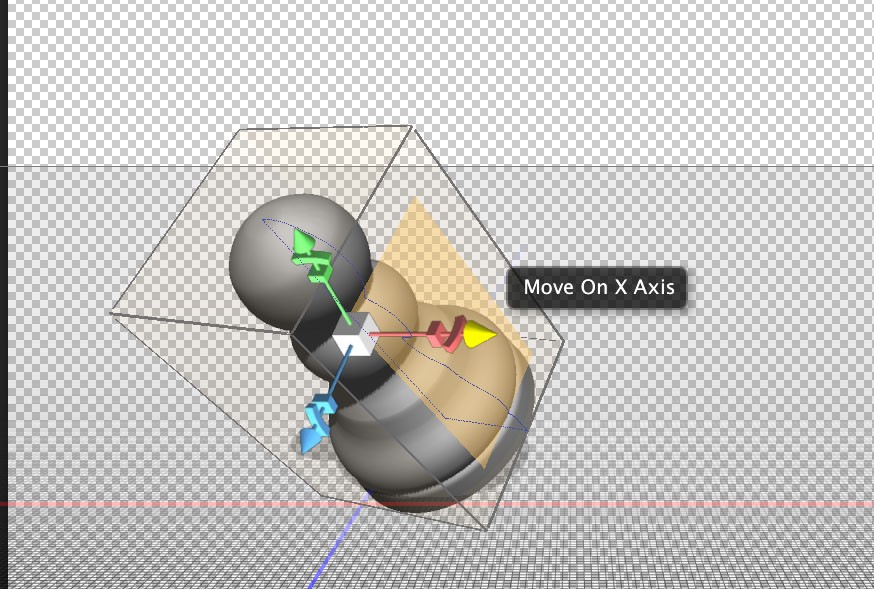
Move on X Axis
When the above arrow is highlighted you can move the object from left to right. Notice the tip of the arrow is highlighted in yellow.
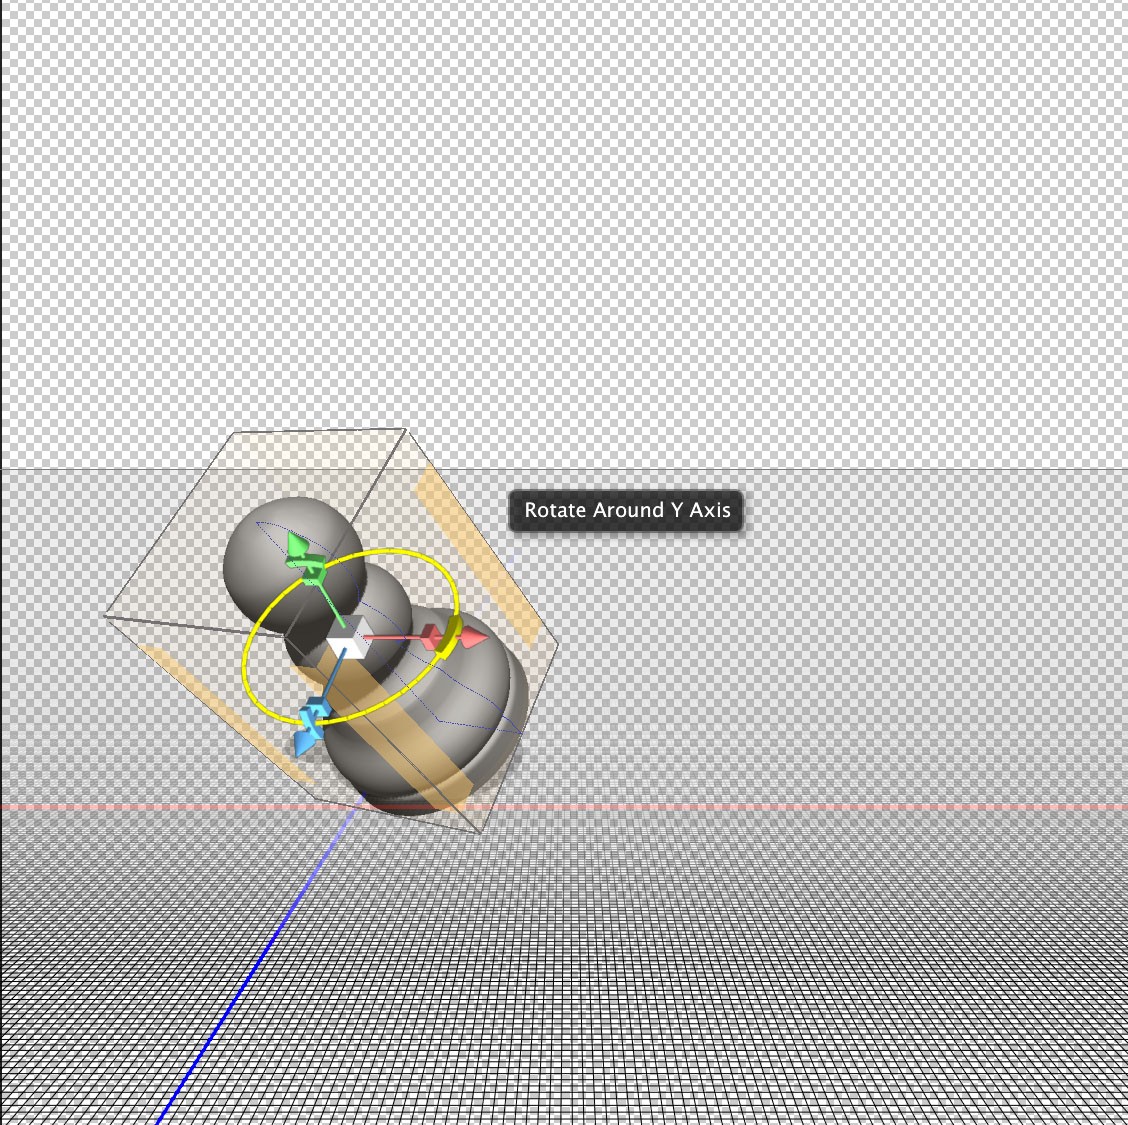
Now Move the cursor slightly to the left. The rotational symbol will now be highlighted as shown.

Rotate around Y Axis
Notice how the above image shows the red “x” rotational symbol highlighted, however the text reads “Rotate Around Y Axis”. If you think about it, it would be difficult to rotate on the “x” axis by using the red handle. The rotation needs to be at right angles to the axis for ease of use.
Moving the Cursor in a bit further to highlight the box will allow you to change the dimensions along the “x” axis.
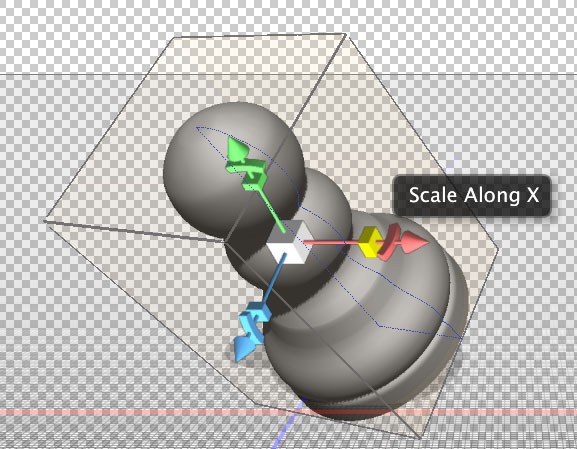
Scale along x axis
Once you have got the feel of making movement, rotational and scale alterations using this method on all three axes there is just one more alteration to look at. That is the white box in the middle. This is a click and drag alteration, same as the others. The difference is that it increases or decreases the size of the object while maintaining the correct proportions between x, y and z axes.
Moving a 3D object using the selection box
This method may well be your preferred method for quickly moving an object around. The small controllers on the axes are sometimes difficult to pinpoint, especially if you are using a pen and tablet.
If you move your cursor over any side of the selection box it will be highlighted in yellow:
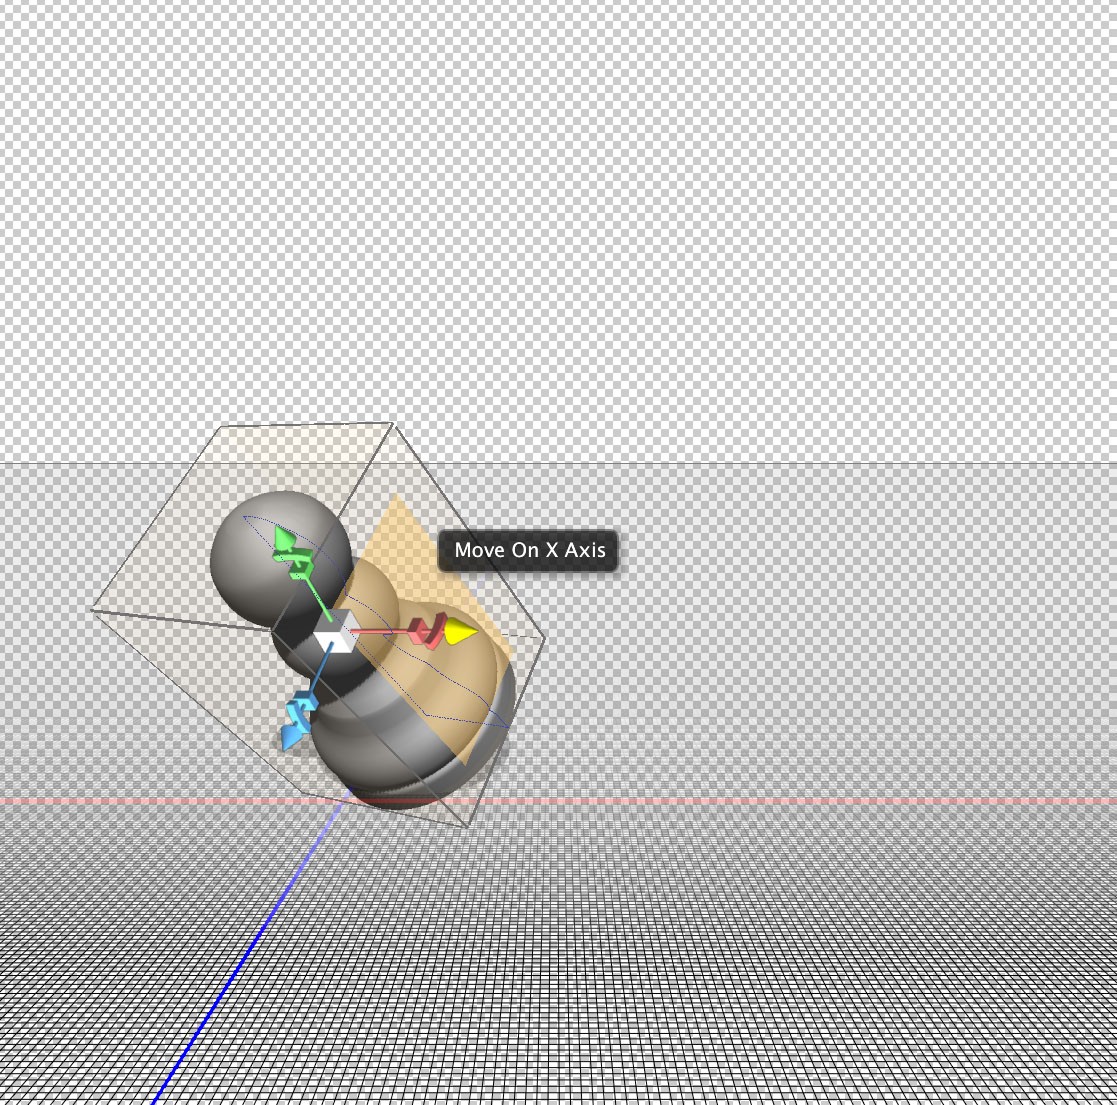
Move on x axis
As the message that appears indicates, you can click and drag to move the object left to right on the x axis.
Now move your cursor closer to the edge of the box. Again you get a message indicating the direction of movement and the three visible edges are highlighted in yellow.
Rotate on y axis
Now position your cursor directly onto the edge rather than just close as in the last example. This will allow you to move the object on two axes simultaneously.
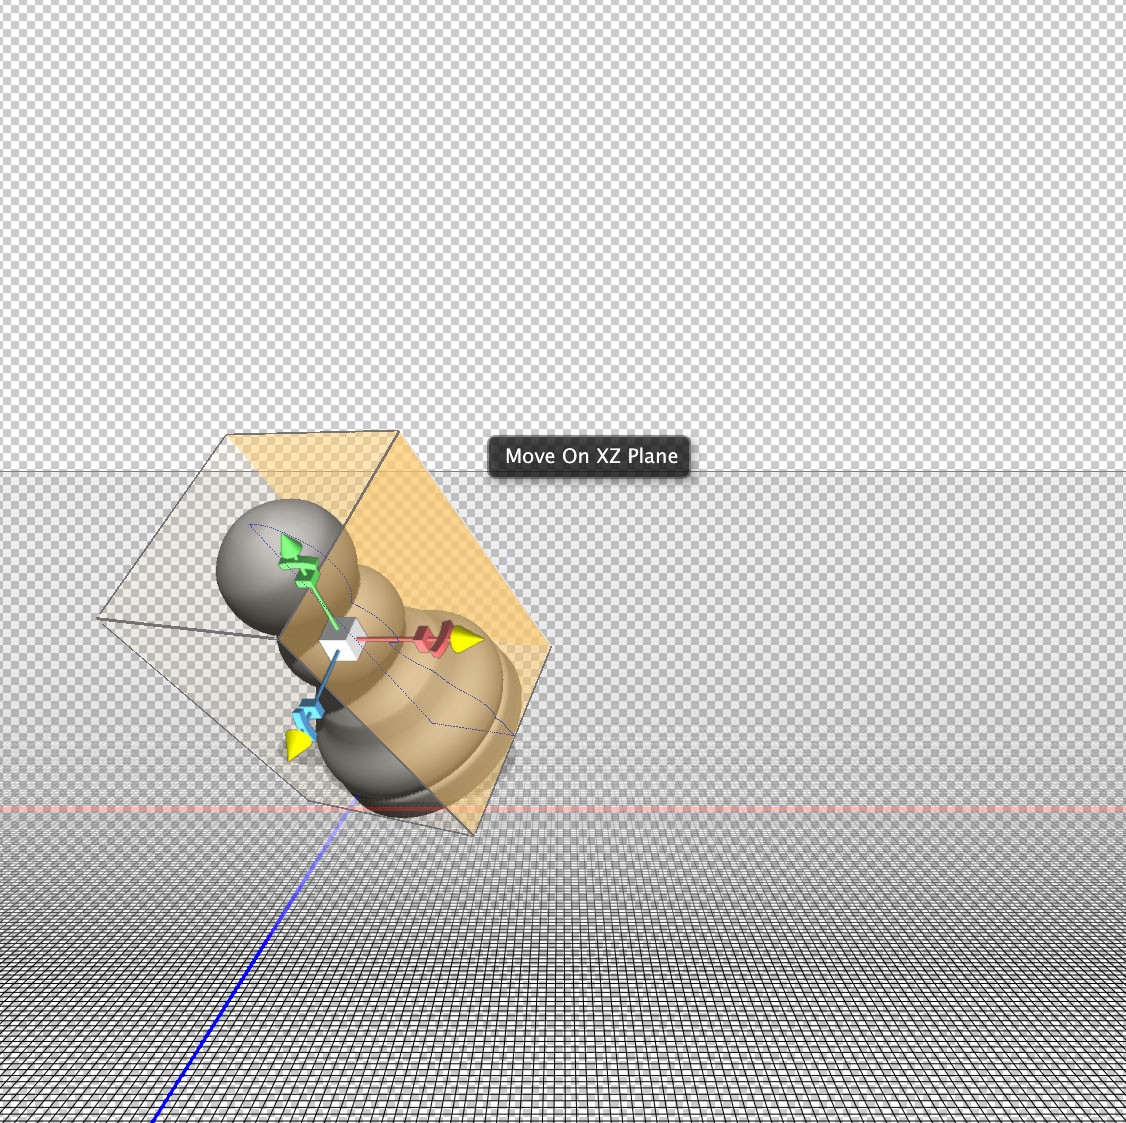
Move on X and Z Plane simultaneously.
The above example is very useful as it is possible to move an object around on the ground plane without accidentally moving it up or down.
Moving using the sides and edges of a box may at first seem like a much better solution than using the control axis. There are however situations where the side of the box is at right angles to the viewing position and not accessible. In this instance using the control axis would be a better solution.
Using the Move Tools
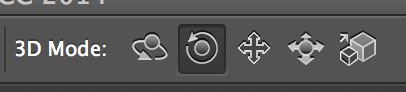
The 3D move tools options can be found at the top of your screen, but only when you have the move tool selected in the tools pallet:
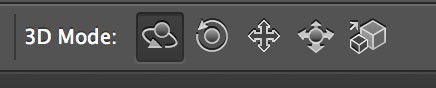
3D move tools, Rotate tool selected.
When using any of these tools make sure you don’t accidentally click on the control points of the box that indicates the object is selected as this will confuse things. Clicking and dragging anywhere outside the objects box will allow you to do this, but make sure you don’t accidentally deselect the object.
The image above shows the Rotate tool selected. Click and drag to experiment with this tool. You can rotate about any axis but the central point remains in the same position.
Using Rotate tool
Notice how the white box at the centre of the image lies directly above the intersection of the red “x” axis and blue “z” axis. This cannot be changed using the rotate tool.
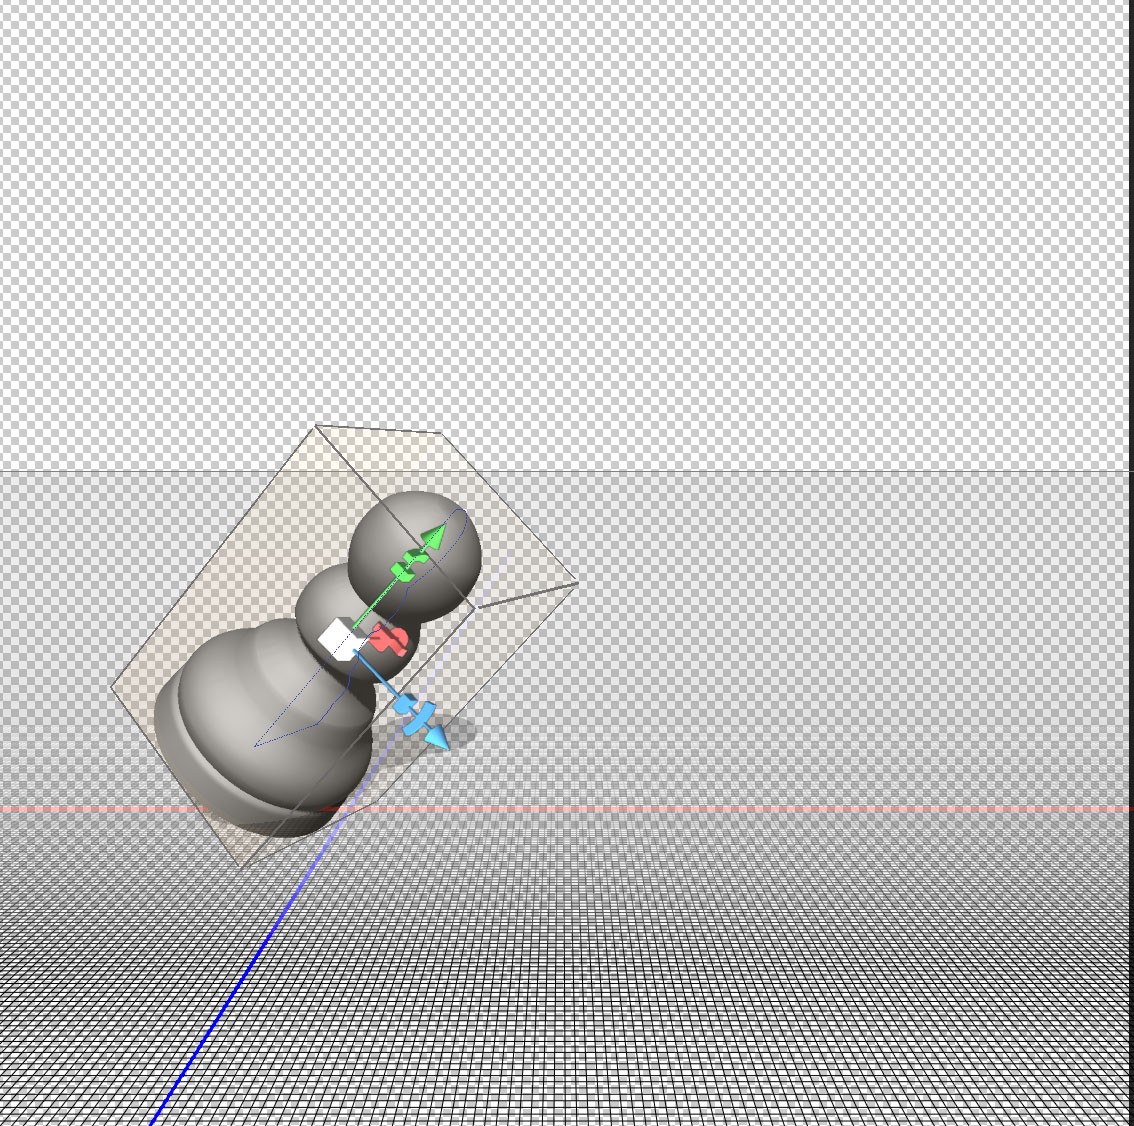
Now look at the next tool along:
Roll Tool Selected
This is the roll tool. It is similar to the rotate tool, but will only rotate in a plane parallel to your monitor.
Effect of roll tool
Because the object was reset before using the roll tool it would be impossible to see the top or bottom of the object without using any of the other tools.
The next tool is the drag tool:

Drag Tool selected.
The drag tool allows you to move the object up, down, left and right. You cannot move the object closer or further away. In other words you are moving on the “x” and “y” axes only.
Next is the slide tool:

Slide Tool Selected.
The slide tool allows you to move an object left, right, forwards and backwards. If you start with your object on the ground plane the slide tool will not allow you to move off the ground plane. In other word you use this tool to move in a plane at right angles to your monitor.
The last tool is the scale tool:

Scale tool selected
The scale tool allows you to uniformly enlarge or shrink the object around it’s central point. Clicking and dragging up will increase the size, whereas down will decrease the size. The relationship between x,y and z dimensions will stay the same when using this tool.
Summary
We have looked a four different ways of moving an object within a 3D space:
1.Using coordinates in the properties pallet.
2.Using the red, blue and green control axes in the object’s box.
3.Using the sides and edges of the objects box.
4.Using the 3D move tool options.
Next post we will look at moving around within the 3D scene. The object will stay in the same place but be viewed from different positions. With the understanding of move tools gained in this post you will find this quite easy to understand.
We will also look at creating more of a scene with several copies of the same object moved to different positions. This will allow you to practice what’s been learnt in this post.
Photoshop 3D Beginners Tutorial (Part 1)
Photoshop 3D Beginners Tutorial (Part 1)
There are many people who have been working in Photoshop for years, but with the emergence of Photoshop 3D capabilities there is a whole new area to learn. I will run a series of blogs starting with the basics, which will help you gain more knowledge and experience in this area. I will assume throughout this series of blogs that you are reasonably proficient in Photoshop and are using Photoshop cc.
The Importance of 3D in retouching
There was a time when I hadn’t even considered using 3D objects in retouching. Having access to a huge collection of two dimensional samples to use in my projects I came to realise that a sample shot at the wrong angle and with different lighting was very difficult to fit into the original image if not impossible.
If you can create a good 3D object you can alter the lighting, viewing angle, texture and colour so that it will fit perfectly into your image. Photoshop will not replace dedicated 3D software as it is more basic. Having said that, it has a lot of good practical uses.
If Photoshop is not capable of creating the object you have in mind it is possible to manipulate 3D objects made in more complex 3D software. Other 3D software can be a lot more complex. I believe Photoshop offers a relatively easy introduction into the world of 3D.
In this first Photoshop 3D blog, you will learn how to create a simple shape that has rotational symmetry then learn the basics of moving this shape around and become familiar with the 3D workspace.
Here’s the image I will use in the tutorial.
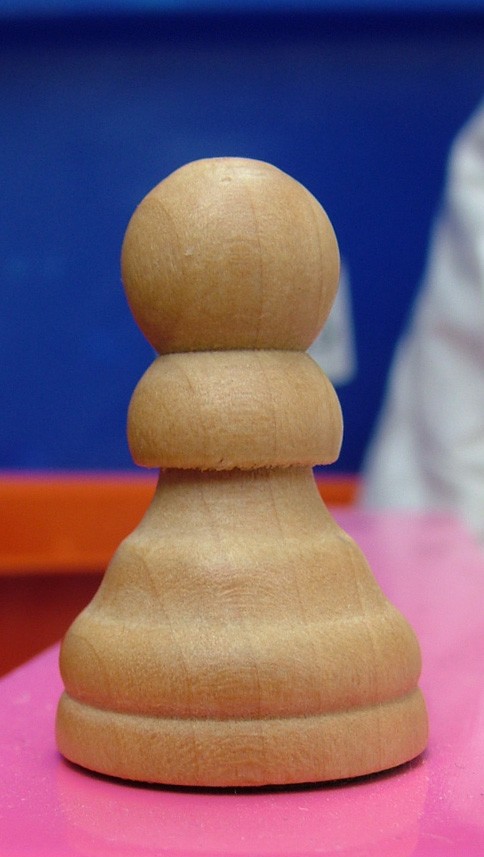
Starting image
If you click on this image to see an enlarged version then right click (or Control click) you are welcome to download it for your own use. The creation of the 3D object relies on a path so you can also choose to use the principals in this tutorial to draw your own shape and create a 3D object from it.
Step One
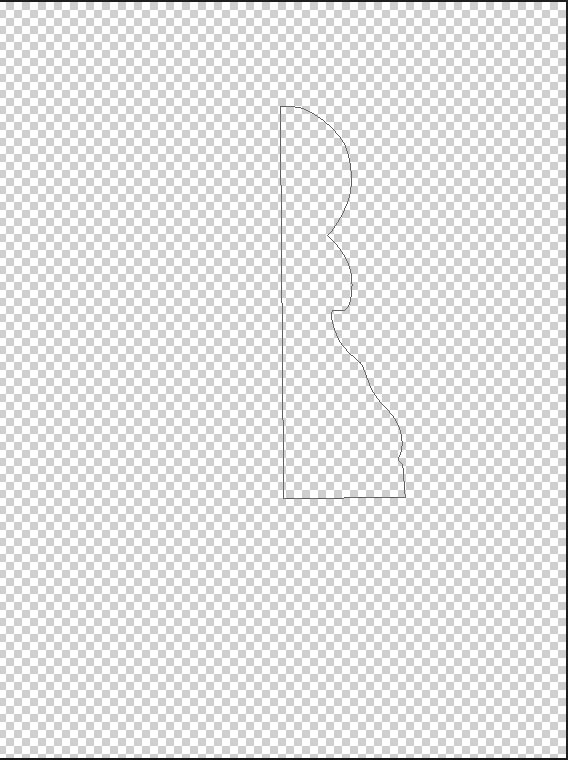
Open your image in Photoshop and draw a path around either the left or right half of it with the pen tool. I have shown the shape of my path in green. This is for illustrative purposes only, as a path is difficult to see. Notice how I have squared off the bottom with a horizontal line rather than following the curve of the base. Also make sure the path is closed i.e. you have to click on your starting point at the end.

Path Shape
Unlock the background layer by double clicking on it then click on the eye in the layers pallet so you only see a transparent canvas with the path visible. If the path is not visible you need to select it in the Paths pallet.
Path Selected in Layers Pallet
Click in the top right hand corner and select “3D” to enter the Photoshop 3D workspace area. This opens up the pallets you are most likely to use and closes ones that are not likely to be needed.
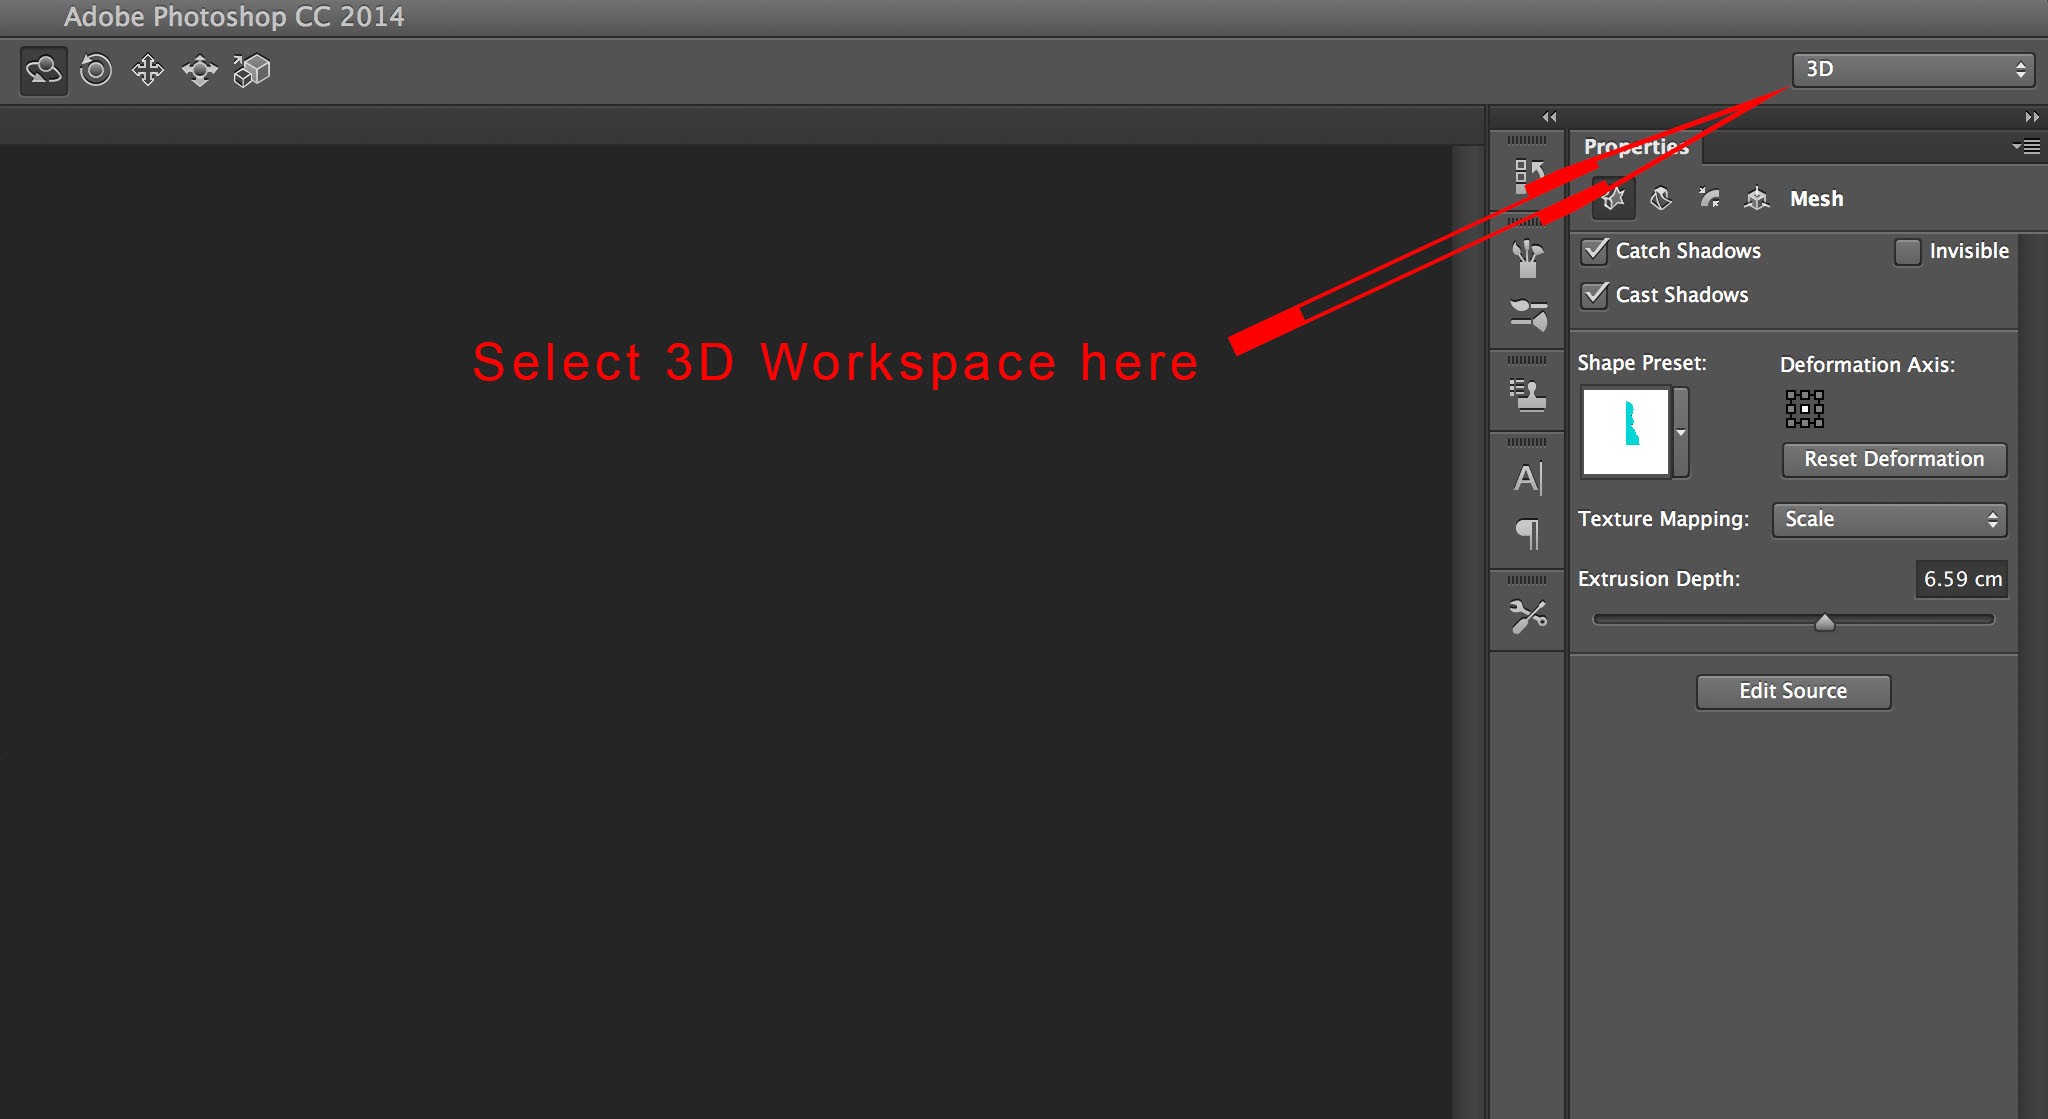
Select Workspace.
In the 3D pallet select “Work Path” as source and make sure “3D Extrusion” is selected.

Create 3D Extrusion.
Click on Create at the bottom of the Pallet. You will now have a 3D object as shown:

Extrusion.
A Brief Exploration of the workspace.
In the top left hand corner is the Secondary view. Click on the camera icon to change the secondary view as shown:

Change Secondary View.
Click in the top right hand corner of the secondary view window to swap the secondary and main views. A second click will swap them back again.

Swap main and secondary views.
You can close the Secondary View window by clicking on the cross in the top left hand corner if you prefer a less cluttered workspace. If you wish to show the secondary view window again go to View>Show>Secondary View.
Moving in 3d space
Moving within a 3D space can be quite confusing if you are not used to it. Start by pressing “V” on your keyboard to select the move tool as normal. Now click anywhere outside your 3D object. This allows you to move your whole 3D world. Below is an example of the whole 3D world having been moved:

Moving 3D World.
Notice how the 3D object lies on the ground plane on the intersection between the red and blue lines. Also the default light has been moved. The light itself cannot be seen, but the shadow has not changed in relation to the background.
Now click on the 3D object itself. This selects the object, which is indicated by a box shown around it. It is now possible to move the 3D object independently of the background and light source. Here’s how the object may look when moved:

3D object moved.
The 3D object is no longer on the intersection of the red and blue lines, and is floating above the ground plane.
The important point is that the same tools are used to move the 3D world and objects within that world. You need to make sure you know if it’s the object or whole world that is selected.
Moving within a 3D space is a lot more complex than normal. The various options needed for moving can be found in the top centre area of the screen, but these will only be visible when the move tool is selected in 3D mode:

3D Moving options.
I would encourage you to experiment with these. We will have a more detailed look at them in next weeks blog.
Step 2
You will now create a 3D pawn as it would appear on a chess board. This may be simpler than you think.
Here’s how the object looks at an angle. I have also hidden the ground plane via View>Show>3D Ground Plane which toggles the ground plane visibility on and off:

3D Object Selected.
Notice the object has a box around it with move options indicating that it is selected.
Now look at the “Properties” pallet which should be in the top right hand corner by default:

Properties Pallet.
Your properties pallet will not look like this if you do not have your 3D object selected.
You can select various options in the properties pallet by clicking on the icons at the top:
Properties Pallet Detail.
The above shows the far left set of options selected. This is where you can change the Extrusion depth. This refers to the thickness of your 3D object. Set the extrusion depth to “0”:
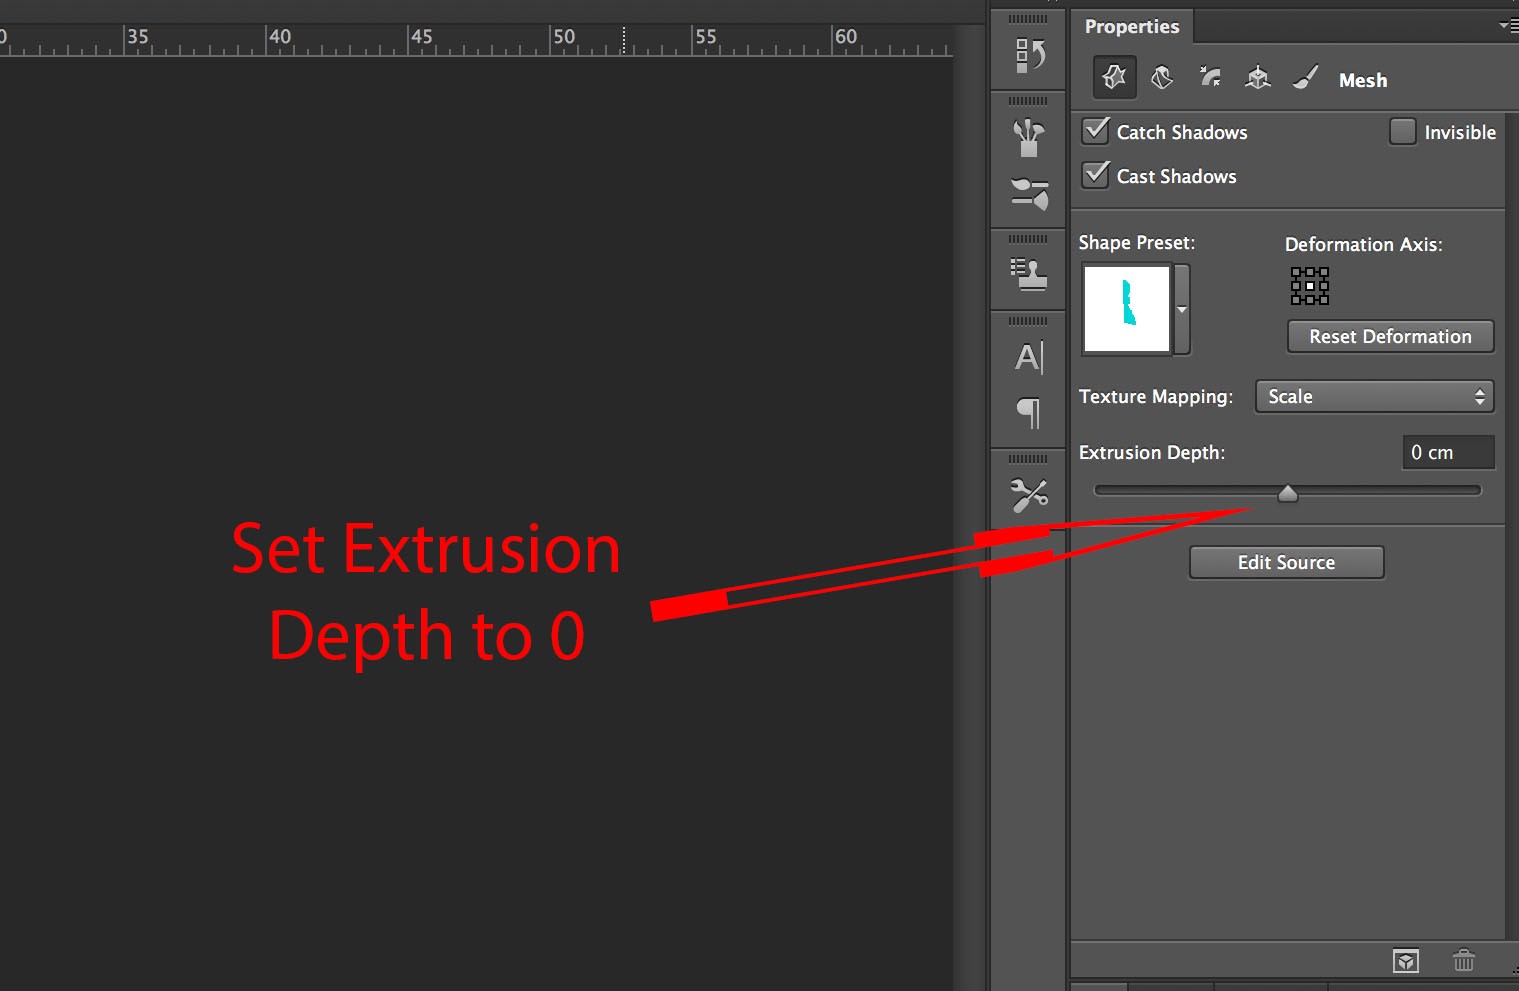
Extrusion set to 0.
Your object will now look paper thin as shown:
Effect on 3D object.
Step 3
You now need to make a 3D object by rotating about an axis.
At the top of the properties pallet click on the second icon in from the left as shown:

Second set of options in properties pallet.
Notice that you can alternatively change the extrusion depth here.
In the lower half of the Properties pallet select “Bend” and change the “Horizontal axis (x)” to 360.
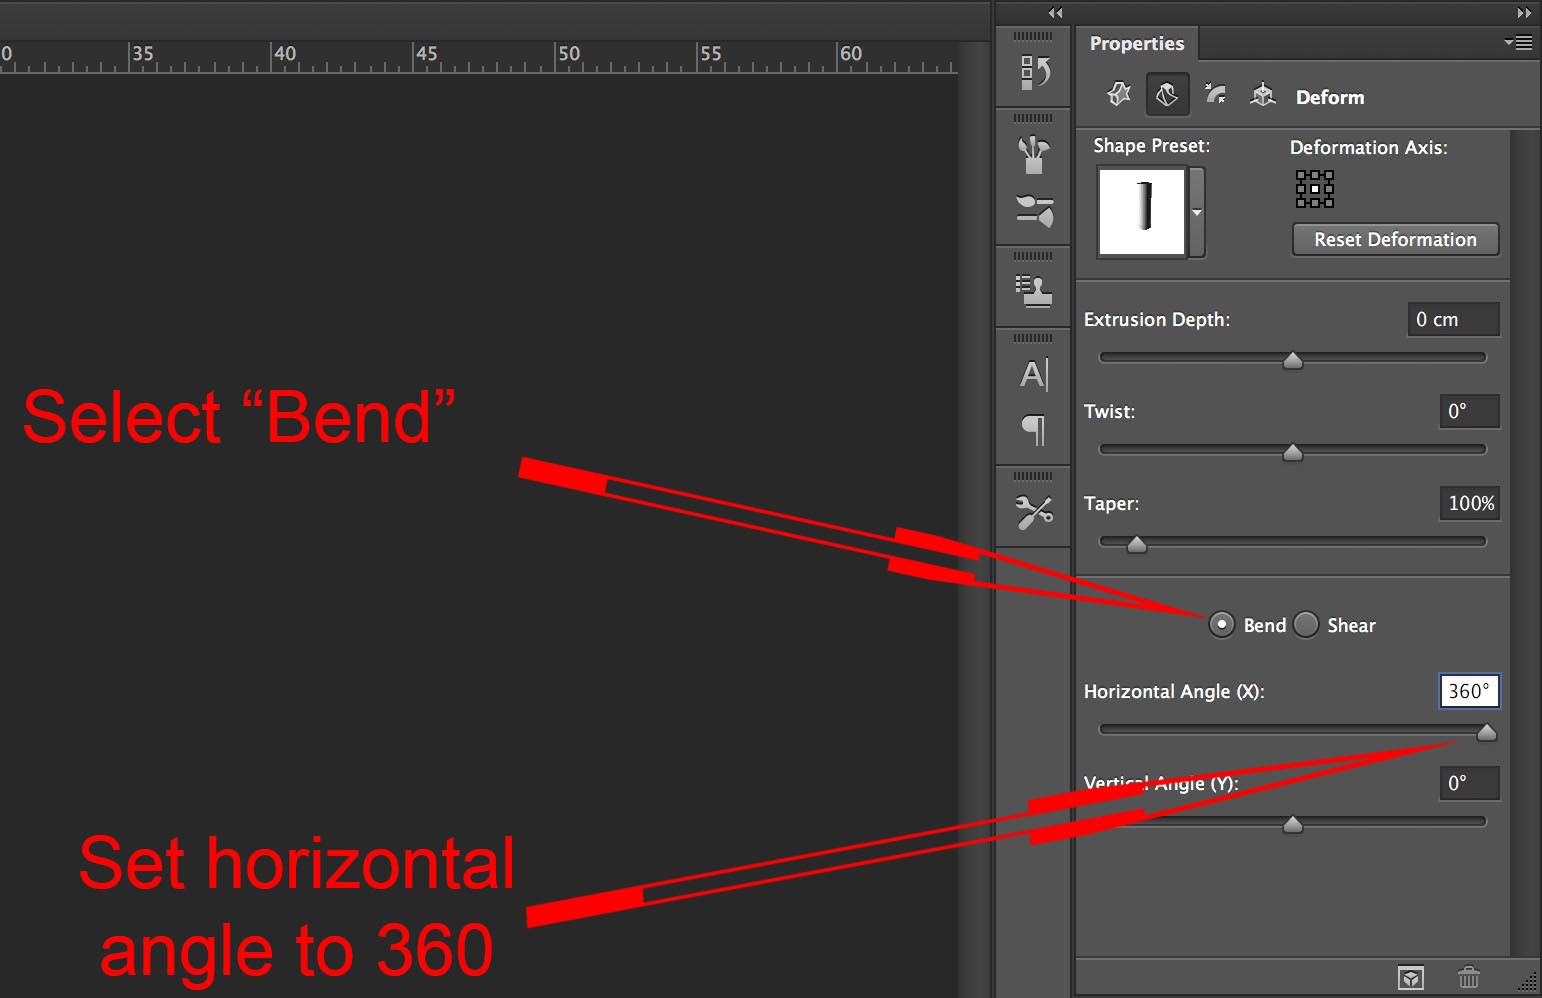
Set Horizontal Rotational Axis.
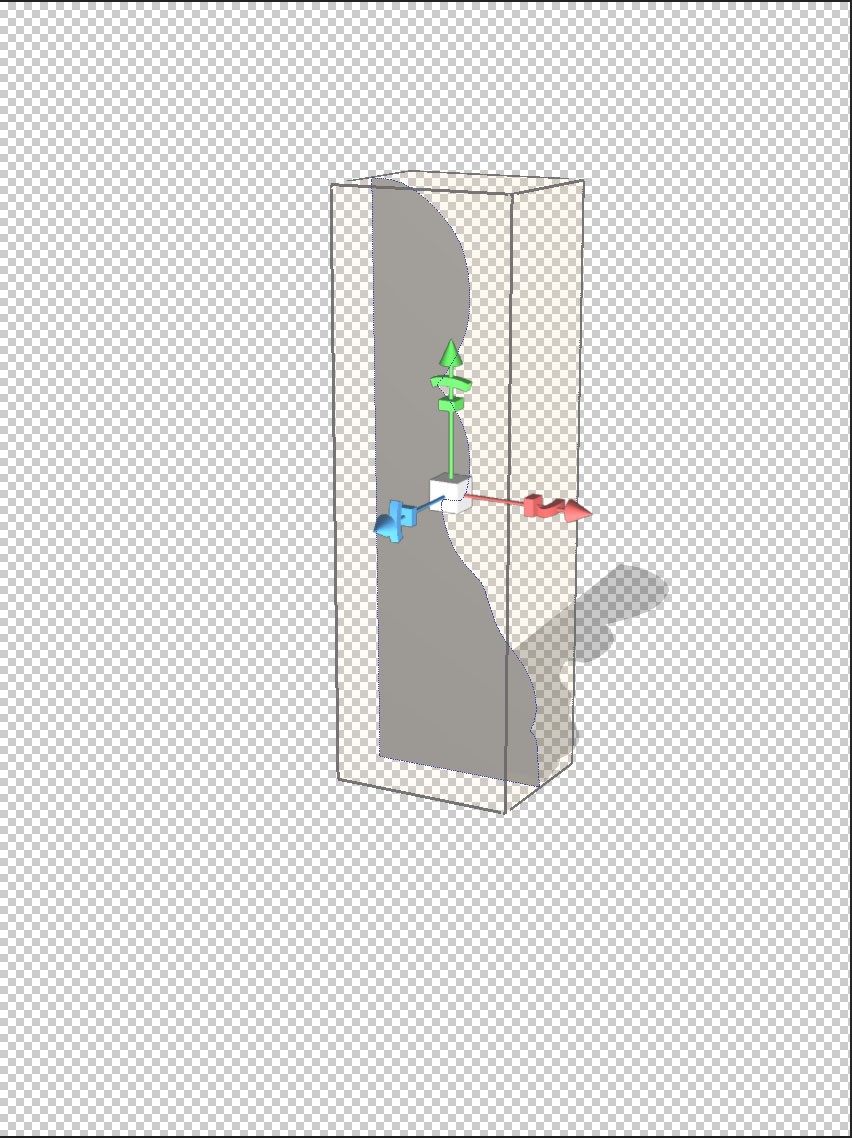
This is how your image looks now:
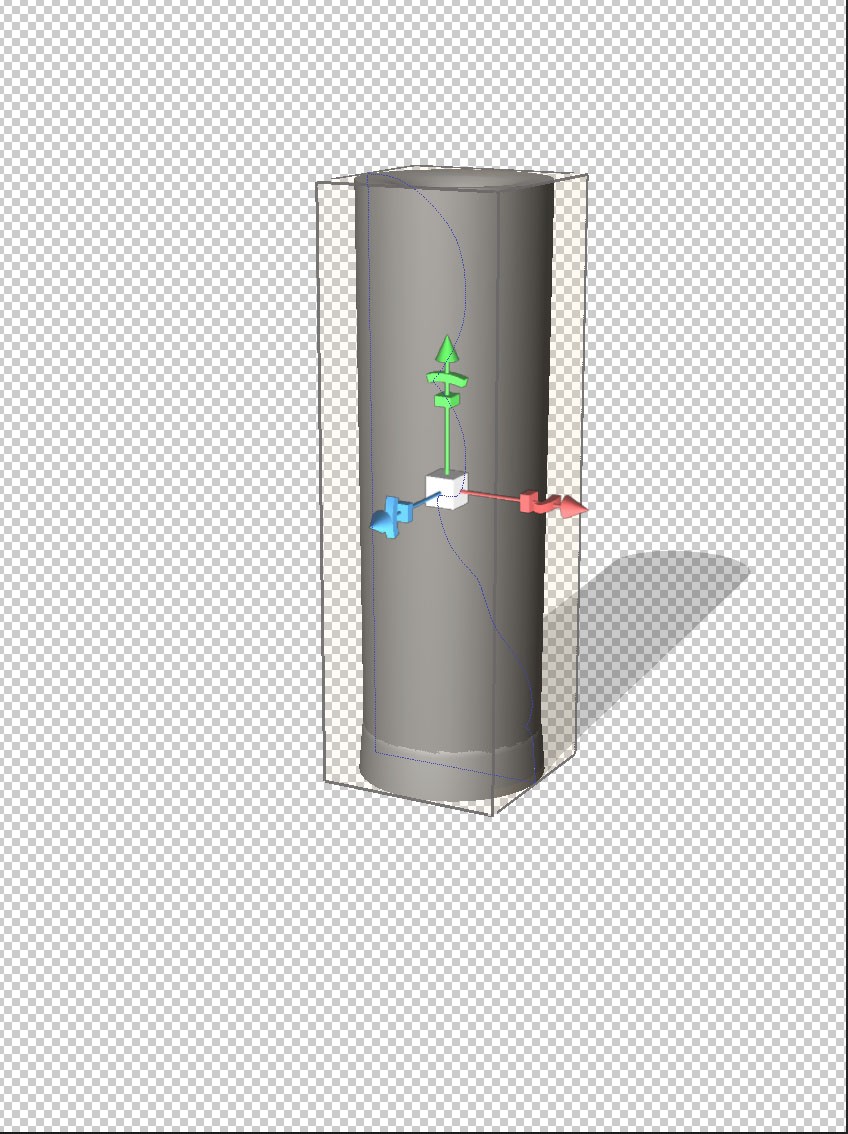
Central Rotational Axis
This object is created by rotation about a central point. You need to change the point of rotation to the left hand side.
Step 3
Go back to the first set of options in the properties pallet as shown:
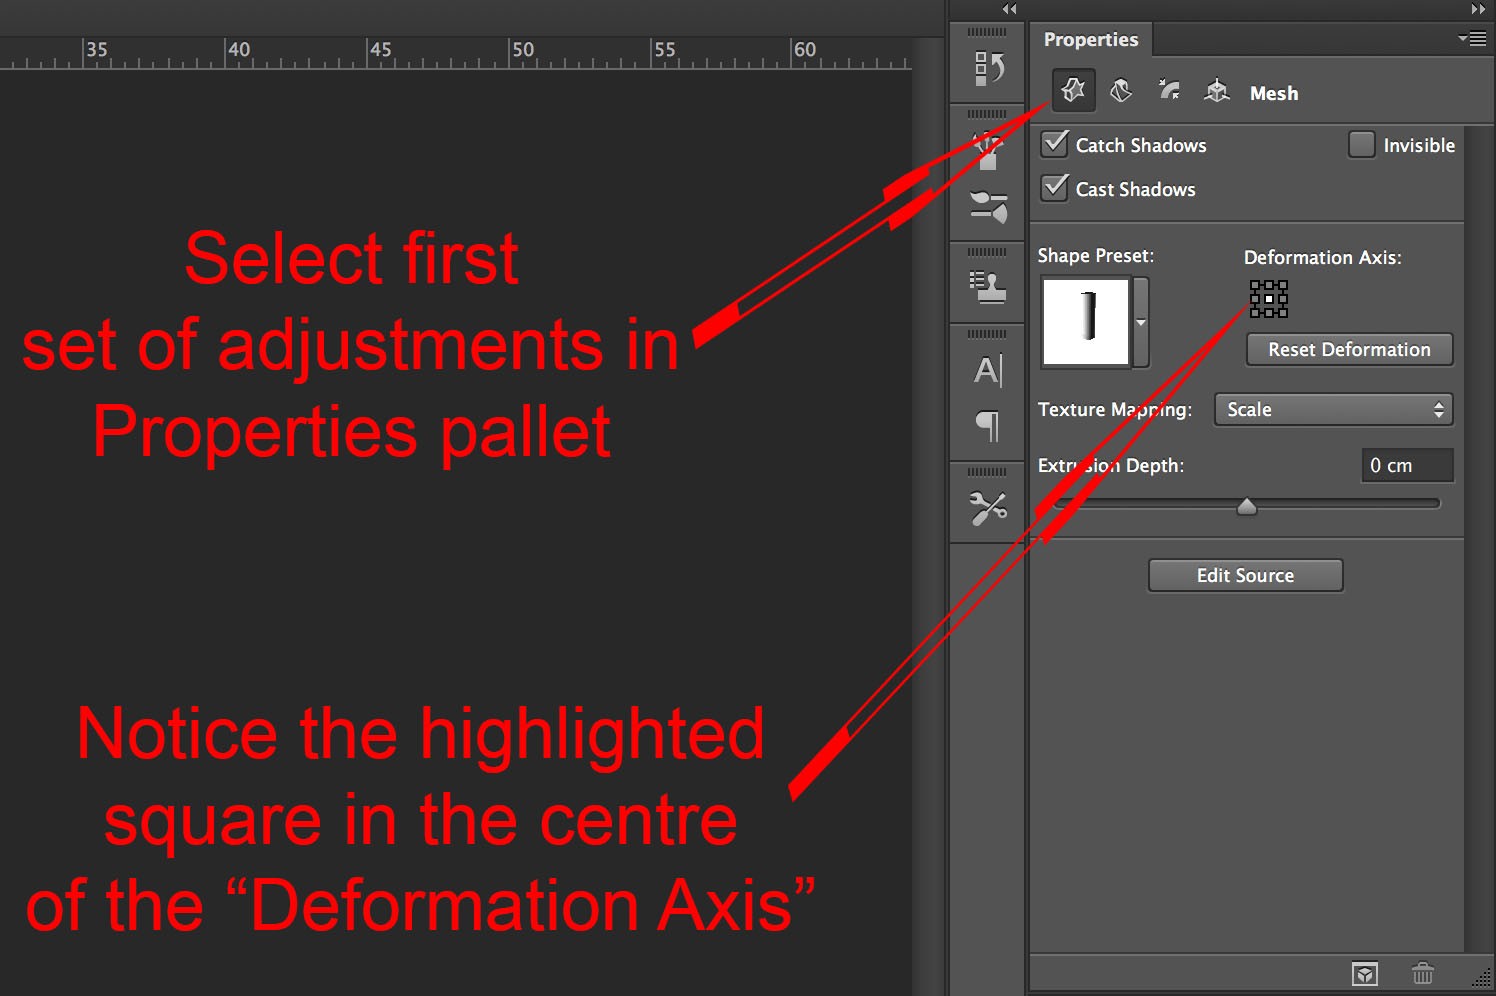
First set of Property pallet options.
Notice the highlighted central square in the “Deformation Axis” area.
Click on the square shown.
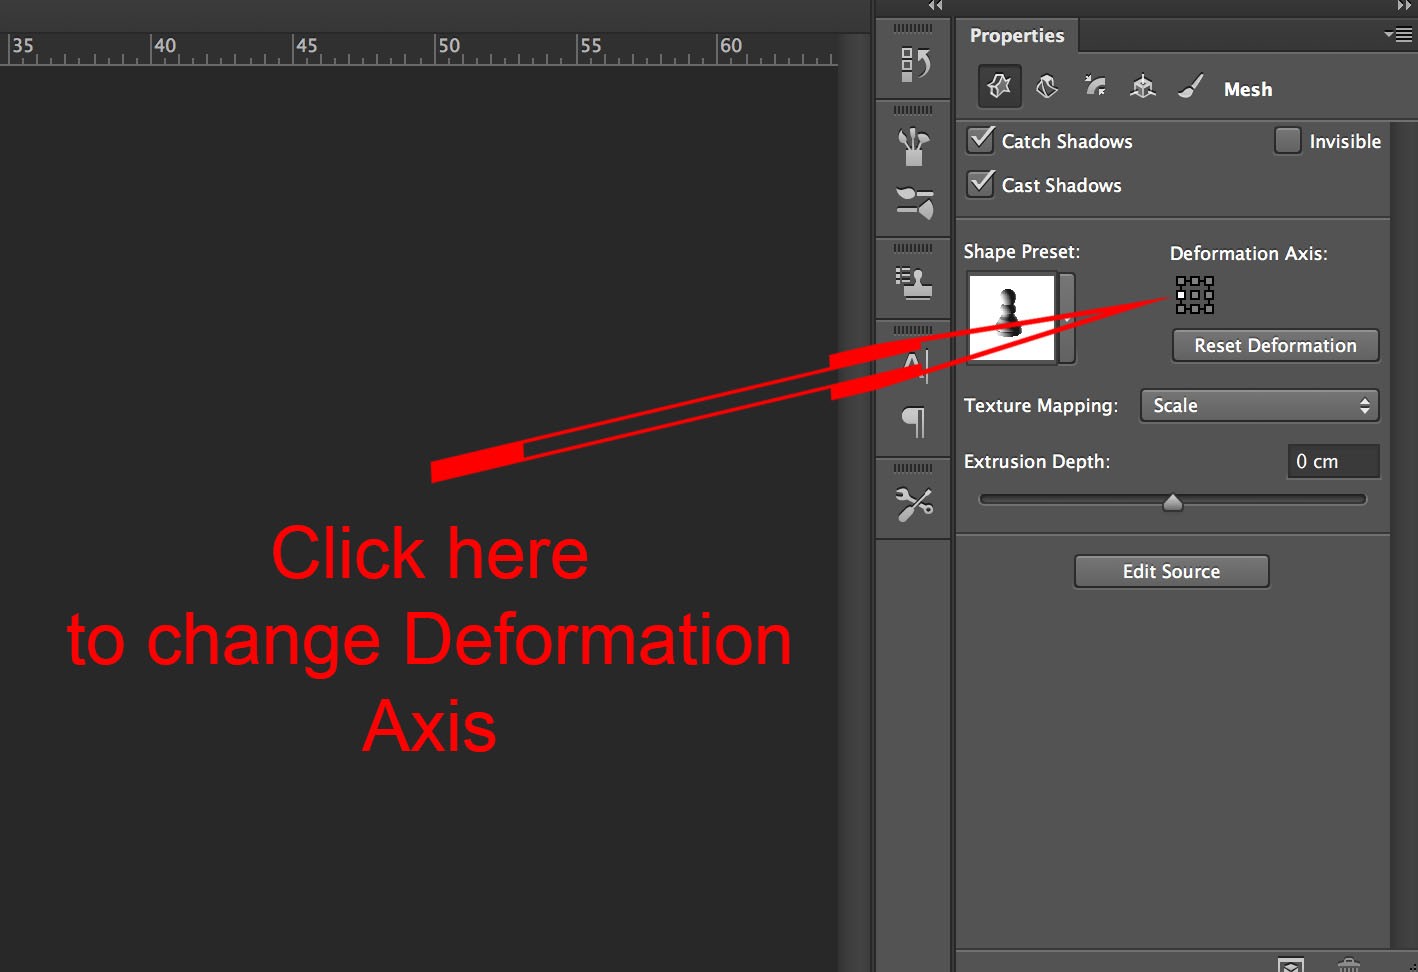
Change Deformation Axis
You have now changed your rotational point to the left hand side, and your image will look like this.
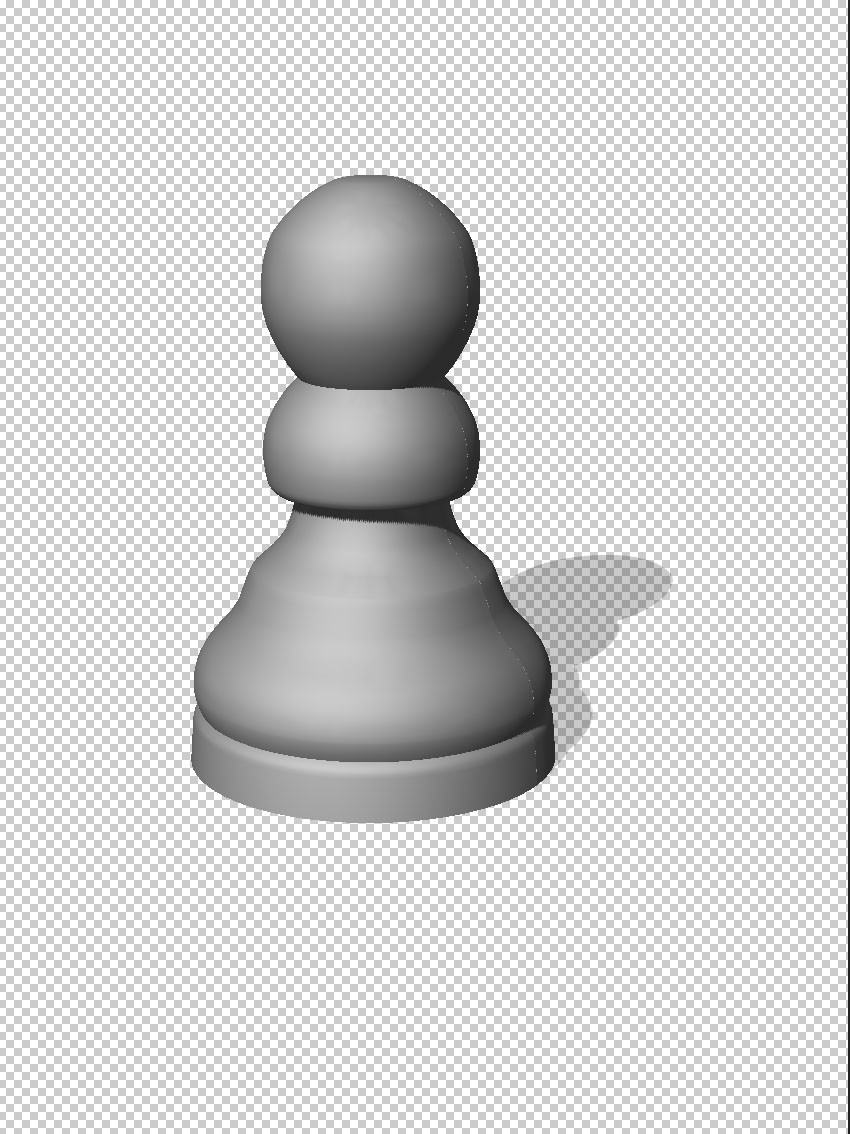
Rotation about left hand axis.
Using the move tools mentioned earlier you can see that this is truly a 3D object that can be viewed from any angle:

3D pawn.
When creating objects in this way think of things that have rotational symmetry. Other possibilities are bottles, plates, wine glasses or bowls.
There’s a lot more to learn on the subject of Photoshop 3D. I think there is a lack of ready available knowledge of the basics. It is very important to learn these before moving onto more complex ideas. If you use the ideas here to create your own objects you will become more familiar with the concepts.
Next week we will look at moving in the 3D space.
I hope this has been of help if you are new to Photoshop 3D and have fun using these ideas!