


Photo Restoration
Old Photo Restoration and the Joy of Painting
Old Photo Restoration and the Joy of Painting
Anyone taking a casual look at my portfolio can clearly see all my retouching is of architectural or interior shots. When I was asked to restore some old family photos I was more than happy to do it. After all, most of old photo restoration work is just cloning out scratches and restoring contrast levels. I may not be experienced in the business of Photo Restoration, but the tools needed in Photoshop are the ones a beginner learns about first. I expected the work to be very simple and maybe a bit tedious.
Having now done the work I can say without a doubt that it was much more involved, more challenging and definitely more fun than I expected.
As with any job some parts of retouching can become repetitive and monotonous. What makes things a lot more interesting is when areas of an image need to be recreated from scratch. I’m not talking about cloning, photo montage or copying and pasting areas of an image here. I’m talking about painting and applying a texture to make it look like part of the original. This is not a step by step tutorial on how to do this, but I will give a few pointers to anyone wanting to give it a go.
Here’s the image we will be discussing:

Before Restoration
First you will need a good quality scan of this. The original was very small, so I scanned it in at a larger size to allow for larger prints. Also I delicately moved areas of the paper emulsion in the torn areas to reveal as much of the image as possible. I used a decent quality scanner which is adequate for this job. It may be worth bearing in mind that the price and quality of scanners varies hugely and a poor quality scan will effect the final image.
After scanning I made a good compositional crop, removing the old border. I avoided being lazy here. For example I could have cropped off large areas on the left hand side and therefore not had to make up any missing areas. This would have been a lot easier, but given a poorly composed final image.
Initial stages involved tonal adjustments to give a good level of contrast and making up missing areas by utilising existing parts of the image.
Now for the fun part! The left hand side of the girl is completely missing and parts of her face obscured by a tear. I could not copy any parts of the original image to make up these areas. Instead I painted in the parts needed using photoshop’s brushes. This is a skill that needs to be learnt through trial and error, rather than be explained. If you wanted to give it a go yourself, here are a few pointer’s;
1.Allways paint on a separate layer from the main image.
2.Block in the main shapes first, then add shadows and highlights gradually using low opacity brushes
3.Constantly evaluate what you are doing at different magnification levels.
4.Apply a matching texture to your painted layer(s). For this image I used a grain effect, but needed to enlarge it to fit with the texture of the original.
5.Don’t be afraid to experiment. If you experiment on a new layer and don’t like what you’ve done you only need to trash the layer. Experimenting is an important part of learning the skill.
6.Don’t be put off if you’re not happy with the way it’s initially looking. It takes time and patience to get believable results.
Here’s my finished image;

Old Photo Restoration
The Importance of painting
This was by no means the first job I had to use painting skills on. I realised a long time ago that painting was a valuable part of the retouching process, but also a very creative and rewarding way of working in Photoshop. It is not something to be used instead of other methods such as cloning or using 3D objects, but sometimes gives the best results and is often the only viable method. It had never occurred to me that this is often the case in Photo Restoration jobs.
Going back a few years, I experimented with painting in a few of my professional retouching jobs and dismissed it as looking unrealistic. I then entered a few Photoshop competitions and needed to gain a lot of painting skills. Having no paying client to answer to gave me the freedom to experiment and take a few risks. I was amazed to find myself winning a few competitions and getting a lot of encouragement from other retouchers. With my newly gained skill and a bit more confidence I was ready to start using what I had learnt on a professional level. Here’s something I painted as an experiment when learning;
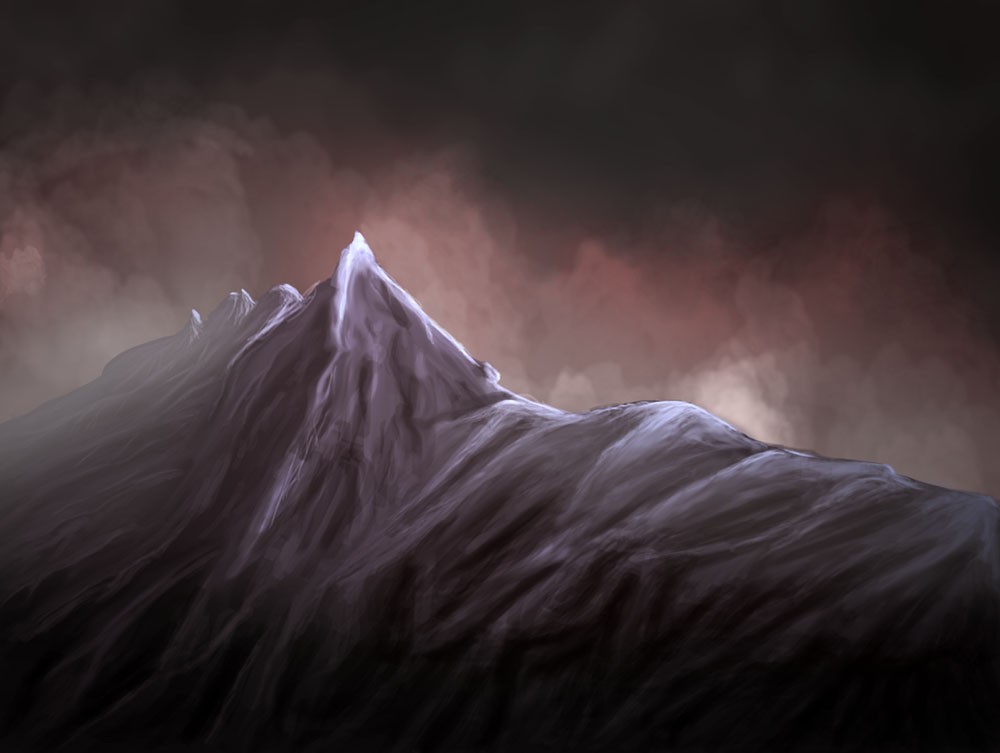
Landscape Painting
Going back even further to my days as a darkroom technician I remember enjoying printing from old negatives. Some of these were on glass and of an exceptionally high quality and of historical interest. Photo Restoration combines my love of painting and an interest in old images. So next time I get offered a job like this there will certainly be no hesitation in accepting it.
If you like what you see here and have a photo restoration job please contact me via my e-mail address on this website. I will be glad to help.